


Create successful ePaper yourself
Turn your PDF publications into a flip-book with our unique Google optimized e-Paper software.
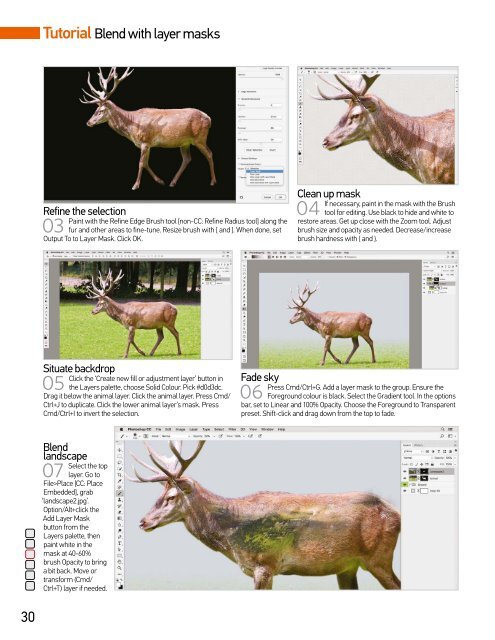
Tutorial Blend with layer masks<br />
Refine the selection<br />
03<br />
Paint with the Refine Edge Brush tool [non-CC: Refine Radius tool] along the<br />
fur and other areas to fine-tune. Resize brush with [ and ]. When done, set<br />
Output To to Layer Mask. Click OK.<br />
Clean up mask<br />
04<br />
If necessary, paint in the mask with the Brush<br />
tool for editing. Use black to hide and white to<br />
restore areas. Get up close with the Zoom tool. Adjust<br />
brush size and opacity as needed. Decrease/increase<br />
brush hardness with { and }.<br />
Situate backdrop<br />
05<br />
Click the ‘Create new fill or adjustment layer’ button in<br />
the Layers palette, choose Solid Colour. Pick #d0d3dc.<br />
Drag it below the animal layer. Click the animal layer. Press Cmd/<br />
Ctrl+J to duplicate. Click the lower animal layer’s mask. Press<br />
Cmd/Ctrl+I to invert the selection.<br />
Fade sky<br />
06<br />
Press Cmd/Ctrl+G. Add a layer mask to the group. Ensure the<br />
Foreground colour is black. Select the Gradient tool. In the options<br />
bar, set to Linear and 100% Opacity. Choose the Foreground to Transparent<br />
preset. Shift-click and drag down from the top to fade.<br />
Blend<br />
landscape<br />
07<br />
Select the top<br />
layer. Go to<br />
File>Place [CC: Place<br />
Embedded], grab<br />
‘landscape2.jpg’.<br />
Option/Alt+click the<br />
Add Layer Mask<br />
button from the<br />
Layers palette, then<br />
paint white in the<br />
mask at 40-60%<br />
brush Opacity to bring<br />
a bit back. Move or<br />
transform (Cmd/<br />
Ctrl+T) layer if needed.<br />
30


