1632 Oxygen Analyser Manual - Novatech Controls
1632 Oxygen Analyser Manual - Novatech Controls
1632 Oxygen Analyser Manual - Novatech Controls

Create successful ePaper yourself
Turn your PDF publications into a flip-book with our unique Google optimized e-Paper software.
<strong>Oxygen</strong> <strong>Analyser</strong><br />
Model <strong>1632</strong><br />
April 2008
CONTENTS<br />
1 SPECIFICATIONS ..........................................................................................................................3<br />
2 DESCRIPTION..............................................................................................................................13<br />
3 INSTALLING & COMMISSIONING ..........................................................................................19<br />
4 OPERATOR FUNCTIONS ...........................................................................................................35<br />
5 SETTING UP THE TRANSMITTER ...........................................................................................41<br />
6 MAINTENANCE...........................................................................................................................59<br />
APPENDICES<br />
APPENDIX 1 CONSTITUENT VALUES FOR FUELS........................................................................65<br />
APPENDIX 2 PROBE OR SENSOR EMF TABLES.............................................................................67<br />
APPENDIX 3 % OXYGEN SCALE TO LOGARITHMIC....................................................................69<br />
APPENDIX 4 SAMPLE LOG PRINT OUT ...........................................................................................71<br />
APPENDIX 5 CIRCUIT SCHEMATICS................................................................................................73<br />
APPENDIX 6 MODBUS REGISTER MAP AND APPLICATION NOTES.....................................83<br />
Note: This manual includes software modifications up to Version 2.32, 3 rd October 2007<br />
© Copyright NOVATECH CONTROLS PTY. LTD. - 1996 - 2008<br />
This manual is part of the product sold by <strong>Novatech</strong> <strong>Controls</strong> Pty. Ltd. ("<strong>Novatech</strong> <strong>Controls</strong>") and is provided to the<br />
customer subject to <strong>Novatech</strong> <strong>Controls</strong>' conditions of sale, a copy of which is set out herein. <strong>Novatech</strong> <strong>Controls</strong>'<br />
liability for the product including the contents of this manual is as set out in the conditions of sale.<br />
All maintenance and service of the product should be carried out by <strong>Novatech</strong> <strong>Controls</strong>' authorised dealers.<br />
This manual is intended only to assist the reader in the use of the products. This manual is provided in good faith but<br />
<strong>Novatech</strong> <strong>Controls</strong> does not warrant or represent that the contents of this manual are correct or accurate. It is the<br />
responsibility of the owner of the product to ensure users take care in familiarising themselves in the use, operation and<br />
performance of the product.<br />
The product, including this manual and products for use with it, are subject to continuous developments and<br />
improvement by <strong>Novatech</strong> <strong>Controls</strong>. All information of a technical nature and particulars of the product and its use<br />
(including the information in this manual) may be changed by <strong>Novatech</strong> <strong>Controls</strong> at any time without notice and<br />
without incurring any obligation. A list of details of any amendments or revisions to this manual can be obtained upon<br />
request from <strong>Novatech</strong> <strong>Controls</strong>. <strong>Novatech</strong> <strong>Controls</strong> welcome comments and suggestions relating to the product<br />
including this manual.<br />
Neither the whole nor any part of the information contained in, or the product described in, this manual may be adapted<br />
or reproduced in any material form except with the prior written approval of <strong>Novatech</strong> <strong>Controls</strong> Pty. Ltd.<br />
All correspondence should be addressed to:<br />
Technical Enquires<br />
<strong>Novatech</strong> <strong>Controls</strong> Pty Ltd<br />
309 Reserve Road<br />
Cheltenham Victoria 3192 Phone: Melbourne +61 3 9585 2833<br />
Australia Fax: Melbourne +61 3 9585 2844<br />
Website: http://www.novatech.com.au/<br />
April 2008<br />
<strong>1632</strong> <strong>Oxygen</strong> Transmitter 1
USING THIS MANUAL<br />
The <strong>Novatech</strong> <strong>1632</strong> <strong>Oxygen</strong> Transmitter has a variety of user-selectable functions.<br />
They are simple to use because each selection is menu driven. For options you are not sure about; read the manual on<br />
that particular item.<br />
Please read the safety information below and the ‘Installation’ section before connecting power to the transmitter.<br />
CAUTION 1<br />
The probe or sensor heater is supplied with mains voltage. This supply has electrical shock danger to maintenance<br />
personnel. Always isolate the transmitter before working with the probe or sensor, gas solenoids, or the transmitter.<br />
The EARTH wire (green) from a heated probe or sensor must ALWAYS be connected to earth.<br />
CAUTION 2<br />
Combustion or atmosphere control systems can be dangerous. Burners must be mechanically set up so that in the worst<br />
case of equipment failure, the system cannot generate explosive atmospheres. This danger is normally avoided with<br />
flue gas trim systems by adjustment so that in the case of failure the appliance will not generate CO in excess of 400<br />
ppm in the flue. The CO level in the flue should be measured with a separate CO instrument, normally an infrared or<br />
cell type.<br />
CAUTION 3<br />
The oxygen sensor which is heated to over 700°C (1300°F) and is a source of ignition. Since raw fuel leaks can occur<br />
during burner shutdown, the transmitter has an interlocking relay that removes power from the probe or sensor heater<br />
when the main fuel shut-off valve power is off. If this configuration does not suit or if it is possible for raw fuel to<br />
come into contact with a hot oxygen probe or sensor then the Model <strong>1632</strong> transmitter with a heated probe or sensor will<br />
not be safe in your application.<br />
An unheated probe can be utilised in such applications, however the oxygen readings are valid only above 650°C<br />
(1200°F).<br />
CAUTION 4<br />
The reducing oxygen signal from the transmitter and the associated alarm relay can be used as an explosive warning or<br />
trip. This measurement assumes complete combustion. If incomplete combustion is possible then this signal will read<br />
less reducing and should not be used as an alarm or trip. A true excess combustibles transmitter, normally<br />
incorporating a catalyst or thermal conductivity bridge, would be more appropriate where incomplete combustion is<br />
possible.<br />
Also read the probe or sensor electrical shock caution in Section 2.5 and the probe or sensor heater interlock caution in<br />
Section 3.6.<br />
CAUTION 5<br />
If an external pressure transducer is used to feed the process pressure to the transmitter for pressure compensation, it is<br />
essential that the pressure transducer is accurate and reliable. An incorrect reading of pressure will result in an<br />
incorrect reading of oxygen. It is therefore possible that an explosive level of fuel could be calculated in the transmitter<br />
as a safe mixture.<br />
CAUTION 6<br />
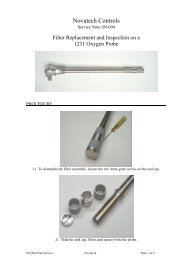
FIL-3 filter. If the optional FIL-3 has been fitted to the 1231 probe in this installation, please read the Important Notice<br />
in section 1.2.<br />
April 2008<br />
2 <strong>1632</strong> <strong>Oxygen</strong> Transmitter
1<br />
SPECIFICATIONS<br />
Section<br />
Number<br />
1.1 MODEL <strong>1632</strong> OXYGEN TRANSMITTER FOR TWO OXYGEN PROBES ................................4<br />
1.2 SERIES 1230 OXYGEN PROBES & SENSORS ............................................................................7<br />
1.3 PURGE & CALIBRATION CHECK ACCESSORIES..................................................................12<br />
1.4 FILTER PURGE PRESSURE SWITCH ........................................................................................12<br />
April 2008<br />
<strong>1632</strong> <strong>Oxygen</strong> Transmitter 3
CABLE GLAN D<br />
1234 OXYGEN<br />
SENSOR<br />
NOVATECH<br />
CONTROLS<br />
EXHAUST<br />
GAS INLET 1/4" TUBE ELBOW<br />
EXHAUST 1/4" NPT FEMALE<br />
Model 1234 <strong>Oxygen</strong> Sensor<br />
ID LABEL<br />
STANDARD PROBE ‘U’ LENGTHS<br />
1231 1232<br />
250 mm (10”) 500 mm (20”)<br />
350 mm (14”) 750 mm (30”)<br />
500 mm (20”) 1000 mm (40”)<br />
750 mm (30”) 1500 mm (60”)<br />
1000 mm (40”)<br />
1500 mm (60”)<br />
2000 mm (80”)<br />
Ordering Information<br />
1. Probe insertion length (from process end of mounting thread to probe sensing tip).<br />
2. Mounting thread (process connection), BSP or NPT (for size of thread refer to specifications).<br />
3. Lagging extension length, if required.<br />
4. If model 1232 probe, state preferred thermocouple type (refer to specifications).<br />
April 2008<br />
8 <strong>1632</strong> <strong>Oxygen</strong> Transmitter
Important Notice Regarding<br />
1231 Probe Option - FIL-3<br />
WARNING: The only identifiable standard for flame arresters for general use is British Standard BS EN 12874:2001.<br />
British Standard BS EN 12874:2001 refers to an operating environment up to 150 Degrees Centigrade.<br />
The FIL-3 device optionally fitted to 1231 Heated Zirconia Probes (the “Probes" or "Probe") operate in an environment<br />
considerably greater than 150 Degrees Centigrade.<br />
Therefore, we know of no Australian, British, European or USA standard applicable to flame arresters or their testing<br />
above 150 degrees Centigrade. Consequently, the FIL-3 device cannot be certified as a safety device.<br />
The probe is only one of several potential sources of ignition. Extreme care is required when using the probes during<br />
the start up processes of a combustion appliance.<br />
The <strong>Novatech</strong> Burner Interlock Relay facility, which is a standard part of the <strong>Novatech</strong> transmitter, is designed to be<br />
wired to the main safety shut-off fuel valves in a way that can shutdown the probe heater when the fuel valves are<br />
closed.<br />
The risk of ignition of flammable gas mixture at the hot end of the Probe can only be minimised by correct use,<br />
maintenance and operation of the FIL-3 device. The user of the FIL-3 device is responsible for verification and<br />
maintenance and correct use and operation of the FIL-3 device.<br />
THE USER AGREES THAT IT USES THE PROBE AND THE FIL-3 DEVICE AT ITS SOLE RISK. NOVATECH<br />
CONTROLS PTY LTD, TO THE FULL EXTENT PERMITTED BY LAW, GIVES NO WARRANTIES OR<br />
ASSURANCES AND EXCLUDES ALL LIABILITY (INCLUDING LIABILITY FOR NEGLIGENCE) IN<br />
RELATION TO THE PROBE AND THE FIL-3 DEVICE.<br />
The user must ensure that it correctly follows all instructions in relation to the Probe and FIL-3 device, correctly<br />
understands the specifications of the Probe and FIL-3 device and ensures that the Probe and FIL-3 device are regularly<br />
inspected and maintained.<br />
FIL-3 equipped Probes should be inspected at least once a year for corrosion and more frequently if there is any reason<br />
to suspect that corrosion may have occurred.<br />
April 2008<br />
<strong>1632</strong> <strong>Oxygen</strong> Transmitter 9
2.2 THE OXYGEN PROBE OR SENSOR<br />
The probe assembly provides a means of exposing the zirconia sensor to the atmosphere to be measured with sensor,<br />
thermocouple and heater wires connected via the transmitter lead. Reference air is fed via the plug for unheated probes<br />
and via a separate gas thread connection for heated probes.<br />
Connections are provided on probes for an in-situ gas calibration check. A cleaning purge of air can be admitted via<br />
the calibration gas check entry. The outer sheath of probes can be metal or ceramic, depending on the application.<br />
Calibration check can be achieved on 1234 sensors using a three way solenoid which blocks the sample and at the same<br />
time admits a calibration check gas to the sensor. Purging a probe for any dust build up can be achieved in the same<br />
way.<br />
In-situ zirconia oxygen probes will give a lower oxygen reading than a sampled gas measurement on a chromatograph<br />
or paramagnetic transmitter because the flue gas contains a significant level of water vapour and a sampling system<br />
removes the water vapour through condensation. The oxygen content then appears as a higher percentage of the<br />
remaining gas. For example: If the gas contained five parts oxygen and fifteen parts moisture, removing the moisture<br />
would leave the oxygen at 5.88%. This phenomenon will depend on the fuel and the completeness of combustion.<br />
They are common to all in-situ oxygen sensors.<br />
2.3 THE TRANSMITTER<br />
The top line of the transmitter display will read oxygen in either % or parts per million (ppm).<br />
The <strong>1632</strong> transmitter is a transmitter with two 4 to 20 mA outputs. One output is linear oxygen with selectable span.<br />
The second output can be selected as oxygen deficiency, combustibles, auxiliary temperature, reducing oxygen, percent<br />
carbon dioxide, sensor EMF or a logarithmic oxygen range. Four alarm relays are provided. Refer to the sections 4.2<br />
and 4.3 for more details.<br />
The <strong>1632</strong> transmitter is designed to operate with either one or two heated or unheated, zirconia probes or sensors in one<br />
process. If two sensors are being used, the transmitter can average the two oxygen signals, alarm when there is a high<br />
difference, transmit and display the average and/or individual oxygen signals.<br />
If heated probes are being used, the transmitter will maintain the temperature of the sensor(s) to over 700°C (1300°F).<br />
If the flue gas temperature is above 850°C (1560°F), the probe heater will cut out completely and the process will<br />
provide probe heating. The transmitter solves the Nernst equation and will provide accurate oxygen measurements up<br />
to 1500°C (2730°F), although most probes are suitable only to 1400°C (2250°F). 1231 heated probes are limited to<br />
900°C (1650°F).<br />
2.4 ALARMS<br />
Refer to OPERATOR FUNCTIONS Section 4 for details on alarm functions.<br />
2.5 PROBE HEATER<br />
CAUTION<br />
The probe or sensor heater is supplied with mains voltage. This supply has electrical shock danger to maintenance<br />
personnel. Always isolate the transmitter before working with the probe or sensor.<br />
The EARTH wire (green) from the probe/sensor must always be connected to earth.<br />
The heater is supplied from the mains power directly, and the temperature is controlled initially at over 700°C (1300°F)<br />
after turn on.<br />
2.6 APPLICATIONS WHERE SENSING POINT IS NOT AT ATMOSPHERIC<br />
PRESSURE<br />
To apply the <strong>1632</strong> transmitter to processes that have pressure at the point of measurement significantly above or below<br />
atmospheric pressure, then compensation must be applied. (Refer to Set-up Steps 37 and 38 in Section 5.5). If two<br />
probes are being used, they must be close to the same pressure.<br />
If the process pressure is not constant, it can be measured by a pressure transducer and fed into the oxygen transmitter<br />
as a 4-20mA signal. The pressure compensation will then change the oxygen reading according to the current process<br />
pressure.<br />
April 2008<br />
<strong>1632</strong> <strong>Oxygen</strong> Transmitter 15
2.13 AUXILIARY TEMPERATURE THERMOCOUPLE<br />
A flue thermocouple must be connected to the AUX thermocouple input when combustibles display is required.<br />
The AUX thermocouple may also be used to monitor and display any process temperature.<br />
2.14 WATCHDOG TIMER<br />
The watchdog timer is started if the microprocessor fails to pulse it within any one-second period, (i.e. fails to run its<br />
normal program). The microprocessor will then be reset up to three times until normal operation is resumed. Reset<br />
cycles are displayed by the POWER light on the keyboard. A steady ‘ON’ light indicates normal operation. If the<br />
program has not resumed normal operation after three attempts to reset, the common alarm relay will be activated. The<br />
reset function will continue repeatedly after the alarm. If a successful reset is achieved, the alarm will be cancelled and<br />
the transmitter will continue to run normally.<br />
2.15 BACK-UP BATTERY<br />
The transmitter’s RAM and real-time clock are backed up by a lithium battery in the event of power failure. All set-up<br />
variables are saved and the clock is kept running for approximately ten years with the power off. The battery module<br />
should be replaced every 8 years. (It is the battery shaped device clipped in a socket labelled M1.)<br />
April 2008<br />
18 <strong>1632</strong> <strong>Oxygen</strong> Transmitter
3<br />
INSTALLING &<br />
COMMISSIONING<br />
Section<br />
Number INSTALLATION<br />
3.2A INSTALLING A 1231 OXYGEN PROBE.....................................................................................20<br />
3.2B INSTALLING A 1234 OXYGEN SENSOR ..................................................................................22<br />
3.3 INSTALLING THE AUXILIARY THERMOCOUPLE................................................................22<br />
3.4 SHIELD CONNECTIONS .............................................................................................................22<br />
3.5 ELECTRICAL CONNECTIONS ...................................................................................................23<br />
3.6 HEATER INTERLOCK RELAYS .................................................................................................25<br />
3.7A CONNECTING AN OXYGEN PROBE CABLE ..........................................................................25<br />
3.7B CONNECTING A 1234 SENSOR CABLE....................................................................................27<br />
3.8 CONNECTING THE AUXILIARY THERMOCOUPLE (OPTIONAL) ......................................27<br />
3.9 CONNECTING THE OUTPUT CHANNELS ...............................................................................27<br />
3.10 CONNECTING THE ALARMS.....................................................................................................27<br />
3.11 CONNECTING THE AUTOMATIC PURGE AND CALIBRATION CHECK SYSTEM ..........28<br />
3.12 CONNECTING REFERENCE AIR ...............................................................................................29<br />
3.13 CONNECTING THE DUAL FUEL INPUT ..................................................................................29<br />
3.14 CONNECTING THE PRINTER.....................................................................................................29<br />
3.15 CONNECTING THE TRANSMITTER TO A MODBUS NETWORK ....................................30<br />
COMMISSIONING<br />
3.16 CONNECTING POWER................................................................................................................31<br />
3.17 COMMISSIONING - SET-UP MODE...........................................................................................31<br />
3.18 COMMISSIONING - RUN MODE................................................................................................31<br />
3.19 BURNER BY-PASS SWITCH.......................................................................................................31<br />
3.20 CHECKING THE ALARMS..........................................................................................................31<br />
3.21 PROBE OR SENSOR CALIBRATION .........................................................................................31<br />
3.22 FILTER PURGING.........................................................................................................................32<br />
3.23 CALIBRATION GAS CHECK ......................................................................................................32<br />
3.24 DUST IN THE FLUE GAS ............................................................................................................32<br />
3.25 STRATIFICATION ........................................................................................................................32<br />
3.26 CONNECTING A PRESSURE TRANSDUCER...........................................................................33<br />
April 2008<br />
<strong>1632</strong> <strong>Oxygen</strong> Transmitter 19
Preferred mounting<br />
angle if there are<br />
particles in the flue gas<br />
and no filter is used<br />
Furnace,<br />
Flue…<br />
<strong>Oxygen</strong> Probe Mounting<br />
CAUTION<br />
Probe may be mounted<br />
horizontally but a small<br />
angle downwards will<br />
reduce condensation<br />
It is important that there is no air in leakage upstream of the oxygen sensing point, otherwise there will be a high<br />
oxygen reading.<br />
If the probe is to be installed on a bend in the flue, it is best located on the outer circumference of the bend to avoid<br />
dead pockets of flue gas flow. While the standard 1231 probe with a ‘U’ length of 250 mm (10”) will suit most low<br />
temperature flue applications, it is occasionally necessary to have a longer probe with the sensing tip in the centre of the<br />
flue gas stream.<br />
Although it is rare, occasionally a probe may sense oxygen vastly differently from the average reading in the flue gas.<br />
If it occurs, then the probe should be moved, or a longer probe installed. This phenomenon is normally caused by<br />
stratification of the flue gas.<br />
April 2008<br />
<strong>1632</strong> <strong>Oxygen</strong> Transmitter 21
3.2B INSTALLING A 1234 OXYGEN SENSOR<br />
Mounting - Screw the 1234 sensor to a wall or similar surface with the piping connections at the bottom.<br />
1234 OXYGEN SENSOR<br />
NOV ATE CH<br />
CON TROL S<br />
1234 Sensor Mounting Dimensions<br />
Sample Piping - Connect the gas sample piping to the “sample in” port. If the process, boiler, kiln or furnace has a<br />
positive pressure, no suction will be required. If the sample is under a negative pressure, connect a pump to the “inlet”<br />
port as shown below. The flow rate should be within the range of 1 to 5 litres/minute (120 to 600 scfm).<br />
Dry<br />
Process<br />
Gas<br />
1/4" Stainless Steel Tube<br />
1234<br />
Sensor<br />
Vent or return<br />
to proc ess<br />
3.3 INSTALLING THE AUXILIARY THERMOCOUPLE<br />
April 2008<br />
22 <strong>1632</strong> <strong>Oxygen</strong> Transmitter<br />
Flue<br />
Gas<br />
LABEL<br />
Upward slopi ng<br />
sample line 3/8”<br />
stainless steel<br />
Sampling<br />
Probe<br />
Flowmeter<br />
1234<br />
Sensor<br />
Optional vent to<br />
atmospherre<br />
Optional re turn<br />
to flue<br />
Weld a 1/2 inch BSP mounting socket to the flue within about 300 mm (12”), and upstream of the oxygen probe. The<br />
thermocouple should be of similar length to the oxygen probe to prevent flue temperature distribution errors.<br />
3.4 SHIELD CONNECTIONS<br />
All external wiring to the <strong>1632</strong> transmitter should be shielded. Do not connect shields at the field end. Simply clip off<br />
and insulate. An extra terminal strip may be required to connect all shields together. This should be supplied by the<br />
installer.
3.5 ELECTRICAL CONNECTIONS<br />
All wiring should comply with local electrical codes. The printed circuit boards are fully floating above earth. All<br />
earth and shield connections should be connected to the earth stud on the LHS inside the case. Before connection of<br />
mains power check that the 115 / 230 volt power selector switch is set to the correct voltage.<br />
SENSOR #2<br />
SENSOR #1<br />
Burner safety lock,<br />
or if safety interlock<br />
not required, link<br />
terminals 18 & 19<br />
4-20mA Outputs<br />
Selectable<br />
ranges<br />
Optional Alarm<br />
Relay Contacts<br />
Normally Closed<br />
Orange<br />
Brown<br />
Black<br />
Blue<br />
Black<br />
Blue<br />
Orange<br />
Brown<br />
1 Probe +<br />
2 Probe -<br />
3 Probe TC+<br />
4 Probe TC-<br />
5 Probe TC2/Aux+<br />
6 Probe TC2/Aux-<br />
7 +12V<br />
8 RGC I/P+<br />
9 RGC I/P-<br />
10 Probe #2+<br />
11 Probe #2-<br />
12 Purge Flow<br />
13 Purge Flow<br />
14 SFuel it 1/2 h<br />
15 Fuel 1/2<br />
16 Remote Alarm<br />
17 Remote Alarm<br />
18 RBurner t On Input<br />
19 Burner On Input<br />
20 RS-232 Rx<br />
21 RS-232 Tx<br />
22 Network -<br />
23 Network +<br />
24 Serial Common<br />
25 Output 1+<br />
26 Output 1-<br />
27 Output 2+<br />
28 Output 2-<br />
29 Common Alarm<br />
30 Common Alarm<br />
31 Alarm 2<br />
32 Alarm 2<br />
33 Alarm 3<br />
34 Alarm 3<br />
35 Alarm 4<br />
36 Alarm 4<br />
Mains Power<br />
240/115VAC<br />
41 Purge Sol<br />
42 Purge Sol<br />
43 Cal 1 Sol<br />
44 Cal 1 Sol<br />
45 Cal 2 Sol<br />
46 Cal 2 Sol<br />
47 Mains E<br />
48<br />
49 Mains N<br />
50 Mains A<br />
51 Heater #1<br />
52 Heater #1<br />
53 Heater #2<br />
54 Heater #2<br />
April 2008<br />
<strong>1632</strong> <strong>Oxygen</strong> Transmitter 23<br />
White<br />
White<br />
White<br />
White<br />
Connection Diagram for <strong>1632</strong> Transmitter and one or two 1231 / 1234 Heated Sensors
All wiring should comply with local electrical codes. The printed circuit boards are fully floating above earth. All<br />
earth and shield connections should be connected to the earth stud on the LHS inside the case. Before connection of<br />
mains power check that the 115 / 230 volt power selector switch is set to the correct voltage.<br />
PROBE #2<br />
PROBE #1<br />
Burner safety lock<br />
or if safety interlock<br />
not required, link<br />
terminals 18 & 19<br />
4-20mA Outputs<br />
Selectable<br />
ranges<br />
Red<br />
Red<br />
Optional Alarm<br />
Relay Contacts<br />
Normally Closed<br />
Orange<br />
Black<br />
Orange<br />
Black<br />
1 Probe +<br />
2 Probe -<br />
3 Probe TC+<br />
4 Probe TC-<br />
5 Probe TC2/Aux+<br />
6 Probe TC2/Aux-<br />
7 +12V<br />
8 RGCI/P+<br />
9 RGCI/P-<br />
10 Sens #2+<br />
11 Sens #2-<br />
12 Purge Flow Switch<br />
13 Purge Flow Switch<br />
14 Fuel 1/2<br />
15 Fuel 1/2<br />
16 Remote Alarm Reset<br />
17 Remote Alarm Reset<br />
18 Burner On Input<br />
19 Burner On Input<br />
20 RS-232 Rx<br />
21 RS-232 Tx<br />
22 Network -<br />
23 Network +<br />
24 Serial Common<br />
25 Output 1+<br />
26 Output 1-<br />
27 Output 2+<br />
28 Output 2-<br />
29 Common Alarm<br />
30 Common Alarm<br />
31 Alarm 2<br />
32 Alarm 2<br />
33 Alarm 3<br />
34 Alarm 3<br />
35 Alarm 4<br />
36 Alarm 4<br />
Mains Power Supply<br />
240/115VAC<br />
Connection Diagram for <strong>1632</strong> Transmitter and one or two 1232 Unheated Sensors<br />
41 Purge Sol<br />
42 Purge Sol<br />
43 Cal 1 Sol<br />
44 Cal 1 Sol<br />
45 Cal 2 Sol<br />
46 Cal 2 Sol<br />
47 Mains E<br />
48<br />
49 Mains N<br />
50 Mains A<br />
51 Heater #1<br />
52 Heater #1<br />
53 Heater #2<br />
54 Heater #2<br />
April 2008<br />
24 <strong>1632</strong> <strong>Oxygen</strong> Transmitter
Probe Head<br />
Connector<br />
Zirconia<br />
Sensor<br />
Probe<br />
Thermocouple<br />
(Optiona l)<br />
A<br />
B<br />
E<br />
C<br />
Note 1: Jumper terminals 3 & 4<br />
to terminals 5 & 6 if<br />
efficiency or flue<br />
temperature dis pla y is<br />
required.<br />
Use copper wire.<br />
Zi rconia<br />
Sensor<br />
Probe<br />
Thermocouple<br />
Probe<br />
Heater<br />
Probe<br />
Ea rth<br />
E<br />
F<br />
D<br />
Probe<br />
Head<br />
G<br />
C<br />
A<br />
B<br />
Other<br />
Shields<br />
Mains<br />
Ea rth<br />
Plug mounted<br />
on head viewed<br />
from outside of<br />
head.<br />
Green &<br />
Yellow<br />
(Shield)<br />
Reducing Fitting<br />
April 2008<br />
26 <strong>1632</strong> <strong>Oxygen</strong> Transmitter<br />
Ref Air<br />
Orange<br />
Black<br />
*Note 1<br />
Red<br />
Shield<br />
Common<br />
Terminal<br />
Bl (By Installer) k<br />
Connection of Probe Cable for Unheated Probes Models 1232.<br />
C<br />
B<br />
A<br />
F<br />
D<br />
E<br />
G<br />
Green<br />
Other<br />
Shields<br />
Mains<br />
Ea rth<br />
Green &<br />
Yellow<br />
(Shield)<br />
Orange<br />
Brown<br />
Black<br />
Blue<br />
White<br />
White<br />
Shiel d<br />
Common<br />
Terminal<br />
(By installer)<br />
Connection of Probe Cable for Heated Probes Model 1231.<br />
1/4" PVC tube to<br />
reference air supply.<br />
1 Probe +<br />
2 Probe -<br />
3 Probe TC +<br />
4 Probe TC -<br />
Earth Stud<br />
1 Probe<br />
2 Probe -<br />
3 Probe TC<br />
4 Probe TC -<br />
51<br />
52<br />
Earth<br />
Stud
The watchdog timer is a special alarm. It will force the common alarm to activate in the event of a microprocessor<br />
failure. There will not be an alarm message displayed, but the transmitter will reset.<br />
Alarms can be accepted by either pressing the alarm button (viewing the alarm messages), or by temporarily closing a<br />
switch connected to terminals 16 & 17, REM ALARM RESET.<br />
Alarm relay 2 to 4 Select any one or all of the following for each relay. Refer 5 to Section 5.5, steps 70 to 81<br />
High oxygen<br />
Low oxygen<br />
Very low oxygen<br />
Probe or sensor under temperature<br />
Calibration check in progress<br />
Probe purge in progress<br />
Alarm horn function (Relay 4 only)<br />
3.11 CONNECTING THE AUTOMATIC PURGE AND CALIBRATION CHECK SYSTEM<br />
CAUTION<br />
The purge and calibration solenoid valves are supplied with mains voltage. This supply has electrical shock danger to<br />
maintenance personnel. Always isolate the transmitter before working with the purge and calibration solenoid valves.<br />
The on-line auto purge and calibration check system is optional. For details on its operation refer to Sections 1.3, 1.4,<br />
2.9 and 2.10.<br />
To automatically sense a blocked probe filter, a pressure sensor should be connected to the ‘purge’ line to the probe<br />
‘cal’ port. It should be adjusted so that it energises just above the purge pressure with a new or clean filter installed.<br />
The switch contacts should be connected to terminals 12 & 13 (PURGE FL SWITCH).<br />
If the filter is still blocked or partly blocked after an auto purge cycle, the pressure switch will energise and cause a<br />
‘Probe Filter Blocked’ alarm.<br />
After installation the purge/cal system should be tested thoroughly for leaks. Any leaks can cause significant errors if<br />
the flue is at negative pressure. If the flue is at positive pressure, an outward leak can cause corrosion in the purge/cal<br />
system piping and fittings.<br />
If probe/filter purging is required but a “Probe Filter Blocked” alarm is not required, link terminals 12 &13.<br />
Mains Voltage 110/240<br />
AC Solenoids<br />
Cal 2 Sol<br />
April 2008<br />
28 <strong>1632</strong> <strong>Oxygen</strong> Transmitter<br />
41<br />
42<br />
43<br />
44<br />
45<br />
46<br />
Purge Sol<br />
Purge Sol<br />
Cal 1 Sol<br />
Cal 1 Sol<br />
Cal 2 Sol<br />
Automatic Purge & Calibration check System Wiring Schematic
To <strong>Oxygen</strong> Probe<br />
‘CAL’ port<br />
Calibration Check Gas Flowmeter/Regulator<br />
5 litres/min (10 scfh)<br />
3.12 CONNECTING REFERENCE AIR<br />
Mains Voltage 110/240 VAC<br />
From terminals 43 & 44<br />
Mains Voltage 110/240 VAC<br />
From terminals 45 & 46<br />
Mains Voltage 110/240 VAC<br />
From terminals 41 & 42<br />
CAL Check Gas #1<br />
140 kPa max (20psi)<br />
CAL Check Gas #2<br />
140 kPa max (20psi)<br />
Clean & Dry Purge<br />
Air Supply<br />
140 kPa max (20psi)<br />
Automatic Purge & Calibration check System Piping Schematic<br />
For 1234 sensors, no reference air connection is required. For oxygen probes, a 1/4” tube connector on the transmitter<br />
should be connected via a nylon, copper or stainless steel tube the to ‘REF’ connector on the probe.<br />
If two probes are being used, a “T” union must be supplied to provide reference air supply to both probes.<br />
If ‘Internal’ is selected in set-up 85, and a reference airflow sensor is connected to CN8 on the 1630-2 (terminal) PCB,<br />
the reference air pump is cycled on and off each minute.<br />
3.13 CONNECTING THE DUAL FUEL INPUT<br />
If combustibles or maximum carbon dioxide display is required and the appliance is capable of firing more than one<br />
fuel, then an external contact must be connected for the transmitter to determine which fuel is being burnt.<br />
Contacts to be open FUEL 1<br />
is running and closed when<br />
FUEL 2 is running<br />
3.14 CONNECTING THE PRINTER<br />
Fuel Selector Input Contact Connection<br />
April 2008<br />
<strong>1632</strong> <strong>Oxygen</strong> Transmitter 29<br />
14<br />
15<br />
FUEL 1/2<br />
A printer with a serial port, or a data logger, or a computer terminal may be connected to RS 232-C or the network port.<br />
Data is logged out of the port as arranged in Set-up steps 82 and 83. The baud rate is selectable in set-up step 84. The<br />
RS-232 protocol for the serial port is eight data bits, one stop bit, no parity.<br />
Available for RS - 485<br />
Network<br />
Printer or Data Logger<br />
Serial Port Connections<br />
20 R -232 R<br />
21 R -232 T<br />
22 Network -<br />
23 Network +<br />
24 Serial
3.15 CONNECTING THE TRANSMITTER TO A MODBUS NETWORK<br />
The transmitter can be networked to other transmitters and to a network master. The network uses the transmitter’s<br />
RS485 port. Up to 31 transmitters can be connected to the network, and can be interrogated by the Network Master.<br />
NOTE: Hardware Protocol Selection<br />
For the RS485 port on the transmitter to operate, the link LK3 on the 1630-1 printed circuit board (mounted on the<br />
door of the transmitter) must be set to the RS485 position. The LK3 is accessed by removing the cover from the door<br />
PCB. It is located at the bottom of the circuit board.<br />
NOTE: Terminating Resistor<br />
There is a terminating 100 ohm resistor fitted to the 1630-1 PCB. Link LK2, in the bottom left-hand corner of the PCB<br />
on the door, is used to connect the terminating resistor. Link LK2 must be removed on all transmitters except the<br />
transmitter on the end of the network line. If the network line from the transmitters is taken from the middle of the<br />
transmitter network string, a terminating resistor should be enabled with LK2 at each end of the network line.<br />
The protocol of the network is –<br />
Baud Rate 9600<br />
Parity none<br />
Stop Bits 1<br />
RS485 Half Duplex<br />
Mode RTU (binary mode)<br />
For more details see Section 2.12 and Appendix 6.<br />
Network Connections<br />
April 2008<br />
30 <strong>1632</strong> <strong>Oxygen</strong> Transmitter
3.22 FILTER PURGING<br />
Purging probe filters is controlled from the ‘PURGE’ button on the transmitter when in ‘RUN’ mode. If ‘AUTO<br />
PURGE’ has been enabled in set-up 53, pressing the PURGE button will start the automatic cycle. Pressing any other<br />
button will cancel the auto purge cycle. If AUTO PURGE was not enabled, the purge solenoid will only stay open for<br />
as long as the button is pressed. Gradually adjust the purge air supply regulator, increasing the pressure until sufficient<br />
flow is obtained to clear the filter. This is best checked with a dirty filter after a period of operation, by withdrawing<br />
the probe from service and watching any build up on the filter being blown off at the set pressure. Normally 30 kPa (5<br />
psi) is adequate but the air pressure may be set as high as 100 kPa (15 psi).<br />
3.23 CALIBRATION GAS CHECK<br />
If the installation has a filter purge facility, set this up first. Refer to the previous paragraph. Press the ‘CAL 1 or<br />
‘CAL 2’ button while in ‘SET UP’ mode to obtain a reasonable flow through the calibration check gas flow meter. If<br />
air is being used as a calibration check gas, use the air from the regulator for filter purge. Then, when setting up a gas<br />
for calibration checking, set the pressure from the calibration gas cylinder so that it is the same as the pressure set on<br />
the air regulator. Then the setting on the rotameter / flow regulator will be the same as that for the airflow. The flow<br />
required is 1 to 5 litres/minute (120 to 600 scfm) for a 1231 probe and up to 20 litres/minute (2400scfm) for an<br />
unheated probe.<br />
Air is not the best gas for calibration checking on a zirconia sensor. The output of a zirconia sensor with air on both<br />
sides of the sensor is zero millivolts. It is better to choose a gas value which provides a reasonable output from the<br />
sensor and which is near to the process oxygen level. A cylinder with 2% oxygen in nitrogen is a commonly used<br />
calibration gas. The maximum pressure on the calibration check gas cylinder regulators is 100 kPa (15 psi).<br />
Note: If two probes was selected in set-up 1, ‘Cal Gas 2’ must be connected to probe 2.<br />
3.24 DUST IN THE FLUE GAS<br />
For unheated probes with no filter, entrained solids or dust in the flue gas does not present a problem unless the dust,<br />
when settled, is not porous. Allow the dust in the process to build up on the probe. It will form a porous layer slowing<br />
the response time. To avoid mechanical abrasion of the electrode material in installations with unheated oxygen<br />
probes, pack ‘SAFFIL’ or equivalent alumina based ceramic fibre in the sensing holes to protect the electrode. Do not<br />
use silica based ceramic fibres such as ‘KAOWOOL’, which can attack the electrode at high temperatures. Once the<br />
dust has built up the response time of the probe will be slower.<br />
For heated probes the preferred method of mounting for dust-laden applications is facing vertically downwards with the<br />
filter removed. Probes can also be mounted horizontally with no filter with some dusts. An occasional automatic back<br />
purge is helpful in this case.<br />
Normally heated probes are supplied with filters for applications with particulates in the flue gas. The probe response<br />
time should be tested when the probe is first installed, and then regularly until it remains constant for a significant<br />
period. Filter purging should be set up on the time periods determined by these tests. To test the probe response time,<br />
use a stopwatch to obtain the time for a probe to achieve a 63 % change from one reading to another. If a probe filter<br />
blocks completely in a short period of time, then there is no option but to use the probe without the filter. A trial probe<br />
with filter can be installed to test whether a filter blockage is likely to occur.<br />
3.25 STRATIFICATION<br />
If the transmitter and probe have been fully tested and the oxygen readings in the flue gas are incorrect, gas<br />
stratification may be occurring. The phenomena cannot be anticipated for any particular installation. Generally, large<br />
flues have oxygen differences of approximately one percent across the flue. Occasionally an oxygen error of several<br />
percent may occur in a flue of any size. Moving the probe to a new location normally solves this problem.<br />
The effects of stratification can be reduced by using two probes and averaging the two oxygen readings. This can be<br />
achieved within a <strong>Novatech</strong> <strong>1632</strong> transmitter controlling two probes.<br />
April 2008<br />
32 <strong>1632</strong> <strong>Oxygen</strong> Transmitter
April 2008<br />
34 <strong>1632</strong> <strong>Oxygen</strong> Transmitter
4<br />
OPERATOR FUNCTIONS<br />
Section<br />
Number<br />
4.1 DISPLAY BUTTON.......................................................................................................................36<br />
4.2 ALARM BUTTON .........................................................................................................................37<br />
4.3 ALARM SCHEDULE.....................................................................................................................37<br />
4.3.1 SUMMARY OF ALARMS - COMMON ALARM...........................................................37<br />
4.3.2 SUMMARY OF ALARMS - SELECTABLE ALARMS ..................................................38<br />
4.3.3 ALARM RELAYS .............................................................................................................39<br />
4.4 POWER LAMP...............................................................................................................................39<br />
4.5 BURNER BYPASS SWITCH ........................................................................................................39<br />
4.6 DISPLAY BACKLIGHT................................................................................................................39<br />
April 2008<br />
<strong>1632</strong> <strong>Oxygen</strong> Transmitter 35
4.2 ALARM BUTTON<br />
Repeatedly pressing the ‘ALARM’ button will produce alarm displays in sequence on the lower line of the LCD<br />
display. If an alarm has cleared prior to pressing the ‘ALARM’ button, it will not re-appear on a second run through<br />
the alarms. Active alarms which have been previously displayed will have ‘acc’ (accepted in lower case), displayed<br />
alongside. New alarms will not have ‘ACC’ (in upper case) displayed until a second press of the ‘ALARM’ button.<br />
After the last active alarm is indicated, the lower line of the display will return to the last displayed lower line variable.<br />
Alarms may also be accepted remotely by a temporary closure of a switch connected to terminal 16 & 17, ‘REMOTE<br />
ALARM RESET’.<br />
The alarm ‘LED’ will flash when there is an un-accepted alarm. Pressing the ‘ALARM’ button will cause the LED to<br />
go steady if any alarms are still active, or extinguish if there are no active alarms. The horn relay will operate when an<br />
alarm occurs. Pressing ‘ALARM’ will mute a horn relay (if one of the user configurable relays have been selected as a<br />
‘Horn’ relay) which will re-initiate on any new alarms.<br />
4.3 ALARM SCHEDULE<br />
4.3.1 SUMMARY OF ALARMS - COMMON ALARM<br />
1. ‘Sensor 1 Fail’<br />
2. ‘Sensor 2 Fail’<br />
<strong>Oxygen</strong> sensor or electrode failure (high impedance); (inhibited under 650°C (1200°F)).<br />
3. ‘Heater 1 Fail’<br />
4. ‘Heater 2 Fail’<br />
In the first 20 minutes of power being applied to the heater after being switched on, this alarm will not occur, but a<br />
‘Sensor 1(2) Lo Temp’ display will occur and common alarm relay will be activated. Refer to Section 6.10. If an ADC<br />
alarms occurs, the heaters will automatically be turned off.<br />
5. ‘Sensor 1 TC Open’<br />
6. ‘Sensor 2 TC Open’<br />
Probe thermocouple is open circuit. The heater in heated probes will switch off.<br />
7. ‘Aux TC Open’<br />
Stack thermocouple is open circuit. If the thermocouple is not needed, select “NO T/C” for “Aux TC Type” or place a<br />
short circuit between terminals 5 & 6.<br />
8. ‘Ref Pump Fail’<br />
The reference air pump in the transmitter has failed.<br />
9. ‘Ref Air Fail’<br />
The reference gas supply from the air pump in the transmitter to the probe is blocked, or there is not sufficient airflow.<br />
10. ‘ADC Cal Fail’<br />
The analog to digital converter has been found to fall outside the normal calibration specifications. In this case the<br />
sensor heater will automatically be turned off.<br />
11. ‘Mains Freq’<br />
The sample of the mains frequency has failed.<br />
12. ‘DAC Cal Fail’<br />
The digital to analog and voltage isolator circuit has been found to fall outside the normal calibration specifications.<br />
This check is only performed when the ‘AUTO CAL’ button is pressed. Refer to Section 6.3.<br />
13. ‘Probe Filter<br />
Blocked probe filter. This test is only performed when automatic purging of the probe is selected. Refer to step 53 in<br />
the set-up menu Section 5.5. This alarm will not reset until the next purge cycle that can be initiated manually or<br />
automatically.<br />
14. ‘Gas 1 Cal Err’<br />
Probe does not correctly calibrate to calibration check gas 1.<br />
April 2008<br />
<strong>1632</strong> <strong>Oxygen</strong> Transmitter 37
April 2008<br />
40 <strong>1632</strong> <strong>Oxygen</strong> Transmitter
5<br />
SETTING UP THE<br />
TRANSMITTER<br />
Section<br />
Number<br />
5.1 SET-UP MODE FUNCTIONS .......................................................................................................42<br />
5.2 SET-UP & RUN MODES...............................................................................................................44<br />
5.3 FUNCTION SELECT .....................................................................................................................44<br />
5.4 ENTER OPTION OR VALUE .......................................................................................................44<br />
5.5 SET-UP FUNCTION DETAILS.....................................................................................................45<br />
April 2008<br />
<strong>1632</strong> <strong>Oxygen</strong> Transmitter 41
5.1 SET-UP MODE FUNCTIONS<br />
SET-UP MODE SUMMARY<br />
1 Number of Sensors<br />
2 Calendar Year<br />
3 Calendar Month<br />
4 Calendar Day<br />
5 Real time clock Hour<br />
6 Real time clock Minutes<br />
7 Reference voltage #1<br />
8 Reference voltage #2<br />
9 Reference voltage #3<br />
10 Reference voltage #4<br />
11 Sensor 1 offset<br />
12 Sensor 2 offset<br />
13 Output channel number 1 calibration<br />
14 Output channel number 1 calibration, 4mA trim<br />
15 Output channel number 1 calibration, 20mA trim<br />
16 Output channel number 2 calibration<br />
17 Output channel number 2 calibration, 4mA trim<br />
18 Output channel number 2 calibration, 20mA trim<br />
19 Service record year<br />
20 Service record month<br />
21 Service record day<br />
22 Sensor 1 Type<br />
23 Sensor 2 Type<br />
24 Sensor 1 Thermocouple Type<br />
25 Sensor 2, Auxiliary Thermocouple Type<br />
26 Transmitter Output Channel 1 scale<br />
27 Transmitter Span Channel 1<br />
28 Transmitter Output Channel 2 scale<br />
29 Transmitter Zero Channel 2<br />
30 Transmitter Span Channel 2<br />
31 Top Line Display Units, % or ppm<br />
32 Centigrade/Fahrenheit Selection<br />
33 Lower Line Display Functions<br />
34 Flue Pressure, Fixed/Variable<br />
35 Flue Pressure Input Zero Level<br />
36 Flue Pressure Input Span Level<br />
37 Flue Pressure mm/inches/kilopascals<br />
38 Flue Pressure Value<br />
Set-up steps 39 to 51 will be skipped automatically if combustibles, maximum CO2 or oxygen deficiency is not selected<br />
in steps 28, 33 or 82.<br />
39 Single or Dual Fuel<br />
40 Fuel #1 ‘A’ Value<br />
41 Fuel #1 ‘H’ Value<br />
42 Fuel #1 ‘O’ Value<br />
43 Fuel #1 ‘N’ Value<br />
44 Fuel #1 ‘S’ Value<br />
45 Fuel #1 ‘M’ Value<br />
Set-up steps 46 to 51 will be skipped automatically if ‘Single Fuel’ is selected in set-up step 39.<br />
46 Fuel #2 ‘A’ Value<br />
47 Fuel #2 ‘H’ Value<br />
48 Fuel #2 ‘O’ Value<br />
49 Fuel #2 ‘N’ Value<br />
50 Fuel #2 ‘S’ Value<br />
51 Fuel #2 ‘M’ Value<br />
52 Purge/Cal Time<br />
53 Automatic Purge<br />
April 2008<br />
42 <strong>1632</strong> <strong>Oxygen</strong> Transmitter
Set-up steps 54 to 56 will be skipped automatically if ‘No’ is selected in set-up step 53.<br />
54 Time between Purges<br />
55 Purge Duration<br />
56 Purge Freeze Time<br />
57 Number of Cal Gases<br />
Set-up steps 58 to 69 may be skipped automatically, depending on the selection in set-up step 57.<br />
58 <strong>Oxygen</strong> Content of Cal Gas 1<br />
59 Maximum Acceptable Positive Error Gas 1<br />
60 Maximum Acceptable Negative Error Gas 1<br />
61 Period Between Gas 1 Autocals<br />
62 Duration of Autocal Gas 1<br />
63 Freeze Time Gas 1<br />
64 <strong>Oxygen</strong> Content of Cal Gas 2<br />
65 Maximum Acceptable Positive Error Gas 2<br />
66 Maximum Acceptable Negative Error Gas 2<br />
67 Period Between Gas 2 Autocals<br />
68 Duration of Autocal Gas 2<br />
69 Freeze Time Gas 2<br />
70 Process alarm enable<br />
Set-up steps 71 to 78 will be skipped automatically if ‘No’ is selected in set-up step 70.<br />
71 High oxygen alarm level<br />
72 High oxygen alarm delay time<br />
73 Low oxygen alarm level<br />
74 Low oxygen alarm delay time<br />
75 <strong>Oxygen</strong> Deviation Alarm (2 probes)<br />
76 <strong>Oxygen</strong> Deviation Alarm Delay (2 probes)<br />
77 Very low oxygen alarm level<br />
78 Very low oxygen alarm delay time<br />
79 Alarm relay number 2 function select<br />
80 Alarm relay number 3 function select<br />
81 Alarm relay number 4 function select<br />
82 Data to Print<br />
83 Print Log Period<br />
84 Printer Baud Rate<br />
85 Reference air pump Internal/External/Inst air<br />
86 Reference air RH if ‘Instrument Air’ selected in Set-up 85.<br />
87 Damping factor<br />
88 MODBUS Address<br />
The “Extended Set-up Menus” steps 89 to 97 will be skipped unless the extended menus are enabled. See Set-up 5.2<br />
for more details.<br />
89 Reference pump cycle time.<br />
90 Low oxygen calibration factor, sensor #1.<br />
91 Low oxygen calibration factor, sensor #2.<br />
92 Gas calibrate / check selection.<br />
93 <strong>Oxygen</strong> mid point calibration factor #1.<br />
94 <strong>Oxygen</strong> mid point calibration factor #2.<br />
95 4-20mA output limit enable option.<br />
96 Solid state relay fail alarm setting.<br />
97 Heater solid state relay swapping function.<br />
April 2008<br />
<strong>1632</strong> <strong>Oxygen</strong> Transmitter 43
5.5 SET-UP FUNCTION DETAILS<br />
Note: The * indicates the default setting after a COLD-START. See Section 6.1<br />
1. Number of Sensors<br />
Options<br />
Select the number of oxygen probes or sensors being used.<br />
1 Sensor *<br />
2 Sensors<br />
2. Calendar Year<br />
Options<br />
Select the current year for the real time clock / calendar.<br />
The cold start default sets the date and time to the software version date.<br />
3. Calendar Month<br />
Options<br />
Select the current month for the real time clock / calendar.<br />
4. Calendar Day<br />
Options<br />
Select the current day for the real time clock / calendar.<br />
5. Real time Clock Hour<br />
Options Select the current hour for the real time clock. (24 hour format)<br />
6. Real time Clock Minutes<br />
Options<br />
Select the current minutes for the real time clock.<br />
7. Reference Voltage # 1 (about 27.5 mV)<br />
Options<br />
Set the value of the reference voltage as read on a 3 1/2 digit multimeter (See Section 6.2 for further details).<br />
27.55 mV *<br />
8. Reference Voltage # 2 (about 194 mV)<br />
Options<br />
Set the value of the reference voltage as read on a 3 1/2 digit multimeter (See Section 6.2 for further details).<br />
193.60 mV *<br />
9. Reference Voltage # 3 (about 1200 mV)<br />
Options<br />
Set the value of the reference voltage as read on a 3 1/2 digit multimeter (See Section 6.2 for further details).<br />
1202.00 mV *<br />
10. Reference Voltage # 4 (about 2500 mV)<br />
Options<br />
Set the value of the reference voltage as read on a 3 1/2 digit multimeter (See Section 6.2 for further details).<br />
2479.00 mV *<br />
Set-up items 7 to 10 are used to calibrate the A/D of the instrument. This should be done 30 minutes or more after the<br />
instrument has been on, approximately once every year. The calibration constants are retained in battery backed<br />
memory unless a ‘COLD START’ is performed. Connect a 3 1/2 digit multimeter negative lead to the test point<br />
marked ‘C’ to the right of the PCB on the inside of the door (labelled ‘REF VOLTS’). Measure the four voltages on<br />
the test point marked 1 to 4 with the positive lead. Refer to Figure 6.2 in the <strong>1632</strong> manual. Enter the measured values<br />
in set-up items 7 to 10. Whenever new values are entered the D/A Section should be re-calibrated, Refer to Section 6.3.<br />
April 2008<br />
<strong>1632</strong> <strong>Oxygen</strong> Transmitter 45
11. Set Probe or Sensor 1 Offset<br />
See function 12<br />
12. Set Probe or Sensor 2 Offset (When 2 sensors are selected in set-up 1)<br />
A new EMF offset must be entered whenever a new oxygen probe or sensor is installed to calibrate for any offset an<br />
individual probe or sensor may have. Each probe or sensor will have an offset value noted on a removable tag. Enter<br />
the ‘SENSOR OFFSET’ value with the same polarity,<br />
E.g. If offset value is -1.2 mV then enter -1.2 mV. The typical maximum is +/- 2mV.<br />
To check a probe offset on site, the probe must be sensing air, with reference air, and allowed to settle at the probe<br />
operating temperature for 30 minutes. Read the offset in ‘RUN’ mode in millivolts on the lower line. Offset errors can<br />
occur if the sensor does not have some air passing over it. A gentle flow of air in the calibration check port can be<br />
provided by a reference air pump or similar.<br />
For heated probes, if the combustion appliance is not operational and the probe heater is interlocked with the<br />
‘BURNER ON’ signal, the ‘BURNER BYPASS’ switch should be set to ‘ON to power the probe heater after removing<br />
the probe from the flue.<br />
CAUTION DANGER<br />
Return the ‘BURNER BYPASS’ switch to normal (off) before installing the probe in the flue.<br />
For unheated probes, the probe sensing tip must be raised to at least 650°C (1200°F) with a portable furnace.<br />
Determine the probe offset in ‘RUN’ mode. Select ‘Sensor EMF’ on the lower line. With probe in air, stabilised at<br />
temperature for 30 minutes, read the ‘Sensor EMF’. Switch back to ‘set-up’ mode and enter ‘Sensor Offset’ of equal<br />
value and the same polarity.<br />
e.g. If the measured ’SENSOR OFFSET’ was -1.2 mV then enter -1.2 mV.<br />
When reading the EMF offset, the flue pressure compensation must be set. If the probe has been removed from the<br />
flue, set the flue pressure compensation set up to “Fixed” in set-up 34, and the value to 0 in set-up step 38.<br />
13. 4 to 20 mA Calibration Options, Channel #1<br />
Select the calibration method for the 4-20mA output channel #1.<br />
The output channels can be either calibrated by simply pressing the ‘AUTO CAL’ button, or can be trimmed at both the<br />
4mA and 20mA ends of the scale using an external multimeter.<br />
Options:<br />
1. Auto Calibration *<br />
2. <strong>Manual</strong> Calibration<br />
3. Set 4mA Trim<br />
4. Set 20mA Trim<br />
If ‘AUTO CAL’ is selected, the output channel is calibrated when ‘Auto Cal’ is initiated from the keyboard (See<br />
Section 6.3).<br />
If ‘MAN CAL’ is selected, it is necessary to trim both ends of the 4-20mA output range using the 4mA and 20mA<br />
options in this menu item. Selecting ‘MAN CAL’ inhibits the ‘Auto Cal’ process of this channel.<br />
Always do the 4mA trim first, and then the 20mA trim. After trimming both ends of the scale, return the<br />
‘CALIBRATION OPTIONS’ menu option back to ‘MAN CAL’ (not ‘AUTO CAL’), or the calibration factors will be<br />
over written by the next ‘AUTO CAL’.<br />
For more details on calibrating the output channels, see Section 6.3.<br />
NOTE: The transmitter will only stay in either ‘4mA TRIM’ or ‘20mA TRIM’ modes for 30 minutes before it<br />
automatically returns to ‘MAN CAL’.<br />
14. Calibrate 4mA, Channel #1<br />
This menu item only appears if ‘Set 4mA Trim’ is selected in Set-up 13.<br />
Range: 0 to 25mA, Default is 4.00mA<br />
For full details on the calibration of the 4-20mA output channels, see Section 6.3.<br />
April 2008<br />
46 <strong>1632</strong> <strong>Oxygen</strong> Transmitter
15. Calibrate 20mA, Channel #1<br />
This menu item only appears if ‘Set 20mA Trim’ is selected in Set-up 13.<br />
Range: 0 to 25mA, Default is 20.00mA<br />
16. 4 to 20 mA Calibration Options, Channel #2<br />
Select the calibration method for the 4-20mA output channel #1.<br />
For more details, see Set-up 13 and Section 6.3.<br />
Options:<br />
1. Auto Calibration *<br />
2. <strong>Manual</strong> Calibration<br />
3. Set 4mA Trim<br />
4. Set 20mA Trim<br />
17. Calibrate 4mA, Channel #2<br />
This menu item only appears if ‘Set 4mA Trim’ is selected in Set-up 16.<br />
Range: 0 to 25mA, Default is 4.00mA<br />
For full details on the calibration of the 4-20mA output channels, see Section 6.3.<br />
18. Calibrate 20mA, Channel #2<br />
This menu item only appears if ‘Set 20mA Trim’ is selected in Set-up 16.<br />
Range: 0 to 25mA, Default is 20.00mA<br />
19. Enter Service Year<br />
For a new ‘DATE OF LAST SERVICE’, enter the service ‘YEAR’. This can represent the last time the probe or<br />
sensor was serviced or the last time the boiler was serviced. It is recommended that probes and sensors be refurbished<br />
every two years<br />
20. Enter Service Month<br />
Enter the current ‘MONTH’.<br />
21. Enter Service Day<br />
Enter the current ‘DAY’ of the month. Altering these values will reset the ‘RUN TIME’.<br />
22. Sensor 1 Type<br />
23. Sensor 2 Type<br />
Options:<br />
Model No. Enter the probe or sensor model number in use<br />
1. 1231/1234 Heated * Heated Probe or sensor<br />
2. 1232 Unheated Unheated Probe<br />
24. Probe or Sensor 1 Thermocouple Type<br />
See function 25<br />
25. Probe or Sensor 2 Thermocouple Type (When 2 Sensors Are Selected In Set-Up 1)<br />
Auxiliary Thermocouple Type (When 1 sensor is selected in set-up 1)<br />
The probe can have either a type K, or R thermocouple as a sensor temperature detector. A 1231 probe or a 1234<br />
sensor will always have a K thermocouple, and a 1232 will usually have an R thermocouple.<br />
Options:<br />
1. K * Check in the manual Section 1<br />
2. R for the probe model number.<br />
3. NO T/C If no TC type is to be used for an Auxiliary use.<br />
NOTE<br />
For heated probes the flue (auxiliary) thermocouple is a separate sensor from the oxygen probe and should be mounted<br />
near to and upstream from the probe. It is optional. If no thermocouple is required, select option ‘NO T/C’. In this<br />
case auxiliary temperature read outs will not be operable.<br />
April 2008<br />
<strong>1632</strong> <strong>Oxygen</strong> Transmitter 47
33. Lower Line Display Functions<br />
In the run mode the upper line on the LCD display will always read % oxygen. The lower line can be set to read one or<br />
more of the following. Select as many as are required to be displayed by pressing the ‘ENTER’ button. Those selected<br />
will have an asterisk displayed alongside.<br />
Options:<br />
1. Average of sensor 1 & sensor 2 oxygen, see Note 3<br />
2. Sensor 2 oxygen , see Note 3<br />
3. Sensor 1 EMF<br />
4. Sensor 2 EMF, see Note 3<br />
5. Sensor 1 temperature<br />
6. Sensor 2 temperature, or Auxiliary temperature if 1 sensor is selected in set-up 1<br />
7. Sensor 1 impedance<br />
8. Sensor 2 impedance, see Note 3<br />
9. Ambient temperature<br />
10. <strong>Oxygen</strong> deficiency 1, see Note 2<br />
11. Combustibles %, or oxygen deficiency 2 if 2 sensors are selected in set-up 1.<br />
12. CO2 theoretical maximum<br />
13. Run hours since last service<br />
14. Date of last service<br />
If no lower line options are required then do not enter any. If options already selected are required to be deleted, select<br />
the required option and press the ‘ENTER’ button. The asterisk will be removed.<br />
NOTE<br />
1. A flue thermocouple must be connected to Terminals 5 and 6 to obtain a proper reading for option 9 (Refer<br />
Section 3.5).<br />
2. The oxygen deficiency display will read ‘EXCESS’ when the combustion contains excess air.<br />
3. These options will not appear unless two sensors are selected in set up 1.<br />
34. Flue Pressure Setup<br />
If the flue or process gas pressure at the position of the oxygen probe is significantly different from atmospheric<br />
pressure, the pressure value should be entered into the transmitter (1 kPa will give an error of about 1% of the oxygen<br />
reading).<br />
If the flue pressure is constant, select “Fixed” in this function and select the pressure units and pressure value in set-up<br />
37 and 38.<br />
If the pressure varies, select “Variable Input”, and connect a pressure transducer to screw terminals 8 & 9 (see Section<br />
3.26). Set the range of the transducer using a zero and span value set in set-up items 35 and 36.<br />
Options:<br />
Fixed *<br />
Variable Input<br />
35. Flue Pressure Zero Input Value<br />
Only available if “Variable Input” is selected in set-up 34.<br />
Set the 4mA level if the pressure transducer measuring the flue or process pressure. The default setting is –1000mb.<br />
Limits :<br />
-1000 to +2900mb. The minimum range is 100mb.<br />
36. Flue Pressure Span Input Value<br />
Only available if “Variable Input” is selected in set-up 34.<br />
Set the 20mA level if the pressure transducer measuring the flue or process pressure. The default setting is 0mb.<br />
Limits :<br />
-900 to +3000mb. The minimum range is 100mb.<br />
37. Flue Pressure<br />
Enter flue pressure, e.g. 3 mm (0.12”) W.G. Only available if “Fixed” is selected in set-up 34.<br />
Options:<br />
mm W.G. *<br />
Kilopascals<br />
Inches W.G.<br />
April 2008<br />
50 <strong>1632</strong> <strong>Oxygen</strong> Transmitter
38. Flue Pressure Value<br />
Enter flue pressure e.g. 3 mm (0.12”) WG. The default setting is 0. Only available if “Fixed” is selected in set-up 34.<br />
Limits :<br />
-3000 to +3000 mm<br />
-3000 to +3000 inches W.G.<br />
-3000 to +3000 kPa<br />
39. Single or Dual Fuel<br />
Enter single or dual fuel. This step and set-up steps 39 to 51 will be skipped if oxygen deficiency, combustibles or<br />
maximum carbon dioxide is not selected in set-up steps 28, 33 or 82 for display or output on the 4-20mA channels or<br />
the printer port.<br />
A set of default values for the fuel constants are loaded into memory. The fuel constants from Appendix can be entered<br />
into the following menu items, or the constants can be tailored to suite any particular fuel.<br />
Options:<br />
1. Single *<br />
2. Dual<br />
40. Fuel Number 1 ‘A’ Value<br />
‘A’ is the heat of combustion of the fuel per gram atom of contained carbon.<br />
Enter the correct value of ‘A’ (Refer notes in Appendix 1).<br />
41. Fuel Number 1 ‘H’ Value<br />
‘H’ is the hydrogen/carbon atom ratio in the fuel.<br />
Enter the correct value of ‘H’ (Refer notes in Appendix 1).<br />
42. Fuel Number 1 ‘O’ Value<br />
‘O’ is the oxygen/carbon atom ratio in the fuel.<br />
Enter the correct value of ‘O’ (Refer notes in Appendix 1).<br />
43. Fuel Number 1 ‘N’ Value<br />
‘N’ is the nitrogen/carbon atom ratio in the fuel.<br />
Enter the correct value of ‘N’ (Refer notes in Appendix 1).<br />
44. Fuel Number 1 ‘S’ Value<br />
‘S’ is the sulphur/carbon atom ratio in the fuel.<br />
Enter the correct value of ‘S’ (Refer notes in Appendix 1).<br />
45. Fuel Number 1 ‘M’ Value<br />
‘M’ is the ratio of water molecules to carbon atoms in the fuel. Enter the correct value of ‘M’ (Refer notes in Appendix<br />
1). For single fuel applications the next set-up step will be 52, for dual fuel the next step is 46.<br />
46. Fuel Number 2 ‘A’ Value<br />
‘A’ is the heat of combustion of the fuel per gram atom of contained carbon.<br />
Enter the correct value of ‘A’ (Refer notes in Appendix 1).<br />
47. Fuel Number 2 ‘H’ Value<br />
‘H’ is the hydrogen/carbon atom ratio in the fuel.<br />
Enter the correct value of ‘H’ (Refer notes in Appendix 1).<br />
48. Fuel Number 2 ‘O’ Value<br />
‘O’ is the oxygen/carbon atom ratio in the fuel.<br />
Enter the correct value of ‘O’ (Refer notes in Appendix 1).<br />
49. Fuel Number 2 ‘N’ Value<br />
‘N’ is the nitrogen/carbon atom ratio in the fuel.<br />
Enter the correct value of ‘N’ (Refer notes in Appendix 1).<br />
50. Fuel Number 2 ‘S’ Value<br />
‘S’ is the sulphur/carbon atom ratio in the fuel.<br />
Enter the correct value of ‘S’ (Refer notes in Appendix 1).<br />
April 2008<br />
<strong>1632</strong> <strong>Oxygen</strong> Transmitter 51
51. Fuel Number 2 ‘M’ Value<br />
‘M’ is the ratio of water molecules to carbon atoms in the fuel.<br />
Enter the correct value of ‘M’ (Refer notes in Appendix 1).<br />
52. Purge / Cal Time<br />
Set the first purge to occur at the correct time-of-day. If purging is not required but on-line auto gas calibration check<br />
is required, enter a time-of-day value suitable for the auto calibration checks. Cal Gas 1 will be tested ten minutes after<br />
the purge/cal time and Cal Gas 2, 20 minutes after. If neither purge nor auto calibration check is required, ignore this<br />
time setting.<br />
Range: 0 to 23 hours in one hour steps. The default time is 12 noon.<br />
53. Automatic Purge<br />
For some oil and coal fired plant, probe filters are necessary and should be back-purged with sufficient frequency to<br />
avoid blocked filters. The outputs will be frozen during purging. If no purge is required, set-up steps 54, 55 and 56<br />
will be skipped.<br />
Options:<br />
None *<br />
Purge<br />
Auto Offset ++<br />
Key Auto Offset ++<br />
++ Note: If ‘Calibrate’ is selected in set-up step 92 these two additional options will be available.<br />
If Auto Offset is selected, set-up steps 54 to 56 will be available. By using these steps the transmitter can be configured<br />
to make small corrections to the probe offset automatically. The offset correction is limited to +/- 3mV.<br />
If Auto Offset is selected set-up 54 and 55 allow the automatic time periods to be set.<br />
If Key Auto Offset is selected the offset correction can be started from the keypad (PURGE).<br />
54. Time Between Purges<br />
Set the time between purges e.g. A two hourly purge or a 100 hourly purge.<br />
Range:<br />
1 to 199 hours. Default setting is 24 hours.<br />
55. Purge Duration<br />
Set up purge duration to a number between three and ten seconds. The filter is actually purged in less than one second,<br />
but three seconds are required for the purge flow switch to check that the filter is not blocked.<br />
Range:<br />
0 to 10 seconds. Default setting is 10 seconds.<br />
56. Purge Freeze Time<br />
After the purge period the transmitter output will remain fixed (frozen) for an adjustable period to allow the probe<br />
reading to return to the correct process level and avoid output ‘bumps’. The freeze period time required will depend on<br />
the probe response time and thus its design, and whether it has a filter or not.<br />
To determine the required freeze time, manually perform a purge while the plant is in operation and note the time<br />
required for the reading to return to the correct process level within approximately 0.5 % oxygen.<br />
Range:<br />
10 to 1000 seconds in ten second steps. Default setting is 60 seconds.<br />
April 2008<br />
52 <strong>1632</strong> <strong>Oxygen</strong> Transmitter
57. Number of Cal Gases<br />
Select the number of calibration or checking gases to 0, 1 or 2. For example, one gas could be air (20.9 % oxygen) and<br />
the other 2 % oxygen<br />
Options:<br />
No Gas Check *<br />
Single Gas Check<br />
Two Gas Check<br />
Auto Gas Calibrate ++<br />
Key Gas Calibrate ++<br />
During the timed calibration check periods the transmitter outputs will be frozen and the transmitter will alarm if<br />
readings are not within the accuracy limits sets in set-up steps 59and 60. If auto gas checking is not required enter ‘No<br />
Gas Check’ and the transmitter will step to set-up 70.<br />
++ Note: If ‘Calibrate’ is selected in set-up step 92 these two additional options will be available.<br />
If Auto Gas Calibrate is selected, set-up steps 58 to 63 (and 64 to 69 for 2 probes) will be available. By using these<br />
steps the transmitter can be configured to make small corrections to the calibration automatically. Select the oxygen<br />
content in set-up 58 (64) and the time periods in set-up steps 61 to 63 (67 to 69).<br />
If Key Gas Calibrate is selected the automatic correction can me instigated from the keypad (CAL1 and CAL2).<br />
58. <strong>Oxygen</strong> Content of Cal Gas 1<br />
Enter value of Cal Gas 1 (to one decimal point).<br />
Range:<br />
0.1 to 20.9 % oxygen. Default setting is 8.0 % oxygen.<br />
59. Maximum Acceptable Positive Error Gas 1<br />
Set the maximum positive error above which the ‘Gas 1 Cal Error’ alarm will be initiated after the timed period set in<br />
set-up step 55.<br />
Range:<br />
0.1 to 3.0 % oxygen. The default setting is 0.5 % oxygen.<br />
60. Maximum Acceptable Negative Error Gas 1<br />
Set the maximum negative error below which the ‘Gas 1 Cal Error’ alarm will be initiated after the timed period set in<br />
set-up step 55.<br />
Range:<br />
0.1 to 3.0 % oxygen. The default setting is 0.2 % oxygen.<br />
61. Period Between Gas 1 Autocals<br />
Set the number of hours between autocal Gas 1. A typical time would be 24 or 168 hours. (Daily or weekly).<br />
Range: 1 to 1999 hours. The default setting is 1 hour.<br />
62. Duration of Autocal Gas 1<br />
Set the number of seconds that the autocal gas solenoid will be open. At the end of this period, if the oxygen level<br />
measured is not within the limits set for Cal Gas 2, an ‘Gas 2 Cal Error’ will initiate. To determine the minimum time<br />
required for a particular length or design of probe to settle, manually admit cal gas while observing the oxygen reading<br />
in ‘RUN’ mode. Typical minimum times vary from 15 seconds to 90 seconds, depending on the probe length and gas<br />
plumbing arrangement. If there is a filter fitted to the oxygen probe, the calibration check reading will be much closer<br />
to the actual gas value.<br />
Range:<br />
0 to 90 seconds. The default setting is 10 seconds.<br />
April 2008<br />
<strong>1632</strong> <strong>Oxygen</strong> Transmitter 53
63. Freeze Time Gas 1<br />
After the Cal Gas 1 period, the transmitter output will remain fixed (frozen) for an adjustable period to allow the probe<br />
reading to return to the correct process level and avoid output ‘bumps’. The freeze period time required will depend<br />
on the probe response time, and whether or not it has a filter fitted.<br />
Range:<br />
0 to 100 seconds in one second steps. The default setting is 30 seconds. To determine the required freeze time,<br />
manually perform a calibration check with Gas 1 while the plant is in operation and note the time required for the<br />
reading to return to the correct process level within approximately 0.5 % oxygen.<br />
If the freeze time is set to zero the 4-20mA outputs will be updated during the purge time AND the freeze time. (i.e. the<br />
outputs will NOT be frozen) This mode will satisfy Environmental Protection Authorities if required.<br />
64 to 69. Cal Gas 2 Parameters<br />
Enter the same requirements for Cal Gas 2 as per set-up steps 58 to 63 for Cal Gas 1. Cal Gas 2 could typically be 2 %<br />
oxygen in nitrogen.<br />
70. Process Alarm Enable<br />
If process alarms are not required, ‘NO’ can be selected. There will not be any process related alarms generated, and<br />
all process alarms will be cancelled, if ‘NO’ is selected.<br />
The process alarms are High oxygen, Low oxygen, <strong>Oxygen</strong> deviation, and Very low oxygen.<br />
Options:<br />
Yes<br />
No *<br />
71. High <strong>Oxygen</strong> Alarm<br />
Set the operating point for the high oxygen alarm relay.<br />
Range:<br />
0.1 –30.0% oxygen. The default setting is 10.0 % oxygen.<br />
72. High <strong>Oxygen</strong> Delay<br />
Typically set at 30 seconds. This delay is to avoid nuisance alarms when the burner is undergoing transitions in firing<br />
rate that can cause it to deviate from the oxygen set point, but recover quickly.<br />
Range:<br />
0–200 seconds. The default setting is 60 seconds.<br />
73. Low <strong>Oxygen</strong> Alarm<br />
Set the operating point for the low oxygen alarm relay. Typically set at 2.0% oxygen, depending on the burner, it can be<br />
used as a safety warning.<br />
Range:<br />
0.1 –21% oxygen. The default setting is 2.5 % oxygen.<br />
74. Low <strong>Oxygen</strong> Delay<br />
Typically set at 30 seconds. This delay is to avoid nuisance alarms when the burner is undergoing transitions in firing<br />
rate that can cause it to deviate from the oxygen set point, but recover quickly.<br />
Range:<br />
0–200 seconds. The default setting is 10 seconds.<br />
75. <strong>Oxygen</strong> Deviation Alarm (Only available if ‘2 sensors’ is selected in set-up 1)<br />
If the difference between 2 sensors running on a transmitter is greater than the limit set here, the alarm will be<br />
triggered.<br />
This alarm could be used to give an on-line warning of a problem in one of the sensors.<br />
Range:<br />
0.1 –21% oxygen. The default setting is 2.0 % oxygen.<br />
76. <strong>Oxygen</strong> Deviation Alarm Delay (Only available if ‘2 sensors’ is selected in set-up 1)<br />
A 30 second delay in the activation of this alarm will usually be ample to cover any deviation due to short-term<br />
stratification differences between the two sensors.<br />
Range:<br />
0–200 seconds. The default setting is 30 seconds.<br />
April 2008<br />
54 <strong>1632</strong> <strong>Oxygen</strong> Transmitter
77. Very Low <strong>Oxygen</strong> Alarm<br />
Set the operating point for the very low oxygen alarm relay, typically 0.5% oxygen. This limit can be used as a shut<br />
down on a boiler as the normal operating level should never be this low.<br />
Range:<br />
0.001 –2.000% oxygen. The default setting is 0.500 % oxygen.<br />
78. Very Low <strong>Oxygen</strong> Delay<br />
Set the very low oxygen alarm delay to the smallest possible period to avoid nuisance alarms/shut-downs, but still<br />
maintain the fastest response to a fuel rich atmosphere<br />
Range:<br />
0–200 seconds. The default setting is 2 seconds.<br />
79. Alarm Relay #2<br />
Any or all of the following alarm functions may be used to activate the alarm relay. They may be selected or deselected<br />
using the ‘ENTER’ buttons as in set-up step 33.<br />
Options :<br />
1. Low oxygen<br />
2. High oxygen<br />
3. Very low oxygen<br />
4. <strong>Oxygen</strong> deviation between sensor 1 and sensor 2, (if sensor 2 is selected)<br />
5. Gas 1 Check Error<br />
6. Gas 2 Check Error<br />
7. No Gas calibration (calibration not successful)<br />
8. Probe or sensor under temperature<br />
9. Calibration check in progress<br />
10. Probe purge in progress<br />
80. Alarm Relay #3<br />
Alarm relay #3 has the same functions available as alarm relay #2. See SET-UP 79.<br />
81. Alarm Relay #4<br />
Alarm relay #4 has the same functions available as alarm relay #2. See SET-UP 79.<br />
In addition an alarm horn function is also available.<br />
If ‘Horn’ is selected it will override any other selections. A relay selected as a ‘Horn’ driver will have the relay<br />
contacts open circuit if there is an unaccepted alarm, and closed when a new alarm occurs.<br />
April 2008<br />
<strong>1632</strong> <strong>Oxygen</strong> Transmitter 55
82. Data To Print<br />
Any or all of the following values may be printed on a printer or computer connected to port 2. They may be selected<br />
or de-selected using the ‘ENTER’ buttons as in set-up step 33. The log period follows in set-up step 83.<br />
A sample of a printout is contained in Appendix 4.<br />
NOTE: If a MODBUS address other than zero is selected in Set up 88, the data log function will be disabled.<br />
For further details, see Set up 88.<br />
RS232C protocol is :<br />
Data word length Eight bits<br />
Stop bits One<br />
Parity None<br />
<strong>Oxygen</strong> is always printed (average if 2 sensors are selected), plus any of the following<br />
Options :<br />
1. Sensor 1 oxygen<br />
2. Sensor 2 oxygen<br />
3. Sensor 1 EMF<br />
4. Sensor 2 EMF<br />
5. Sensor 1 temperature<br />
6. Sensor 2 temperature, or Auxiliary temperature if 1 sensor is selected in Set up 1<br />
7. Sensor 1 impedance<br />
8. Sensor 2 impedance<br />
9. Ambient temperature<br />
10. <strong>Oxygen</strong> deficiency 1<br />
11. Combustibles %, or oxygen deficiency 2 if 2 sensors are selected in set up 1.<br />
12. CO2 theoretical maximum<br />
13. Run hours since last service<br />
14. Date of last service<br />
83. Print Log Period<br />
Select the time interval between data print outs on the printer.<br />
When the print period is selected below “1 minute”, the selection will automatically switch to “seconds”. The time can<br />
then be selected up to 120 seconds. Above 120 seconds the time will switch automatically back to minutes.<br />
NOTE: The print log could be up 2 seconds after the expected time.<br />
Range:<br />
5 to 120 seconds, 1 to 2000 minutes<br />
84. Printer Baud Rate<br />
Select the correct BAUD rate for data to be transmitted out of the port to the printer.<br />
Options:<br />
300<br />
1200<br />
2400<br />
4800<br />
9600 *<br />
85. Reference Air Selection<br />
The reference air supply for the oxygen sensor is normally supplied from the transmitter. If the internal pump is not<br />
being used, ‘External’ must be selected to stop the ‘Ref Pump Fail’ alarm. If an external air supply that has a known<br />
relative humidity, select ‘Instrument Air’. This will allow the relative humidity level to be entered in set-up 86.<br />
Less than half a litre per minute provides sufficient reference air for any sensor.<br />
Note: The reference pump will only be turned on if either probe is over 550°C and the burner is enabled.<br />
Options:<br />
Int CM-15 *<br />
Int MP-24 1.5v<br />
Int MP-24 2.0v<br />
Int MP-24 3.0v<br />
External<br />
Instrument air<br />
April 2008<br />
56 <strong>1632</strong> <strong>Oxygen</strong> Transmitter
6<br />
MAINTENANCE<br />
Section<br />
Number TRANSMITTER MAINTENANCE<br />
6.1 COLD START ................................................................................................................................60<br />
6.2 A/D CALIBRATION......................................................................................................................60<br />
6.3 D/A (4-20MA OUTPUT CHANNELS) CALIBRATION..............................................................60<br />
6.4 PUMP REPLACEMENT................................................................................................................61<br />
6.5 BACK-UP BATTERY REPLACEMENT......................................................................................61<br />
6.6 ELECTRONIC REPAIRS...............................................................................................................61<br />
PROBE MAINTENANCE<br />
6.7 INSTALLING A NEW PROBE OR SENSOR ..............................................................................62<br />
6.8 TEST EQUIPMENT REQUIRED ..................................................................................................62<br />
6.9 TESTING A PROBE OR SENSOR................................................................................................63<br />
6.10 PROBE OR SENSOR THERMOCOUPLE....................................................................................63<br />
6.11 HEATER FAILURE .......................................................................................................................63<br />
6.12 FILTER BLOCKAGE.....................................................................................................................63<br />
April 2008<br />
<strong>1632</strong> <strong>Oxygen</strong> Transmitter 59
TRANSMITTER MAINTENANCE<br />
6.1 COLD START<br />
A ‘COLD START’ will reset all ‘Set-up’ mode entries to their factory default values. ‘COLD START’ will show on<br />
the display for a second prior to a microprocessor initialising sequence, which takes about seven seconds.<br />
After a ‘COLD START’, it is necessary to set all new variables in the ‘SET-UP’ mode, including calibration voltages<br />
and time and date.<br />
To initiate a ‘COLD START’<br />
Turn the mains power off<br />
Remove the ‘COLD START LINK’ (this is located on the door PCB, next to the keyboard lock switch, behind the<br />
shield)<br />
Turn the mains power on. The message “Cold Start......” will be displayed.<br />
Leave the LINK off until the message “Replace c/s Link” is displayed. Replace the LINK.<br />
The date and version number of the software will be displayed.<br />
A ‘WARM START’, which is performed by applying power with the COLD START LINK in its place, will retain all<br />
data previously entered in the Set-up mode.<br />
6.2 A/D CALIBRATION<br />
Door Shield<br />
Reference voltage<br />
test points.<br />
Reference voltage<br />
common point.<br />
16 Way<br />
Ribbon Cable<br />
40 Way<br />
Ribbon Cable<br />
April 2008<br />
60 <strong>1632</strong> <strong>Oxygen</strong> Transmitter<br />
REF VOLTS<br />
4<br />
3<br />
2<br />
1<br />
C<br />
1630-1 PCB<br />
Location of Calibration Test Points<br />
The transmitter maintains its accuracy over a very long period by continuously checking itself against internal stabilised<br />
references. The only calibration required is to set the actual values of these references into battery backed memory.<br />
The transmitter will read these references every minute and update its zero and span correction factors. See Section<br />
5.5.7 to 10.<br />
These references should be checked every 12 months. An AUTOCAL of the analog output section should always be<br />
performed if these references are altered. See Section 6.3.<br />
6.3 D/A (4-20MA OUTPUT CHANNELS) CALIBRATION<br />
The calibration can either be done using the ‘Auto Cal’ or ‘<strong>Manual</strong> Cal’.<br />
Auto Cal<br />
The ‘Auto Cal’ mode is selected in set-up 13 (and 16 for channel 2).<br />
The transmitter will automatically divert the output back to the input, measure the offset and span, and record the<br />
calibration factors for each channel.<br />
If either of the channels are selected to be calibrated manually, an ‘Auto Cal’ will not change the factors.
<strong>Manual</strong> Cal<br />
The ‘<strong>Manual</strong> Cal’ mode is selected in set-up 13 (and 16).<br />
Set the 4mA calibration first and then the 20mA calibration.<br />
1. Select ‘Set 4mA Trim’ in set-up 13 (or 16).<br />
2. Return to RUN mode.<br />
3. Measure the output on the channel to be calibrated with a digital multimeter. If the current is not exactly<br />
4.00mA, return to set-up mode and change the 4mA calibration factor in set-up 14 (or 17).<br />
4. Re-measure the current while back in RUN mode until the current is within 3.9 to 4.1mA.<br />
5. Return to set-up mode and select ‘<strong>Manual</strong> Cal’ in set-up 13 (or 16).<br />
Set the 20mA calibration factor.<br />
6. Select ‘Set 20mA Trim’ in set-up 13 (or 16).<br />
7. Return to RUN mode.<br />
8. Measure the output on the channel to be calibrated with a digital multimeter. If the current is not exactly<br />
20.00mA, return to set-up mode and change the 20mA calibration factor in set-up 15 (or 18).<br />
9. Re-measure the current while back in RUN mode until the current is within 19.9 to 20.1mA.<br />
10. Return to set-up mode and select ‘<strong>Manual</strong> Cal’ in set-up 13 (or 16).<br />
This calibration is now saved in battery backed memory until<br />
The factors are changed in the manual calibration<br />
The transmitter is forced into a COLD-START (see section 6.1)<br />
The calibration mode in set-up 13 (or 16) is changed to Auto Cal and an Auto Cal is initiated.<br />
NOTE: The 4mA or the 20mA trim mode will only be held on the output channels for 30 minutes before automatically<br />
returning to ‘<strong>Manual</strong> Cal’ mode in set-up 13 (or 16).<br />
6.4 PUMP REPLACEMENT<br />
The reference air pump is mounted on the 1630-2 PCB in the base of the transmitter. The operation of the pump is<br />
monitored by the transmitter and alarms will be shown if a fault occurs. (“Pump Fail” alarm)<br />
To replace the pump, unplug all the field wiring terminals. i.e. Probe connectors, power connector etc.<br />
The nuts for the pump screws are captive into the PCB, enabling the pump to be removed WITHOUT removing the<br />
PCB. The pump wires can be unplugged.<br />
6.5 BACK-UP BATTERY REPLACEMENT<br />
The back-up battery is contained within the battery-like real time clock/memory module, plugged into socket M2. It is<br />
rated for an average service life of greater than ten years. The module is not re-chargeable and should be replaced<br />
every three years in a stored transmitter with power off or every eight years with transmitters that have had the power<br />
on. The memory module must be purchased from <strong>Novatech</strong> <strong>Controls</strong> or an agent of <strong>Novatech</strong> <strong>Controls</strong>.<br />
After replacing the battery, re-enter all set-up mode functions.<br />
6.6 ELECTRONIC REPAIRS<br />
Electronic schematics are included in Appendix 5. A competent electronic technician could perform troubleshooting<br />
with these schematics, aided by the transmitter self-diagnostic alarms. It is recommended that service be performed on<br />
a changeover circuit board basis. A fast turn-around or replacement service is available from <strong>Novatech</strong> or accredited<br />
service agents. Other service aids, including a test EPROM firmware package and probe input simulator are also<br />
available.<br />
There are 3 fuses on the 1630-2 (terminal) PCB. FS1 and FS2 are M205 3Amp (or 3.15Amp) fast blow and are in the<br />
input power active and neutral lines. FS3 is a PCB mounted 375mA fuse and is in series with the power transformer<br />
primary winding.<br />
If any of these fuses are blown the transmitter display will be blank.<br />
April 2008<br />
<strong>1632</strong> <strong>Oxygen</strong> Transmitter 61
6.7 INSTALLING A NEW PROBE OR SENSOR<br />
Whenever a new oxygen probe or sensor is installed, the millivolt offset value should be entered. To achieve this refer<br />
to set-up 11 (and 12 for the second sensor).<br />
The probe or sensor offset is noted on a tag or label attached to probe or sensor. To check an offset on site, the probe<br />
or sensor must be sensing air with reference air connected and allowed to settle at the operating temperature for 30<br />
minutes. Read the offset in ‘RUN’ mode in millivolts on the lower line. Offset errors can occur if the sensor does not<br />
have some air passing over it. A gentle flow of air in the calibration check port can be provided by a reference air<br />
pump or similar. If a probe is in a process with the process running, the air purge on the sensing side of the oxygen<br />
sensor will only be successful if the probe has a filter or small sensing hole. Probes with open sensing ends or with<br />
large sensing holes allow the process gas to mix with the calibration gas, giving a false reading.<br />
For heated probes or sensors, if the combustion appliance is not operational and the probe or sensor heater is<br />
interlocked with the ‘FUEL ON’ signal, the ‘BURNER BYPASS’ switch should be set to ‘BYPASS’ to power the<br />
probe or sensor heater after removing the probe or sensor from the flue. For unheated probes, the sensing tip must be<br />
raised to at least 650°C (1200°F) with a portable furnace.<br />
CAUTION DANGER<br />
Return the ‘BURNER BYPASS’ switch to normal (off) before installing the probe or sensor in the<br />
flue.<br />
6.8 TEST EQUIPMENT REQUIRED<br />
All measurements are simplified if a transmitter is connected to the probe or sensor. Readings can then be easily taken<br />
of probe or sensor impedance, EMF, temperature and percent oxygen. The transmitter also provides proper heater<br />
control for heated probes or sensors.<br />
The following tests are described using readily available workshop equipment where a transmitter is not available. If a<br />
transmitter is available the same test procedures will apply. First check all alarms on the transmitter, allowing time for<br />
the probe or sensor to heat up after switch on.<br />
An instrument to measure probe or sensor EMF and temperature is required. A 3 1/2 or 4 1/2 digit multimeter will<br />
perform both measurements.<br />
A separate temperature indicator to suit the probe or sensor thermocouple type is also useful, although not necessary.<br />
A reference air pump is required and a cylinder of calibration check gas e.g. 2 % oxygen in nitrogen. The cylinder<br />
should have a pressure and flow regulator. Both of these are inexpensive devices available from gas supply companies.<br />
The calibration check gas should be chromatograph tested to an accuracy of 0.1 % oxygen.<br />
TEST EQUIPMENT FOR UNHEATED PROBES<br />
A small test furnace capable of raising the probe tip temperature to over 700°C (1300°F) is required. The furnace<br />
should have a uniform temperature for about 50 mm (2”) either side of the sensor tip.<br />
TEST EQUIPMENT FOR HEATED PROBES OR SENSORS<br />
If a <strong>1632</strong> transmitter is available at the test location then no other equipment will be required. If not, then a controllable<br />
power source for the heater is required. A Variac (variable transformer), set to approximately 80 volts will regulate the<br />
probe or sensor temperature to over 700°C (1300°F).<br />
April 2008<br />
62 <strong>1632</strong> <strong>Oxygen</strong> Transmitter
April 2008<br />
64 <strong>1632</strong> <strong>Oxygen</strong> Transmitter
APPENDIX 1<br />
CONSTITUENT VALUES FOR FUELS<br />
If the transmitter is set up to have readout or output of combustibles or maximum carbon dioxide, then the fuel<br />
constituents must be entered. Any or all of the variables can be modified and entered in set-up steps 39 to 45 and 46 to<br />
51. (Refer to Section 5.5). Your fuel supplier or chemist should be able to give you all these values.<br />
A is the heat of combustion of the fuel per gram atom of contained carbon.<br />
H is the H/C atom ratio in the fuel.<br />
O is the O/C atom ratio in the fuel.<br />
N is the N/C atom ratio in the fuel.<br />
S is the S/C atom ratio in the fuel.<br />
M is the ratio of H2O molecules to C atoms in the fuel<br />
FUEL A H O N S M<br />
Blast Furnace Gas 50.55 0.08 1.3 3.08 b a<br />
Coke Oven Gas 256.88 5.6 0.25 0.23 b a<br />
Producer Gas 101.98 1.18 1.02 2.9 b a<br />
Natural Gas 209.9 3.86 0 0.1 0 0<br />
Propane, Natural 176.4 2.69 0 0 0 0<br />
Butane, Refinery 166.1 2.34 0 0 0 0<br />
Methanol 172.59 3.97 1 - - -<br />
Gasoline, Motor 157.58 2.01 0 0 0 0<br />
No 1 Distillate Oil 149.65 1.83 0 - 0 -<br />
No 2 Distillate Oil 145.18 1.71 - - 0 -<br />
No 4 Fuel Oil 145.54 1.6 - - 0.01 0<br />
No 5 Residual Oil 142.25 1.44 - 0 0 0<br />
No 6 Residual Oil 136.52 1.25 0.01 0 0 0<br />
Wood, Non-Resinous 110.91 2.26 1.07 0 0 c<br />
Coal, Bituminous 116.88 0.74 0.05 0 0 0.03<br />
Coal, Anthracite 104.98 0.35 0.05 0 0.01 0.04<br />
Coke 99.63 0.11 0.01 0.01 0 0.01<br />
a. The moisture level varies depending on the process details. The calculated values assume M = O.<br />
b. The sulphur level varies depending on the process details. The calculated values assume S = O.<br />
c. Variable.<br />
Values calculated from the North American Combustion Handbook, Tables 2.1a and 2.1b.<br />
April 2008<br />
<strong>1632</strong> <strong>Oxygen</strong> Transmitter 65
April 2008<br />
66 <strong>1632</strong> <strong>Oxygen</strong> Transmitter
APPENDIX 3<br />
% OXYGEN SCALE TO LOGARITHMIC<br />
OXYGEN FULL SCALE<br />
% %<br />
0.1 0<br />
0.15 7.65<br />
0.2 13.1<br />
0.3 20.7<br />
0.4 26.2<br />
0.6 33.8<br />
0.8 39.2<br />
1 43.5<br />
1.5 51.1<br />
2 56.5<br />
3 64.2<br />
4 69.6<br />
6 77.3<br />
8 82.7<br />
10 86.9<br />
12 90.4<br />
14 93.3<br />
16 95.8<br />
18 98<br />
20 100<br />
April 2008<br />
<strong>1632</strong> <strong>Oxygen</strong> Transmitter 69
April 2008<br />
70 <strong>1632</strong> <strong>Oxygen</strong> Transmitter
APPENDIX 4<br />
SAMPLE LOG PRINT OUT<br />
<strong>Novatech</strong> <strong>Controls</strong> 14-07-2005 06:14:00<br />
<strong>Oxygen</strong> % 1.86<br />
EMF 1 mV 38.0<br />
Probe Temp 458C (856F)<br />
Ambient T 21.9C (71.42F)<br />
Servc'd 13/07/05<br />
Humidity 43%<br />
Sensor 1 Imp 5.7K<br />
Next Purge at 06:00:00 17-07-2005<br />
Next Print at 06:34:00 14-07-2005<br />
06:00:11 14-07-2005 Heater 1 Fail Is Active<br />
06:00:13 14-07-2005 O2% Low Is Active<br />
02:33:17 14-07-2005 RefPump Fail Accepted<br />
April 2008<br />
<strong>1632</strong> <strong>Oxygen</strong> Transmitter 71
April 2008<br />
72 <strong>1632</strong> <strong>Oxygen</strong> Transmitter
APPENDIX 5<br />
CIRCUIT SCHEMATICS<br />
April 2008<br />
<strong>1632</strong> <strong>Oxygen</strong> Transmitter 73
April 2008<br />
74 <strong>1632</strong> <strong>Oxygen</strong> Transmitter<br />
1<br />
1<br />
2<br />
2<br />
3<br />
3<br />
4<br />
A A<br />
ADC<br />
ADC.SCH<br />
P5-[0..7]<br />
B P5-[0..7]<br />
P5-[0..7]<br />
B<br />
DACS<br />
DACS.SCH<br />
D-A2<br />
P3-0<br />
Vcc<br />
Gnd<br />
L4-[3..6]<br />
P4-[0..7]<br />
P6-[0..7]<br />
Error 01<br />
P3-2<br />
DAC-PS-[0..5]<br />
/P6-1<br />
Ser-[1..5]<br />
SVcc<br />
SVee<br />
C SVee<br />
C<br />
SVcc<br />
Ser-[1..5]<br />
/P6-1<br />
DAC-PS-[0..5]<br />
P6-[0..7]<br />
P3-[0..7]<br />
Vcc<br />
Gnd<br />
Svee<br />
SVcc<br />
D-A2<br />
P3-0<br />
Vcc<br />
Gnd<br />
L4-[3..6]<br />
P4-[0..7]<br />
P6-[0..7]<br />
Error<br />
P3-2<br />
DAC-PS-[0..5] P3-[0..7]<br />
/P6-1<br />
Ser-[1..5]<br />
D D<br />
4<br />
5<br />
5<br />
MICRO<br />
MICRO.SCH<br />
D-A2<br />
P3-0<br />
Vcc<br />
Gnd<br />
L4-[3..6]<br />
P4-[0..7]<br />
P6-[0..7]<br />
Error<br />
P3-2<br />
P3-[0..7]<br />
6<br />
6<br />
Title<br />
7<br />
<strong>Novatech</strong> <strong>Controls</strong><br />
163x <strong>Analyser</strong><br />
Size Number 1630-1<br />
Revision<br />
1.6<br />
A3 Block Diagram<br />
Date: 22/04/2008 Sheet 1of 4<br />
File: C:\Documents and Settings\..\163x-1.prj Drawn By: FHC<br />
7<br />
8<br />
8
April 2008<br />
<strong>1632</strong> <strong>Oxygen</strong> Transmitter 75<br />
1<br />
1<br />
Probe analog inputs<br />
13<br />
12<br />
4<br />
3<br />
10<br />
11<br />
2<br />
2<br />
1<br />
2<br />
P4-0<br />
P4-1<br />
3<br />
R113<br />
3<br />
250R 1%<br />
C26<br />
0.1<br />
R111<br />
C20<br />
0.1<br />
P4-7<br />
C27<br />
0.1<br />
1k5 1%<br />
C21<br />
0.1<br />
C28<br />
0.1<br />
R110<br />
C22<br />
0.1<br />
C29<br />
0.1<br />
9k1 1%<br />
C25<br />
0.1<br />
R108<br />
C31<br />
0.1<br />
4k7 1%<br />
C32<br />
0.1<br />
R106<br />
6k8 1%<br />
C24<br />
0.1<br />
4<br />
4<br />
AVcc(5)<br />
A A<br />
B<br />
C<br />
D<br />
R54<br />
Title<br />
B<br />
C<br />
D<br />
Size<br />
A3<br />
Date:<br />
File:<br />
Number Revision<br />
22/04/2008 Sheet of<br />
C:\Documents and Settings\..\Adc.sch Drawn By:<br />
10k<br />
R53 10k<br />
L4-[3..6]<br />
10k R58 1k R61<br />
R105<br />
2k2<br />
14<br />
0<br />
5<br />
1<br />
6<br />
2<br />
15<br />
3<br />
IC22<br />
74HC4316 SMD<br />
0 1 2<br />
Vcc<br />
3 Vee<br />
/En<br />
Gnd<br />
AVcc(5)<br />
16<br />
9<br />
AVee(5)<br />
7<br />
8<br />
Gnd<br />
Gnd<br />
6k8<br />
R60<br />
AVcc<br />
R57<br />
Gnd<br />
IC31<br />
1k<br />
R104 100k<br />
13<br />
X0 X<br />
R102 1k<br />
14<br />
X1<br />
R100 1k<br />
15<br />
X2 INH<br />
R98 100k<br />
12<br />
X3 A<br />
R96 1k<br />
1<br />
X4 B<br />
R94 1k<br />
5<br />
X5 C<br />
R92 1k<br />
2<br />
X6<br />
R90 1k<br />
4<br />
X7 VCC<br />
VEE<br />
GND<br />
C33 CD4051 SMD<br />
1.0/16VTant<br />
IC30<br />
R103 100k<br />
C30 1.0/16V Tant<br />
13<br />
X0 X<br />
R101 1k<br />
14<br />
X1<br />
R99 1k<br />
15<br />
X2 INH<br />
R97 100k<br />
12<br />
X3 A<br />
R95 1k<br />
1<br />
X4 B<br />
R93 1k<br />
5<br />
X5 C<br />
R91 1k<br />
2<br />
X6<br />
R89 1k<br />
4<br />
X7 VCC<br />
Gnd<br />
VEE<br />
Gnd<br />
GND<br />
CD4051 SMD<br />
R88<br />
IC29<br />
1k<br />
13<br />
X0 X<br />
R86 1k<br />
14<br />
X1<br />
R85 1k<br />
15<br />
X2 INH<br />
R84 1k<br />
12<br />
X3 A<br />
R83 1k 1<br />
X4 B<br />
R82 1k 5<br />
X5 C<br />
R80 1k 2<br />
X6<br />
R78 1k 4<br />
X7 VCC<br />
VEE<br />
GND<br />
CD4051 SMD<br />
IC28<br />
13<br />
X0 X<br />
1k<br />
14<br />
R87<br />
X1<br />
15<br />
X2 INH<br />
12<br />
X3 A<br />
1<br />
X4 B<br />
5<br />
X5 C<br />
2<br />
X6<br />
4<br />
R77 X7 VCC<br />
VEE<br />
GND<br />
CD4051 SMD<br />
3<br />
6<br />
C15 0.01uF<br />
11<br />
Gnd<br />
10<br />
9<br />
R52<br />
AVcc(5)<br />
10k AVcc<br />
16 AVee(5)<br />
7<br />
8<br />
R51<br />
1k<br />
Gnd<br />
R71 1k<br />
R67<br />
3<br />
AVee<br />
1k5<br />
R70<br />
C19<br />
6<br />
1k8<br />
0.01uF<br />
11<br />
10<br />
R69<br />
9<br />
270k<br />
Gnd<br />
AVcc(5)<br />
R56 10k<br />
16 AVee(5)<br />
7<br />
IC32 CD4051 SMD<br />
C18 0.01uF<br />
8<br />
R68 12K<br />
13<br />
3<br />
X0 X<br />
14<br />
X1<br />
Gnd<br />
15<br />
6<br />
X2 INH<br />
12<br />
11<br />
X3 A<br />
R63<br />
1<br />
10<br />
82K5 1%<br />
X4 B<br />
3<br />
5<br />
9<br />
X5 C<br />
2<br />
X6<br />
6<br />
4<br />
16<br />
X7 VCC<br />
11<br />
7<br />
VEE<br />
10<br />
8<br />
GND<br />
9<br />
Gnd<br />
AVcc(5)<br />
16 AVee(5)<br />
7<br />
8<br />
3<br />
6<br />
IC18D<br />
11<br />
10<br />
9<br />
8<br />
9<br />
AVcc(5)<br />
74HC04<br />
16<br />
7<br />
AVee(5)<br />
8<br />
P5-[0..7]<br />
1k<br />
R79 1k<br />
R81 1k<br />
AVee(5)<br />
AVcc<br />
R65<br />
47k<br />
R66<br />
12k<br />
Gnd<br />
Gnd<br />
O2 sensor #1+<br />
Probe TC +<br />
Aux TC / Sen TC #2 -<br />
CJ Ambient sensor<br />
Heater interlock<br />
Analog ground<br />
+12v analog power<br />
Trim f/b pot<br />
Burner f/b pot<br />
CO2 i/p(1637) -<br />
Cal 4-20mA signal<br />
Heater drive enable<br />
DC volts pre-regulator<br />
50/60 mains freq<br />
Rear head / RGC TC +<br />
Rear head / RGC TC -<br />
Channel #1 +p/s<br />
Channel #1 signal<br />
Channel #1 com<br />
Channel #2 signal<br />
Channel #2 +p/s<br />
Ref air pump drive (DA-1)<br />
Channel #2 com<br />
Ref air pump current<br />
/P6(1) Clock<br />
-12v Analog power<br />
+12v Analog power<br />
+5 Digital power<br />
R59<br />
1k<br />
AVee(5)<br />
R76<br />
100k<br />
R45 100k R42<br />
Gnd<br />
10k<br />
Gnd<br />
C10<br />
Gnd<br />
10/16V Tant<br />
Gnd<br />
R12<br />
Gnd<br />
250R<br />
C16<br />
270p npo<br />
P5-2<br />
AVee<br />
P5-3<br />
P5-4<br />
OPA4234UA<br />
12 IC26D<br />
14<br />
13<br />
OPA4234UA<br />
3<br />
IC26A<br />
OPA4234UA<br />
1<br />
5 IC26B<br />
2<br />
7<br />
6<br />
OPA4234UA<br />
10 IC26C<br />
P5-2<br />
8<br />
P5-3<br />
9<br />
P5-4<br />
Gnd<br />
R75 10k<br />
IC34A<br />
74HC14 SMD<br />
74HC14 SMD 3 4<br />
1 2<br />
Gnd<br />
IC34B<br />
P5-2<br />
P5-3<br />
P5-4<br />
R74 2k2<br />
AVee(5)<br />
Gnd<br />
R73 220k<br />
Gnd<br />
IC27<br />
12<br />
13<br />
P5-2<br />
3<br />
4<br />
P5-3 P5-5<br />
P5-4<br />
11<br />
10<br />
R55 1<br />
2<br />
Gnd<br />
74HC4316 SMD<br />
AVcc(5)<br />
10k<br />
C13 0.1<br />
Gnd<br />
L4-3<br />
L4-6<br />
L4-5<br />
L4-4<br />
C54<br />
0.1<br />
Gnd<br />
C14<br />
.001uF<br />
1<br />
14<br />
- i/p<br />
+ i/p<br />
IC23<br />
VFC-32<br />
7<br />
Fout<br />
11<br />
Com<br />
P3-0<br />
CN5<br />
1<br />
2<br />
CO2 signal + (1637)<br />
3<br />
CO2 signal - (1637)<br />
4<br />
O2 sensor #2+<br />
5<br />
O2 sensor #2-<br />
6<br />
7<br />
O2 sensor #1-<br />
8<br />
9<br />
Probe TC -<br />
10<br />
Aux TC / Sen TC #2 + 11<br />
12<br />
13<br />
14<br />
15<br />
16<br />
16PIN<br />
CN4<br />
1<br />
2<br />
3<br />
4<br />
CO2 i/p (1637) +<br />
5<br />
6<br />
7<br />
8<br />
9<br />
10<br />
11<br />
12<br />
13<br />
14<br />
15<br />
16<br />
17<br />
18<br />
19<br />
20<br />
+12v Serial coms power<br />
21<br />
Ext Ref Air Flow Sens<br />
22<br />
-12v Serial coms power<br />
23<br />
Serial latch o/p enable<br />
24<br />
Watchdog relay drive<br />
25<br />
Serial common (Ser5)<br />
26<br />
RS-232 Rx (Ser1)<br />
27<br />
RS-232 Tx (Ser2)<br />
28<br />
RS-485 + (Ser4)<br />
29<br />
RS-485 - (Ser3)<br />
30<br />
31<br />
32<br />
P6(4) Dig o/p data<br />
33<br />
34<br />
P6(5) Dig o/p latch<br />
35<br />
Analog Com<br />
36<br />
P6(6) Dig i/p data<br />
37<br />
38<br />
P6(7) Dig i/p load/shift<br />
39<br />
Digital Com<br />
40<br />
40 PIN box header<br />
0.1 C49<br />
Gnd<br />
Gnd<br />
Gnd<br />
C35<br />
0.1<br />
Gnd<br />
DAC-PS-0<br />
C57<br />
DAC-PS-1<br />
0.1<br />
DAC-PS-2<br />
DAC-PS-3<br />
DAC-PS-4<br />
D-A2<br />
DAC-PS-5<br />
P4-6<br />
SVcc<br />
SVcc<br />
SVee<br />
SVee<br />
Gnd<br />
Error<br />
Error<br />
Ser-5<br />
P3-2<br />
Ser-1<br />
Ser-2<br />
DAC-PS-[0..5]<br />
DAC-PS-[0..5]<br />
Ser-4<br />
Ser-3<br />
/P6-1<br />
Ser-[1..5]<br />
Ser-[1..5]<br />
P6-4<br />
/P6-1<br />
P6-5<br />
IC36<br />
P6-6<br />
AVcc 78L05<br />
Avcc(5)<br />
I O<br />
P6-7<br />
P6-[0..7]<br />
C38<br />
P6-[0..7]<br />
0.1<br />
Gnd<br />
AVee<br />
AVcc<br />
Vcc<br />
AVee<br />
C37 Avee(5)<br />
Vcc<br />
0.1<br />
Vcc<br />
I O<br />
Gnd<br />
Gnd<br />
C39<br />
Gnd<br />
1.0/16V Tant IC35<br />
79L05<br />
Gnd<br />
R116 1k<br />
Gnd<br />
C52<br />
0.1<br />
C50<br />
Gnd<br />
0.1<br />
Gnd<br />
R115 1k<br />
C53<br />
0.1<br />
Gnd<br />
Gnd<br />
R72<br />
12K<br />
C23<br />
0.1<br />
C34<br />
Gnd<br />
10/16V Tant<br />
Gnd<br />
R107<br />
1k<br />
Vcc C11<br />
1uF non polar<br />
Gnd<br />
Gnd<br />
IC24A<br />
R41<br />
3<br />
OPA2132 RH sensor<br />
1<br />
2<br />
AVee(5)<br />
R50<br />
10k<br />
IC24B<br />
R62 6 OPA2132<br />
10k<br />
7<br />
5<br />
Gnd<br />
AVee(5) Vcc<br />
Gnd<br />
P4-[0..7]<br />
P4-[0..7]<br />
IC34F<br />
74HC14 SMD<br />
13<br />
12<br />
Vcc<br />
IC34C<br />
74HC14<br />
5 6<br />
Gnd<br />
<strong>Novatech</strong> <strong>Controls</strong><br />
163x <strong>Analyser</strong><br />
P5-0<br />
P5-1<br />
R64 2.5v<br />
100k<br />
C12<br />
10/16V Tant<br />
Gnd<br />
P4-2<br />
1630-1<br />
1.6<br />
Input MUX's, ADC and RH sensor<br />
2 4<br />
FHC<br />
Gnd<br />
4k7<br />
1k2<br />
R118<br />
R117<br />
Gnd<br />
IC33<br />
LM336M-2.5<br />
C58<br />
Gnd 0.1<br />
C60<br />
0.01uF<br />
Gnd<br />
Vcc<br />
Gnd<br />
L4-[3..6]<br />
C41<br />
0.1<br />
C42<br />
0.1<br />
C43<br />
0.1<br />
C44<br />
0.1<br />
C<br />
C45<br />
0.1<br />
C<br />
C46<br />
0.1<br />
C47<br />
0.1<br />
C40<br />
0.1<br />
C48<br />
0.1<br />
C55<br />
0.1<br />
C56<br />
C59<br />
0.1<br />
0.1<br />
4 8<br />
P4-3<br />
P5-[0..7]<br />
5<br />
5<br />
C51<br />
0.1<br />
7 14<br />
4<br />
11<br />
8<br />
4<br />
6<br />
6<br />
13<br />
7<br />
Vo<br />
Vee<br />
Comp i/p<br />
Vcc<br />
Cap<br />
4<br />
15<br />
6<br />
5<br />
14<br />
3<br />
2<br />
1<br />
0<br />
Gnd<br />
/En<br />
Vee 3<br />
Vcc<br />
8<br />
7<br />
10<br />
9<br />
16<br />
7<br />
12<br />
0<br />
1<br />
2<br />
5<br />
8<br />
8
April 2008<br />
76 <strong>1632</strong> <strong>Oxygen</strong> Transmitter<br />
1<br />
1<br />
2<br />
2<br />
3<br />
3<br />
-<br />
4<br />
A<br />
Probe +<br />
Probe -<br />
Probe TC+<br />
Probe TC-<br />
TC2 / Aux +<br />
TC2 / Aux -<br />
+12v supply out<br />
1<br />
2<br />
3<br />
4<br />
5<br />
6<br />
7<br />
CN7<br />
1<br />
2<br />
3<br />
4<br />
5<br />
6<br />
7<br />
1M R3<br />
R12 10M<br />
LM35 IC1<br />
+ T<br />
CN2<br />
1<br />
2<br />
3<br />
4<br />
5<br />
6<br />
7<br />
8<br />
9<br />
10<br />
11<br />
12<br />
13<br />
14<br />
15<br />
CN?<br />
12v 1<br />
Signal 2<br />
Common 3<br />
CN14<br />
1<br />
2<br />
3<br />
4<br />
5<br />
6<br />
7<br />
8<br />
9<br />
10<br />
Unreg +12v<br />
+5v<br />
Dig com<br />
Dig com<br />
Signal +<br />
Signal -<br />
Analog com<br />
Analog com<br />
+12v<br />
-12v<br />
A<br />
1M R11<br />
16<br />
Burner Feedback Transducer<br />
B<br />
RGC I/P +<br />
RGC I/P -<br />
Sensor #2 +<br />
Sensor #2 -<br />
Purge flow sw<br />
Purge flow sw<br />
Fuel 1/2<br />
Fuel 1/2<br />
Remote alarm reset<br />
Remote alarm reset<br />
Burner on i/p<br />
Burner on i/p<br />
8<br />
9<br />
10<br />
11<br />
12<br />
13<br />
14<br />
15<br />
16<br />
17<br />
18<br />
19<br />
CN6<br />
1<br />
2<br />
3<br />
4<br />
5<br />
6<br />
7<br />
8<br />
9<br />
10<br />
11<br />
12<br />
D1<br />
AGnd<br />
10M R9<br />
R1<br />
R10<br />
1M<br />
10k<br />
R7<br />
R5<br />
CON-PH3.8-2<br />
135-102DAG-J01 CN8<br />
AVee<br />
2<br />
Ref Air Flow Sensor 38<br />
AVcc<br />
1<br />
TH1 37<br />
10k<br />
R6 10k<br />
10k<br />
R1510k<br />
Vcc<br />
R13 R14<br />
10k<br />
10k<br />
L2-4<br />
L2-[0..7]<br />
16 PIN IDC crimp/solder<br />
L2-1<br />
L2-6<br />
L2-2<br />
HtrEn<br />
PreReg<br />
50/60Hz<br />
Ch#2Sig<br />
Sensor #2<br />
D1Vcc<br />
D1Gnd<br />
D2Vcc<br />
CN1<br />
1<br />
2<br />
3<br />
4<br />
5<br />
6<br />
7<br />
8<br />
9<br />
10<br />
11<br />
12<br />
13<br />
14<br />
15<br />
16<br />
17<br />
18<br />
B<br />
SVcc<br />
D2Gnd<br />
P4-6<br />
SerPS3<br />
19<br />
20<br />
21<br />
RS-232 Rx<br />
RS-232 Tx<br />
Network -<br />
Network +<br />
Serial port common<br />
20<br />
21<br />
22<br />
23<br />
24<br />
CN5<br />
1<br />
2<br />
3<br />
4<br />
5<br />
SVee<br />
SerPS1<br />
22<br />
23<br />
24<br />
25<br />
26<br />
27<br />
28<br />
29<br />
30<br />
Output #1+<br />
Output #1 -<br />
Output #2 +<br />
Output #2 -<br />
25<br />
26<br />
27<br />
28<br />
CN4<br />
1<br />
2<br />
3<br />
4<br />
FBR-46D005P<br />
RL2 Vcc<br />
D3 1N4004<br />
BC550<br />
TR4<br />
OutputCh#1+<br />
OutputCh#1-<br />
OutputCh#2+<br />
OutputCh#2-<br />
R38 L5-0<br />
4-20mA DRIVERS<br />
4-20DRV.SCH<br />
OutputCh#1+<br />
OutputCh#1- 4-20CalSig+<br />
OutputCh#2+ 4-20CalSig-<br />
OutputCh#2- Ch#1Sig<br />
SerPS[1..3] Ch#2Sig<br />
4-20CalSig+<br />
4-20CalSig-<br />
Ch#1Sig<br />
AVee<br />
AVcc<br />
AGnd<br />
Vcc<br />
P6-4<br />
P6-5<br />
P6-6<br />
P6-7<br />
31<br />
32<br />
33<br />
34<br />
35<br />
36<br />
37<br />
38<br />
39<br />
40<br />
C<br />
Com alarm<br />
Com alarm<br />
Alarm relay #2<br />
Alarm relay #2<br />
Alarm relay #3<br />
Alarm relay #3<br />
Alarm relay #4<br />
Alarm relay #4<br />
29<br />
30<br />
31<br />
32<br />
33<br />
34<br />
35<br />
36<br />
CN3<br />
1<br />
2<br />
3<br />
4<br />
5<br />
6<br />
7<br />
8<br />
Vcc<br />
RL6<br />
D? 1N4004<br />
Vcc<br />
RL1<br />
D? 1N4004<br />
TR?<br />
BC550<br />
TR?<br />
BC550<br />
10k<br />
R31<br />
10k<br />
TR3 BC550<br />
R? 10k<br />
R? 10k<br />
L5-1<br />
L5-2<br />
L5-[0..5]<br />
DIGITAL LATCHES<br />
40 pin IDC crimp/solder<br />
C<br />
Vcc<br />
RL5<br />
D? 1N4004<br />
TR?<br />
BC550<br />
R? 10k<br />
L5-3<br />
L5-[0..5]<br />
DIGIO.SCH<br />
L2-[0..3]<br />
L5-[0..5]<br />
Senable-1<br />
/P6-1<br />
Senable-1<br />
/P6-1<br />
Purge solenoid<br />
Purge solenoid<br />
Cal 1 solenoid<br />
Cal 1 solenoid<br />
Cal 2 solenoid<br />
Cal 2 solenoid<br />
41<br />
42<br />
43<br />
44<br />
45<br />
46<br />
CN11<br />
6<br />
5<br />
4<br />
3<br />
2<br />
1<br />
Sol1<br />
Sol2<br />
Sol3<br />
Sol4<br />
POWER SUPPLY<br />
POWER.SCH<br />
L2-[0..7]<br />
L6-[0..7]<br />
HtrEn<br />
Error<br />
L6-[0..7]<br />
Error<br />
L6-[0..7]<br />
P6-[0..7]<br />
P6-[0..7]<br />
D<br />
Probe heater #1<br />
Probe heater #1<br />
Probe heater #2<br />
Probe heater #2<br />
Mains Active<br />
Mains Neutral<br />
Mains Earth<br />
CN10<br />
51 2<br />
52 1<br />
CN15<br />
53 2<br />
54 1<br />
CN12<br />
50 1<br />
49 2<br />
3<br />
47 4<br />
0.022uF/240V<br />
HV5<br />
HV4<br />
HV6<br />
HV1<br />
HV2<br />
0.022uF/240V<br />
Sol[1..4]<br />
HV[1..6]<br />
Sol[1..4]<br />
HV[1..6]<br />
Unreg<br />
DA-2<br />
PreReg<br />
P4-5<br />
50/60Hz<br />
SerPS[1..3]<br />
Unreg<br />
DA-2<br />
PreReg<br />
P4-5<br />
50/60Hz<br />
SerPS[1..3]<br />
Title<br />
Size<br />
A3<br />
Date:<br />
File:<br />
<strong>Novatech</strong> <strong>Controls</strong><br />
163x <strong>Analyser</strong><br />
Number<br />
1630-2<br />
Revision<br />
1.5<br />
Terminal allocation, Block diagram<br />
22/04/2008 Sheet 1 of 4<br />
C:\Documents and Settings\..\163x-2.prj Drawn By: FHC<br />
D<br />
C30<br />
C29<br />
4<br />
5<br />
5<br />
6<br />
6<br />
SerPS2<br />
7<br />
7<br />
8<br />
8
April 2008<br />
<strong>1632</strong> <strong>Oxygen</strong> Transmitter 77<br />
1<br />
1<br />
2<br />
2<br />
3<br />
3<br />
4<br />
A A<br />
4-20CalSig+<br />
4-20CalSig+<br />
IC6B<br />
B<br />
4-20CalSig-<br />
OutputCh#1+<br />
OutputCh#1-<br />
OutputCh#2+<br />
OutputCh#2-<br />
4-20CalSig-<br />
OutputCh#1+<br />
OutputCh#1-<br />
OutputCh#2+<br />
FBR-46D005P<br />
220K R39<br />
R19 220K R23<br />
100R<br />
220K R20<br />
Ch#1 -12<br />
5<br />
7<br />
6<br />
LM358<br />
R26<br />
220KC7<br />
B<br />
Ch#1Sig<br />
Ch#2Sig<br />
Ch#1Sig<br />
Ch#2Sig<br />
3mm LED<br />
LED2<br />
D1Vee<br />
0.1uF<br />
D2Vcc<br />
R34<br />
1M<br />
D1Gnd<br />
Ch#2 +12<br />
Ch#2 Com<br />
L5-[0..7]<br />
L5-[0..7]<br />
L5-4<br />
L5-5<br />
OutputCh#2-<br />
R4<br />
47R<br />
C FBR-46D005P<br />
C<br />
D D<br />
4<br />
RL4<br />
RL3<br />
R17<br />
100R<br />
LED1<br />
3mm LED<br />
5<br />
TR2<br />
BD139<br />
TR1<br />
BD139<br />
R33 220K<br />
R22 220K<br />
R18 220K<br />
Ch#2 -12<br />
5<br />
D2Vee<br />
Ch#1 +12<br />
Ch#1 com<br />
LM358<br />
1<br />
LM358<br />
1<br />
5<br />
6<br />
8<br />
4<br />
8<br />
4<br />
IC5B<br />
LM358<br />
R25 220K<br />
D1Vcc<br />
D1Gnd<br />
IC6A<br />
3<br />
Ch#1 sig<br />
2<br />
D2Gnd<br />
IC5A<br />
3<br />
Ch#2 sig<br />
2<br />
7<br />
0.1uF<br />
C6<br />
6<br />
R32<br />
1M<br />
6<br />
D2Gnd<br />
Title<br />
7<br />
<strong>Novatech</strong> <strong>Controls</strong><br />
163x <strong>Analyser</strong><br />
Size Number 1630-2<br />
Revision<br />
1.5<br />
A3 4-20mA Output Drivers<br />
Date: 22/04/2008 Sheet 3of 4<br />
File: C:\Documents and Settings\..\4-20drv.sch Drawn By: FHC<br />
7<br />
8<br />
8
April 2008<br />
78 <strong>1632</strong> <strong>Oxygen</strong> Transmitter<br />
1<br />
1<br />
2<br />
2<br />
SVcc(5)<br />
3<br />
3<br />
4<br />
Vcc<br />
R22<br />
1K<br />
D1<br />
BAV99<br />
Ser-1<br />
Ser-2<br />
RS-232 Rx<br />
RS-232 Tx<br />
A<br />
P3-5<br />
P3-7<br />
R32<br />
470R<br />
R36<br />
470R<br />
SVcc(5)<br />
1<br />
4<br />
3<br />
5<br />
OP7 SGnd<br />
PC-400<br />
SVcc(5)<br />
1<br />
4<br />
3<br />
5<br />
SVcc(5)<br />
R18<br />
1k<br />
R28<br />
SGnd<br />
2k2<br />
R20<br />
SVcc<br />
27k<br />
LM1458<br />
LED1<br />
IC8B<br />
SGnd<br />
6<br />
7<br />
5<br />
SVcc(5)<br />
SVcc(5)<br />
47k<br />
R14<br />
10k<br />
R27<br />
IC5<br />
4<br />
SP485CS Tx<br />
Tx<br />
3<br />
6<br />
TXen NET+<br />
2<br />
7<br />
/RXen NET-<br />
1<br />
Rx<br />
R8<br />
1k<br />
LK2<br />
2<br />
1<br />
LINK-2<br />
R13<br />
10k<br />
R7<br />
100R<br />
R119<br />
470<br />
SVcc(5)<br />
Ser-3<br />
Ser-4<br />
Ser-5<br />
Net -<br />
RS-232 Tx<br />
Net +<br />
RS-232 Com<br />
+12 Isolated<br />
RS-485 Dir<br />
RS-232 Rx<br />
Network -<br />
Network +<br />
Serial port common<br />
Ser-[1..5]<br />
CN1<br />
1<br />
2<br />
3<br />
4<br />
5<br />
6<br />
7<br />
8<br />
9<br />
10<br />
Ser-[1..5]<br />
A<br />
Gnd<br />
OP6<br />
PC-400<br />
SGnd<br />
SGnd<br />
SGnd<br />
CON-10<br />
Vcc SGnd<br />
Vcc<br />
100k<br />
R19<br />
SVcc<br />
B<br />
P3-4<br />
R35<br />
IC10C<br />
1K<br />
6<br />
5<br />
4<br />
R1<br />
5<br />
74HC04<br />
1k<br />
OP5<br />
PC-400<br />
Vcc<br />
Gnd<br />
LED2<br />
RX<br />
1<br />
3 R21<br />
1k<br />
SGnd<br />
LK3<br />
RS-485 RS-232<br />
1<br />
3<br />
2<br />
LM1458<br />
IC8A<br />
SVee<br />
R25<br />
10k<br />
SGnd<br />
R26<br />
47k<br />
SVee<br />
SVcc(5)<br />
SVee<br />
C1<br />
0.1<br />
SVee<br />
IC4<br />
LM340L-05<br />
O I<br />
SGnd<br />
SVee<br />
SVcc<br />
SVcc<br />
SVcc<br />
C5<br />
10/25V Tant<br />
B<br />
SGnd<br />
SGnd<br />
P3-[0..7]<br />
R3<br />
DAC-PS-1<br />
TR1<br />
BC817<br />
10K<br />
P3-[0..7]<br />
P3-3 PWM output<br />
1K<br />
R30<br />
1<br />
3<br />
4<br />
5<br />
IC7<br />
LM336M-2.5<br />
C3<br />
10/16V Tant<br />
C6<br />
10/16V Tant<br />
C /P6-1<br />
/P6-1<br />
Vcc<br />
Gnd OP4<br />
PC-400<br />
C<br />
DAC-PS-2<br />
P6-[0..7]<br />
7 14<br />
6<br />
6<br />
R29<br />
220R<br />
6<br />
R24<br />
220R<br />
6<br />
3<br />
2<br />
1<br />
6<br />
R4<br />
6k8<br />
4<br />
7 14<br />
13<br />
8<br />
Vcc<br />
Gnd<br />
5<br />
74HC14<br />
8<br />
4<br />
12<br />
4 8<br />
4 8<br />
R5<br />
10K<br />
P6-1<br />
P6-2<br />
Clock<br />
DAC data<br />
13<br />
11<br />
12<br />
74HC04<br />
IC10F<br />
10<br />
1<br />
3<br />
OP3<br />
PC-400<br />
1<br />
4<br />
5<br />
4<br />
R111K<br />
IC6C<br />
1<br />
IC6A<br />
74HC14<br />
2<br />
IC6D<br />
R2<br />
4K7<br />
IC1<br />
MAX538<br />
6<br />
REFin<br />
Dout<br />
4<br />
IC3<br />
LM340L-05<br />
DAC-PS-4<br />
O I<br />
0.1<br />
C2<br />
C4<br />
10/25V Tant<br />
74HC04<br />
Vcc IC10E<br />
3<br />
OP2<br />
PC-400<br />
5<br />
74HC14<br />
5<br />
9<br />
6<br />
8<br />
74HC14<br />
IC6E<br />
1<br />
2<br />
Din<br />
CLK Vout<br />
7<br />
DAC-PS-3<br />
P6-3 DAC cs 1 2<br />
220R<br />
1<br />
3<br />
4<br />
5<br />
1K<br />
R10<br />
11<br />
10<br />
74HC14<br />
3<br />
/CS<br />
D<br />
P6-[0..7]<br />
74HC04<br />
IC10A<br />
Gnd<br />
IC10D<br />
9<br />
8<br />
R23 OP1<br />
PC-400<br />
IC10B<br />
3 4<br />
74HC04<br />
1K<br />
R9<br />
3<br />
IC2<br />
LM336M-2.5<br />
4<br />
IC37<br />
LTC1257<br />
6<br />
REF<br />
2<br />
Din<br />
Dout<br />
4<br />
DAC-PS-5<br />
DAC-PS-[0..5]<br />
D<br />
74HC04<br />
74HC14<br />
IC6B<br />
1<br />
CLK Vout<br />
7<br />
Title<br />
IC6F<br />
3<br />
/LOAD<br />
6<br />
6<br />
5<br />
5<br />
8<br />
Vdd<br />
Agnd<br />
5<br />
8<br />
Vcc<br />
Gnd<br />
5<br />
C<br />
6<br />
DAC-PS-0<br />
6<br />
C<br />
DAC-PS-[0..5]<br />
7<br />
<strong>Novatech</strong> <strong>Controls</strong><br />
163x <strong>Analyser</strong><br />
Size Number 1630-1<br />
Revision<br />
1.6<br />
A3 Serial interface and D/A converters<br />
Date: 22/04/2008 Sheet 3of 4<br />
File: C:\Documents and Settings\..\Dacs.sch Drawn By: FHC<br />
7<br />
8<br />
8
April 2008<br />
<strong>1632</strong> <strong>Oxygen</strong> Transmitter 79<br />
1<br />
1<br />
2<br />
2<br />
3<br />
3<br />
4<br />
LCD1<br />
LCD-LM16A21<br />
A<br />
IC18C<br />
5 6<br />
1<br />
2<br />
3<br />
4<br />
5<br />
6<br />
LGnd<br />
Vcc<br />
V1<br />
RSel<br />
R/W<br />
E<br />
Gnd<br />
Gnd<br />
Gnd<br />
30<br />
31<br />
32<br />
33<br />
A<br />
B<br />
C<br />
R44<br />
2<br />
1<br />
3<br />
IC15A<br />
74HC02 SMD<br />
74HC02 SMD<br />
8<br />
10<br />
9<br />
IC15C<br />
1<br />
2<br />
3<br />
4<br />
IC16<br />
8<br />
5<br />
6<br />
11 74HC30 SMD<br />
12<br />
IC17A<br />
2<br />
4<br />
A Y0<br />
3<br />
5<br />
B Y1<br />
6<br />
Y2<br />
1<br />
7<br />
E Y3<br />
74HC139 SMD<br />
74HC04 SMD<br />
13<br />
12<br />
74HC04 SMD<br />
IC18F<br />
IC19B 74HC139 SMD<br />
14<br />
12<br />
A Y0<br />
13<br />
11<br />
B Y1<br />
10<br />
Y2<br />
15<br />
9<br />
E Y3<br />
2<br />
4<br />
A Y0<br />
3<br />
5<br />
B Y1<br />
6<br />
Y2<br />
1<br />
7<br />
E Y3<br />
IC19A 74HC139 SMD<br />
IC12<br />
10<br />
A0<br />
9<br />
A1<br />
8<br />
A2<br />
7<br />
A3<br />
6<br />
A4<br />
5<br />
11 D0<br />
A5 DO<br />
4<br />
12 D1<br />
A6 D1<br />
3<br />
13 D2<br />
A7 D2<br />
25<br />
15 D3<br />
A8 D3<br />
24<br />
16 D4<br />
A9 D4<br />
21<br />
17 D5<br />
A10 D5<br />
23<br />
18 D6<br />
A11 D6<br />
2<br />
19 D7<br />
A12 D7<br />
26<br />
A13<br />
27<br />
A14<br />
1<br />
A15<br />
20<br />
/CS<br />
22<br />
OE/VPP<br />
27C512<br />
IC13<br />
10<br />
A0<br />
9<br />
A1<br />
8<br />
A2<br />
7<br />
A3<br />
6<br />
A4<br />
5<br />
11<br />
A5 DO<br />
4<br />
12<br />
A6 DI<br />
3<br />
13<br />
A7 D2<br />
25<br />
15<br />
A8 D3<br />
24<br />
16<br />
A9 D4<br />
21<br />
17<br />
A10 D5<br />
23<br />
18<br />
A11 D6<br />
2<br />
19<br />
A12 D7<br />
26<br />
A13<br />
1<br />
A14<br />
IC20<br />
3<br />
2<br />
7<br />
D0 Q0<br />
LD0<br />
4<br />
5<br />
8<br />
D1 Q1<br />
LD1<br />
7<br />
6<br />
9<br />
D2 Q2<br />
LD2<br />
8<br />
9<br />
10<br />
D3 Q3<br />
LD3<br />
13<br />
12<br />
11<br />
D4 Q4<br />
LD4<br />
14<br />
15<br />
12<br />
D5 Q5<br />
LD5<br />
17<br />
16<br />
13<br />
D6 Q6<br />
LD6<br />
18<br />
19<br />
14<br />
D7 Q7<br />
LD7<br />
1<br />
OE<br />
11<br />
CLK<br />
74HC374 SMD<br />
IC14<br />
3<br />
2<br />
D0 Q0<br />
4<br />
5<br />
D1 Q1<br />
7<br />
6<br />
D2 Q2<br />
8<br />
9<br />
D3 Q3<br />
13<br />
12<br />
D4 Q4<br />
14<br />
15<br />
D5 Q5<br />
17<br />
16<br />
D6 Q6<br />
18<br />
19<br />
D7 Q7<br />
1<br />
OE<br />
11<br />
CLK<br />
74HC374 SMD<br />
IC25<br />
2<br />
3<br />
Q0 D0<br />
5<br />
4<br />
Q1 D1<br />
6<br />
7<br />
Q2 D2<br />
9<br />
8<br />
Q3 D3<br />
12<br />
13<br />
Q4 D4<br />
15<br />
14<br />
Q5 D5<br />
16<br />
17<br />
Q6 D6<br />
19<br />
18<br />
Q7 D7<br />
1<br />
OE<br />
11<br />
LE<br />
74HC373 SMD<br />
B<br />
C<br />
47K<br />
Vcc<br />
Vcc<br />
Gnd<br />
Vcc<br />
A0<br />
LCD-R/W<br />
R38<br />
4k7 TR4<br />
BC817<br />
20<br />
/WR<br />
23<br />
SYNC<br />
24<br />
RESETout<br />
67<br />
D-A1<br />
66<br />
D-A2<br />
P3-0 3<br />
P3(0) EV1<br />
P3-1 2<br />
P3(1) EV2<br />
P3-2 79<br />
P3(2) EV3<br />
P3-3 78<br />
P3(3) PWMout<br />
P3-4 77<br />
P3(4) RxD<br />
P3-5 76<br />
P3(5) TxD<br />
P3-6 75<br />
P3(6) Sclk<br />
P3-7 74<br />
P3(7) Srdy<br />
R/W<br />
31<br />
Cold start Link<br />
PH<br />
P4-0 65<br />
40 D0<br />
P4(0) AN0<br />
D0<br />
P4-1 64<br />
39 D1<br />
P4(1) AN1<br />
D1<br />
P4-2 63<br />
38 D2<br />
P4(2) AN2<br />
D2<br />
P4-3 62<br />
37 D3<br />
Vcc<br />
P4(3) AN3<br />
D3<br />
P4-4 61<br />
36 D4<br />
P4(4) AN4<br />
D4<br />
P4-4<br />
P4-5 60<br />
35 D5<br />
P4(5) AN5<br />
D5<br />
59<br />
34 D6<br />
P4(6) AN6<br />
D6<br />
Gnd<br />
P4-7 58<br />
33 D7<br />
P4(7) AN7<br />
D7<br />
68<br />
Vcc<br />
DA-Vref<br />
P5-0 11<br />
P6-0<br />
2K2 R16<br />
P5(0)<br />
P5-1 10<br />
P6-1<br />
4 8<br />
P5(1)<br />
Gnd<br />
P5-2 9<br />
17 P6-2<br />
IC9<br />
P5(2)<br />
INT3 P6(2)<br />
P5-3 8<br />
16 P6-3<br />
LM336M-2.5<br />
P5(3)<br />
P6(3)<br />
P5-4 7<br />
15 P6-4<br />
P5(4)<br />
P6(4)<br />
P5-5 6<br />
14 P6-5<br />
P5(5)<br />
P6(5)<br />
P5-6 5<br />
13 P6-6<br />
P5(6)<br />
P6(6)<br />
P5-7 4<br />
12 P6-7<br />
P5(7)<br />
P6(7)<br />
69<br />
26<br />
XL1 10.0Mhz low profile<br />
AD-Vref<br />
/RESET<br />
28<br />
21<br />
Xin<br />
/RD<br />
29<br />
Xout<br />
R40<br />
1M<br />
C9 C7<br />
6p8 6p8<br />
Gnd<br />
Gnd<br />
M1<br />
Gnd DS1994<br />
Vcc CN2<br />
D0<br />
1 2<br />
D1<br />
R/W<br />
3 4<br />
D2<br />
/PH<br />
5 6<br />
D3<br />
A0<br />
7 8<br />
A0<br />
D4<br />
A1<br />
9 10<br />
A1<br />
D5<br />
A3<br />
11 12<br />
A2<br />
D6<br />
A2<br />
13 14<br />
A3<br />
D7<br />
15 16<br />
A4<br />
A4<br />
17 18<br />
A5<br />
A5<br />
19 20<br />
A6<br />
A7<br />
20 PIN (pin header)<br />
A8<br />
A9<br />
A10<br />
A11<br />
A12<br />
LK4<br />
A13<br />
A B<br />
A14<br />
A15<br />
A14<br />
R/W<br />
PH<br />
Gnd<br />
A15<br />
A13<br />
A14<br />
A8<br />
A9<br />
A10<br />
A11<br />
A12<br />
A7<br />
5<br />
4 LCD-R/W<br />
6<br />
IC15B<br />
74HC02 SMD Vcc<br />
R49<br />
10k<br />
7<br />
Clk<br />
6<br />
1<br />
o/p Sw-in<br />
LK5<br />
1<br />
IC21<br />
TC1232COA<br />
2<br />
Gnd<br />
Gnd<br />
/PH<br />
PH<br />
A6<br />
A5<br />
A3<br />
A4<br />
A0<br />
A1<br />
A2<br />
A3<br />
A4<br />
A5<br />
A6<br />
A7<br />
A8<br />
A9<br />
A10<br />
A11<br />
A12<br />
A13<br />
A14<br />
A15<br />
A0<br />
A1<br />
A2<br />
A3<br />
A4<br />
A5<br />
D0<br />
A6<br />
D1<br />
A7<br />
D2<br />
A8<br />
D3<br />
A9<br />
D4<br />
A10<br />
D5<br />
A11<br />
D6<br />
A12<br />
D7<br />
A13<br />
A14<br />
TR3<br />
D7<br />
R37<br />
BC817<br />
D5<br />
4k7<br />
D3<br />
D1<br />
D0<br />
D2<br />
D4<br />
D6<br />
Gnd<br />
Vcc<br />
Gnd<br />
D7<br />
D5<br />
L4-5<br />
D3<br />
L4-3<br />
D1<br />
D0<br />
D2<br />
D4<br />
L4-4<br />
D6<br />
L4-6<br />
R31<br />
1K<br />
Gnd<br />
Latch 4<br />
TR2<br />
1FC0<br />
L4-[3..6]<br />
BC817<br />
D7<br />
Gnd<br />
D5<br />
D3<br />
D1<br />
D0<br />
D2<br />
D4<br />
D6<br />
Vcc<br />
10K 9 PIN<br />
SIP4<br />
1FF0<br />
Vcc<br />
Latch 1<br />
22<br />
P3-0<br />
P5-[0..7]<br />
D2<br />
P5-[0..7]<br />
Vcc<br />
LED4<br />
INC<br />
LED3<br />
DEC<br />
BAV99<br />
C8<br />
Vcc<br />
D4<br />
D0<br />
D1<br />
D2<br />
D3<br />
Gnd<br />
Gnd<br />
R34<br />
1k<br />
R33<br />
1k<br />
Gnd<br />
10/16V Tant<br />
57<br />
A0<br />
56<br />
A1<br />
55<br />
A2<br />
54<br />
A3<br />
53<br />
A4<br />
52<br />
A5<br />
51<br />
A6<br />
50<br />
A7<br />
49<br />
D-A2<br />
A8<br />
48<br />
A9<br />
47<br />
A10<br />
46<br />
A11<br />
45<br />
A12<br />
44<br />
A13<br />
43<br />
P3-0<br />
A14<br />
42<br />
A15<br />
P3-2<br />
P3-[0..7]<br />
P3-[0..7]<br />
LK1<br />
SIP2<br />
2x1 pin link<br />
1k<br />
R6<br />
10k<br />
P4-6<br />
Vcc<br />
P4-[0..7]<br />
P4-[0..7]<br />
Keyboard Lock<br />
19<br />
INT0 P6(0)<br />
18<br />
INT2 P6(1)<br />
SW1<br />
Gnd<br />
Vcc<br />
R15<br />
10k<br />
P5-[0..7]<br />
P5-[0..7]<br />
IC11<br />
M37451S4FP SMD<br />
P6-[0..7]<br />
P6-[0..7]<br />
P6-0<br />
Vcc<br />
4k7 R17<br />
IC34D<br />
R109<br />
8 9<br />
Vcc<br />
1k<br />
D3<br />
LED8<br />
74HC14 SMD<br />
BAV99<br />
Power/reset LED<br />
R114 R112<br />
100K 2M2<br />
IC34E<br />
Error 10 11<br />
Error<br />
74HC14 SMD<br />
C36<br />
1.0/16V Tant<br />
Vcc<br />
Vcc<br />
Vcc<br />
Gnd<br />
D5<br />
D6<br />
D7<br />
A6<br />
12<br />
13<br />
IC15D<br />
11<br />
74HC02 SMD<br />
A[0..15]<br />
W/dog<br />
3<br />
2<br />
C61<br />
1<br />
A0<br />
A0<br />
0.1<br />
3x1 pin link<br />
LK6<br />
Gnd<br />
PH<br />
IC18E<br />
11<br />
10<br />
74HC04<br />
Gnd<br />
C17<br />
100p<br />
Gnd<br />
R47<br />
1M<br />
Gnd<br />
C62<br />
0.1 LED7<br />
R43 Alarm<br />
1k<br />
LED6<br />
Setup<br />
1k R39<br />
LED5<br />
R46 Neutral<br />
1k<br />
Gnd<br />
SW8<br />
SW6<br />
Cal check #1<br />
SW4<br />
Cal check #2<br />
SW2<br />
Purge<br />
SW7<br />
Autocal<br />
SW9<br />
Alarm<br />
SW5<br />
Display<br />
SW3<br />
Setup mode<br />
Neutral<br />
Gnd<br />
Gnd Vcc<br />
CN3<br />
CON-PH3.8-8<br />
External Keypad/LED's<br />
Vcc<br />
2x1 pin link<br />
LK7<br />
Gnd<br />
2<br />
1<br />
P4-5<br />
P3-2<br />
P3-6<br />
P3-1<br />
1<br />
2<br />
+<br />
72<br />
Vcc<br />
25<br />
AVss<br />
70<br />
CN<br />
Vss<br />
32<br />
71<br />
A-Vcc<br />
Vss<br />
73<br />
D Gnd<br />
IC17B<br />
R/W 27<br />
Gnd<br />
R/W<br />
D<br />
14<br />
12<br />
20<br />
A Y0<br />
/CS<br />
Gnd<br />
13<br />
11<br />
22<br />
Vcc<br />
B Y1<br />
/OE<br />
10<br />
Y2<br />
HM62256 WIDE SMD<br />
IC18A<br />
15<br />
9<br />
Title<br />
E Y3<br />
<strong>Novatech</strong> <strong>Controls</strong><br />
4<br />
IC18B<br />
74HC04<br />
3<br />
2<br />
7 14<br />
1<br />
SIP1<br />
47k<br />
74HC04 SMD<br />
Gnd<br />
SIP3<br />
47K<br />
1<br />
2<br />
3<br />
2<br />
8<br />
Vcc<br />
Vss<br />
4<br />
3<br />
74HC139 SMD<br />
4<br />
R/W<br />
Reset<br />
1F80-1FFF<br />
5<br />
5<br />
R48<br />
1M<br />
6<br />
6<br />
L4-[3..6]<br />
7<br />
Size Number 1630-1<br />
Revision<br />
1.6<br />
A3 Microprocessor, display and keyboard<br />
Date: 22/04/2008 Sheet 4of 4<br />
File: C:\Documents and Settings\..\Micro.sch Drawn By: FHC<br />
7<br />
Gnd<br />
16<br />
LED+<br />
15<br />
LED-<br />
1<br />
2<br />
3<br />
4<br />
5<br />
6<br />
7<br />
8<br />
163x <strong>Analyser</strong><br />
P5-6<br />
P5-7<br />
8<br />
8
April 2008<br />
80 <strong>1632</strong> <strong>Oxygen</strong> Transmitter<br />
1<br />
1<br />
2<br />
2<br />
3<br />
3<br />
4<br />
A<br />
Vcc<br />
L2-[0..7]<br />
L2-3<br />
L2-4<br />
R42 1k<br />
R43<br />
10k<br />
BR3<br />
W04 1A bridge rect<br />
LM358 IC4B<br />
DA-2<br />
5<br />
7<br />
6<br />
R21<br />
R28<br />
5k6<br />
TR6<br />
BC550<br />
IC12<br />
LM2575T-5.0, small heatsink<br />
1<br />
2<br />
Vin<br />
Vout<br />
4<br />
F/B<br />
3<br />
2<br />
R16 10k<br />
L1<br />
PE 92114 330uH<br />
C13<br />
D4<br />
470uF/16v<br />
SR104 Schotky diode<br />
IC4A<br />
LM358<br />
1 R29<br />
150<br />
R24 12k<br />
R27<br />
1ohm<br />
PS1<br />
1<br />
+in<br />
2<br />
-in<br />
3<br />
-out<br />
4<br />
com-out<br />
5<br />
+out<br />
HPR-104 (5 to +/-12v)<br />
TR5<br />
BD140<br />
+5v 330mA<br />
39 Ref air pump +<br />
40 Ref air pump -<br />
50/60Hz<br />
A<br />
B<br />
HtrEn<br />
SD-926c<br />
W04 1A bridge rect<br />
BR2<br />
12v<br />
B<br />
TF1 7<br />
C21<br />
220uF/35v<br />
C11<br />
0.1uF<br />
FS2<br />
FS1<br />
FL1<br />
2<br />
3<br />
1<br />
In Out<br />
1<br />
In Out<br />
2<br />
PLAM 2321 R9<br />
3<br />
8<br />
10<br />
11<br />
12<br />
18<br />
17<br />
C20<br />
220uF/35v<br />
C9<br />
1.0uF Tant<br />
-12v<br />
16<br />
1k<br />
R40<br />
RL7<br />
HV5<br />
C1<br />
0.1uF<br />
SW1<br />
L2-0<br />
P4-6<br />
10uF/16v RB<br />
C3<br />
C8<br />
10/35v Elect<br />
CN9<br />
1<br />
2<br />
-12v<br />
DAC 2 Com<br />
+12v<br />
Vcc<br />
D2Vee<br />
D2Gnd<br />
D2Vcc<br />
Heater com<br />
SSR1<br />
1<br />
1<br />
2<br />
2<br />
A<br />
K<br />
A<br />
K<br />
IC8<br />
78L12<br />
I O<br />
PreReg<br />
AVcc<br />
HV4 Heater 1<br />
S202-S02<br />
SW3 240v<br />
12v/300<br />
Mains A<br />
Mains N<br />
Mains E<br />
HV1<br />
HV2<br />
HV3<br />
V202-12-MS-02-Q<br />
110v<br />
15v/50<br />
15v/50<br />
15v/30<br />
I<br />
IC10<br />
79L12<br />
O<br />
AGnd<br />
AVee<br />
15v/30<br />
1k<br />
Burner on LED<br />
LED3<br />
R50<br />
10k<br />
BC560<br />
TR11<br />
1N4004<br />
D5<br />
HV6<br />
Heater 2<br />
Burner Bypass switch<br />
R51<br />
10k<br />
R56 10k<br />
Vcc<br />
R49<br />
10k<br />
R47 10k Error<br />
Error<br />
BC550<br />
TR12 SSR5<br />
A<br />
1<br />
A<br />
1<br />
2<br />
K<br />
2 K<br />
S202-S02<br />
C23<br />
0.022uF<br />
P4-6<br />
C331.0uF<br />
Unreg<br />
Unreg<br />
0-2.5v<br />
DA-2<br />
50/60Hz<br />
0-5v<br />
C24<br />
HtrEn<br />
PreReg<br />
0.022uF<br />
SW2<br />
POWER ON<br />
CN13<br />
C28<br />
0.022uF<br />
5<br />
4<br />
3<br />
2<br />
1<br />
FS3<br />
250mA axial lead fuse<br />
HV[1..6]<br />
Heater #1 On<br />
LED4<br />
15<br />
14 15v/30<br />
L6-5<br />
13<br />
BR4<br />
IC9<br />
78L12<br />
220R R41<br />
L6-0<br />
I O<br />
D1Vcc<br />
C<br />
HV[1..6]<br />
Sol4<br />
Heater #2 On<br />
LED8<br />
L6-4<br />
C27<br />
220uF/35v<br />
C12<br />
0.1uF<br />
C<br />
Sol1<br />
Sol2<br />
Sol3<br />
C16 0.022uF<br />
C22 0.022uF<br />
C18 0.022uF<br />
SSR4<br />
1<br />
1<br />
2<br />
2<br />
S202-S02<br />
SSR3<br />
1<br />
1<br />
2<br />
2<br />
S202-S02<br />
SSR2<br />
1<br />
1<br />
2<br />
2<br />
S202-S02<br />
A<br />
K<br />
A<br />
K<br />
A<br />
K<br />
220R<br />
R44<br />
R37<br />
220R<br />
A<br />
K<br />
LED7<br />
A<br />
R36<br />
K<br />
220R<br />
LED6<br />
A<br />
R35<br />
K<br />
220R<br />
LED5<br />
L6-1<br />
L6-2<br />
L6-3<br />
L6-[0..7]<br />
W04 1A bridge rect<br />
220uF/35v<br />
C26<br />
78L12<br />
BR1<br />
IC13<br />
I<br />
C25<br />
220uF/35v<br />
W04 1A bridge rect<br />
O<br />
I<br />
IC11<br />
79L12<br />
O<br />
C17<br />
0.1uF<br />
C10<br />
1.0uF Tant<br />
SerPS3<br />
D1Gnd<br />
D1Vee<br />
Sol[1..4]<br />
SerPS2<br />
220uF/35v<br />
C19<br />
I O<br />
C15<br />
1.0uF Tant<br />
SerPS1<br />
D IC14<br />
79L12<br />
SerPS[1..3]<br />
D<br />
Sol[1..4]<br />
R48<br />
10k<br />
BC560<br />
TR10<br />
L6-[0..7]<br />
15v/30<br />
L2-[0..7]<br />
4<br />
C14<br />
2200uF/25v RB, 0.3"<br />
5<br />
5<br />
/En<br />
5<br />
C<br />
C<br />
C<br />
Gnd<br />
3<br />
C<br />
C<br />
C<br />
6<br />
6<br />
8<br />
4<br />
SerPS[1..3]<br />
7<br />
R30 680<br />
Title<br />
<strong>Novatech</strong> <strong>Controls</strong><br />
163x <strong>Analyser</strong><br />
Size<br />
A3<br />
Date:<br />
File:<br />
Number<br />
1630-2<br />
Revision<br />
1.6<br />
Power Supply, Reference air pump<br />
22/04/2008 Sheet 4 of 4<br />
C:\Documents and Settings\..\Power.sch Drawn By: FHC<br />
7<br />
8<br />
8
April 2008<br />
<strong>1632</strong> <strong>Oxygen</strong> Transmitter 81<br />
1<br />
1<br />
2<br />
2<br />
3<br />
3<br />
4<br />
A A<br />
B B<br />
P6-[0..7]<br />
Vcc C5<br />
Alarm relay #1<br />
Alarm relay #2<br />
Alarm relay #3<br />
Alarm relay #4<br />
4-20 Cal relay #1<br />
4-20 Cal relay #2<br />
Inc trim relay<br />
Dec trim relay<br />
IC2<br />
74HC595<br />
SER<br />
L5-0<br />
L5-1<br />
L5-2<br />
L5-3<br />
L5-4<br />
L5-5<br />
15<br />
1<br />
2<br />
3<br />
4<br />
5<br />
6<br />
7<br />
O0<br />
O1<br />
O2<br />
O3<br />
O4<br />
O5<br />
O6<br />
O7<br />
14<br />
SRCLK<br />
SRCLR<br />
11<br />
10<br />
RCLK<br />
E<br />
12<br />
13<br />
9<br />
D D<br />
4<br />
Q7<br />
L5-[0..5]<br />
L5-[0..5]<br />
IC7<br />
74HC595<br />
SER<br />
14<br />
SRCLK<br />
SRCLR<br />
11<br />
10<br />
5<br />
L6-0<br />
L6-1<br />
L6-2<br />
L6-3<br />
L6-4<br />
L6-5<br />
15<br />
1<br />
2<br />
3<br />
4<br />
5<br />
6<br />
7<br />
O0<br />
O1<br />
O2<br />
O3<br />
O4<br />
O5<br />
O6<br />
O7<br />
0.1uF<br />
/P6-1<br />
P6-4<br />
/P6-1<br />
P6-5<br />
Digital output data<br />
Clock<br />
Digital output latch<br />
Vcc<br />
Vcc<br />
R45<br />
Vcc<br />
SIP1<br />
10k<br />
C Senable-1<br />
C<br />
P6-7 Digital input load/shift<br />
Latch #2<br />
P6-[0..7]<br />
P6-6 Digital input data<br />
C2<br />
0.1uF<br />
C4<br />
0.01uF<br />
IC3<br />
74HC165<br />
7<br />
Q7<br />
9<br />
Q7<br />
10<br />
SER<br />
1<br />
PL<br />
15<br />
CLK2<br />
2<br />
CLK1<br />
P7<br />
P6<br />
P5<br />
P4<br />
P3<br />
P2<br />
P1<br />
P0<br />
6<br />
5<br />
4<br />
3<br />
14<br />
13<br />
12<br />
11<br />
L2-7<br />
L2-6<br />
L2-5<br />
L2-4<br />
L2-3<br />
L2-2<br />
L2-1<br />
L2-0<br />
L2-[0..7]<br />
L2-[0..7]<br />
Terminal PCB select<br />
Fuel 1 or 2 input<br />
Remote furnace stop<br />
Burner on Relay<br />
Burner Bypass Switch<br />
Remote Alarm Reset<br />
Purge Flow Switch/ Rem burn out<br />
Mains vlotage selector switch<br />
LK2<br />
2<br />
1<br />
LINK2X1<br />
10k<br />
Vcc<br />
Senable-1<br />
SIP2<br />
10K<br />
Latch #5<br />
Latch #6<br />
Heater #1<br />
Purge solenoid<br />
Gas cal solenoid #1<br />
Gas cal solenoid #2<br />
Heater #2<br />
5<br />
RCLK<br />
E<br />
12<br />
13<br />
9<br />
Q7<br />
L6-[0..7]<br />
L6-[0..7]<br />
6<br />
6<br />
Title<br />
7<br />
Notatech <strong>Controls</strong><br />
163x <strong>Analyser</strong><br />
Size Number 1630-2<br />
Revision<br />
1.5<br />
A3 Digital input/output<br />
Date: 22/04/2008 Sheet 2of 4<br />
File: C:\Documents and Settings\..\Digio.sch Drawn By: FHC<br />
7<br />
8<br />
8
April 2008<br />
82 <strong>1632</strong> <strong>Oxygen</strong> Transmitter
APPENDIX 6<br />
MODBUS REGISTER MAP AND APPLICATION NOTES<br />
MODBUS Functions Supported are:-<br />
ReadHolding Register Function 3<br />
WriteHolding Register Function 6 ( for allowable addresses only )<br />
Introduction.<br />
The <strong>1632</strong> transmitter implements the MODBUS slave protocol, it is intended to work in conjunction with a<br />
MODBUS master.<br />
This is accomplished by setting the MODBUS address to some non-zero value in the range 1-31, setting the jumper<br />
positions to select the RS485 half duplex configuration, and re-starting the transmitter.<br />
The master must be configured as follows.<br />
Baud Rate 9600<br />
Parity none<br />
Stop Bits 1<br />
RS485 Half Duplex<br />
Mode RTU ( binary mode)<br />
A typical transaction would be to read the current value of a variable from the transmitter.<br />
The master send a ReadHoldingRegister packet, with the appropriate address and the transmitter responds with data at<br />
that address.<br />
The Register Addresses are as follows, to convert to Schneider addresses for earlier model PLC's address space, add<br />
40001 to each address.<br />
or for later model PLC's with linear address space the address co-responds directly to %MW XXXX address.<br />
For Example, to read probe temperature set-point -<br />
Read %MW1436 which is equivalent to holding register 41437 = 40001 + 1436<br />
Some data is 32 bit data (double) which requires some care to ensure that the word order is correctly interpreted.<br />
For Example, OXYGEN32, (dual probe) which is at address 2052 is interpreted as follows.<br />
2052 contains the high 16 bits for probe 1 oxygen<br />
2053 contains the low 16 bits for probe 1 oxygen<br />
2054 contains the high 16 bits for probe 2 oxygen<br />
2055 contains the low 16 bits for probe 2 oxygen<br />
April 2008<br />
<strong>1632</strong> <strong>Oxygen</strong> Transmitter 83
1<br />
1230 <strong>Oxygen</strong> Probes .............................................................7<br />
1231 Heated <strong>Oxygen</strong> Probe...................................................7<br />
1234 <strong>Oxygen</strong> Sensor<br />
Installing ........................................................................ 22<br />
4<br />
4-20 mA Calibration............................................................ 46<br />
A<br />
Alarm<br />
High <strong>Oxygen</strong>.................................................................. 54<br />
Low <strong>Oxygen</strong>................................................................... 54<br />
<strong>Oxygen</strong> Deviation .......................................................... 54<br />
Very Low <strong>Oxygen</strong>.......................................................... 55<br />
Alarm Button....................................................................... 37<br />
Alarm Relays....................................................................... 39<br />
Alarm Schedule ................................................................... 37<br />
Alarms ........................................................................... 27, 31<br />
Common Alarm.............................................................. 37<br />
Selectable Alarms .......................................................... 38<br />
Summary ........................................................................ 37<br />
<strong>Analyser</strong> .............................................................................. 15<br />
Mounting........................................................................ 20<br />
<strong>Analyser</strong> Description.............................................................4<br />
<strong>Analyser</strong> System....................................................................4<br />
Auxiliary Temperature ........................................................ 18<br />
B<br />
Backlight ............................................................................. 39<br />
Back-Up Battery.................................................................. 18<br />
Battery................................................................................. 18<br />
Battery Replacement ........................................................... 61<br />
Baud Rate ............................................................................ 56<br />
Burner Bypass Switch ................................................... 31, 39<br />
C<br />
Calender .............................................................................. 45<br />
Calibration<br />
A/D................................................................................. 60<br />
Checking Of Probes ....................................................... 17<br />
D/A................................................................................. 60<br />
Electronics...................................................................... 16<br />
Probes............................................................................. 16<br />
Sensor............................................................................. 31<br />
Test Points...................................................................... 60<br />
Calibration Check<br />
Connecting Calibration Solenoid ................................... 28<br />
Calibration Gas Check......................................................... 32<br />
Calibration Gases ................................................................ 53<br />
INDEX<br />
Centigrade............................................................................49<br />
Cold Start.............................................................................60<br />
Commissioning ....................................................................31<br />
Common Alarms..................................................................27<br />
April 2008<br />
<strong>1632</strong> <strong>Oxygen</strong> Transmitter 85<br />
D<br />
Damping Factor ...................................................................57<br />
Display Button.....................................................................36<br />
Dual Fuel .............................................................................51<br />
Dual Fuel Input<br />
Connecting................................................................29, 33<br />
Dust In The Flue Gas...........................................................32<br />
E<br />
Extended Menus ..................................................................57<br />
F<br />
Fahrenheit ............................................................................49<br />
Filter Blockage.....................................................................63<br />
Filter Purge Pressure Switch................................................12<br />
Filter Purging.......................................................................32<br />
Function Select ....................................................................44<br />
H<br />
Heater Failure ......................................................................63<br />
Heater Interlock Relays .......................................................25<br />
I<br />
Impedance............................................................................16<br />
Interlock...............................................................................25<br />
L<br />
Lower Line ............................................................................6<br />
Display Functions...........................................................50<br />
M<br />
Modbus Address ..................................................................57<br />
Model 1232 Unheated <strong>Oxygen</strong> Probe....................................7<br />
Model 1234 <strong>Oxygen</strong> Sensor...................................................8<br />
N<br />
Number of Sensors...............................................................45
O<br />
Option or Value................................................................... 44<br />
Outputs ..................................................................................5<br />
<strong>Oxygen</strong> Probe...................................................................... 10<br />
Installing ........................................................................ 20<br />
P<br />
Power................................................................................... 31<br />
Power Lamp ........................................................................ 39<br />
Pressure ......................................................................... 15, 50<br />
Flue Pressure.................................................................. 50<br />
Print Log<br />
Data................................................................................ 56<br />
Printer<br />
Connecting ............................................................... 29, 30<br />
Probe<br />
Testing............................................................................ 63<br />
Probe Cable ......................................................................... 26<br />
Pump Replacement.............................................................. 61<br />
Purge ................................................................................... 17<br />
Automatic....................................................................... 52<br />
Connecting Purge Solenoid............................................ 28<br />
Freeze Time ................................................................... 52<br />
Purge / Cal Time ................................................................. 52<br />
R<br />
Range Of Indication ..............................................................5<br />
Range of Output 1 .................................................................5<br />
Range of Output 2 .................................................................5<br />
Reference Air<br />
Connecting ..................................................................... 29<br />
Reference Air Selection....................................................... 56<br />
Reference Voltages.............................................................. 45<br />
Relative Humidity ............................................................... 57<br />
Repairs................................................................................. 61<br />
RH ....................................................................................... 57<br />
RS 232................................................................................. 17<br />
RS 485................................................................................. 17<br />
Run Mode............................................................................ 31<br />
April 2008<br />
86 <strong>1632</strong> <strong>Oxygen</strong> Transmitter<br />
S<br />
Sensor Type .........................................................................47<br />
Serial Port ......................................................................29, 30<br />
Service Date.........................................................................47<br />
Set-Up & Run Modes ..........................................................44<br />
Set-Up Function Details.......................................................45<br />
Set-Up Mode........................................................................31<br />
Set-Up Mode Functions .......................................................42<br />
Software.................................................................................1<br />
Specifications...................................................................3, 10<br />
Stratification ........................................................................32<br />
T<br />
Technical Enquires ................................................................1<br />
Testing A Probe ...................................................................63<br />
Thermocouple Type<br />
Auxiluary........................................................................47<br />
Probe...............................................................................47<br />
Time.....................................................................................45<br />
Top Line Units.....................................................................49<br />
Transmitter 4-20 mA ...........................................................48<br />
V<br />
Version...................................................................................1<br />
W<br />
Watchdog Timer ..................................................................18<br />
Z<br />
Zirconia Sensor....................................................................14<br />
Zirconia Sensor Output........................................................67
Declaration of Conformity<br />
Application of Council Directives:<br />
89/336/EEC (92/31/EEC)<br />
72/23/EEC<br />
Standards to which conformity is declared:<br />
EN550011.1:1995 (ISM, Group 1, Class B)<br />
EN55014:1995 (Clause 4.2)<br />
EN50082-2 (Industrial)<br />
EN61010-1<br />
AS61000.4.5:1999<br />
IEC-68-2-2<br />
IEC-68-2-3<br />
AS1099.2.6<br />
Manufacturer’s name: <strong>Novatech</strong> <strong>Controls</strong> Pty Ltd<br />
Manufacturer’s address: 309 Reserve Road<br />
Cheltenham VIC 3192<br />
AUSTRALIA<br />
Type of equipment: <strong>Oxygen</strong> Transmitter<br />
Equipment Class: ISM, Group 1, Class B<br />
Model Number: 1630 Series Transmitter<br />
1231 <strong>Oxygen</strong> Probe<br />
1234 <strong>Oxygen</strong> Sensor<br />
I hereby declare that the equipment specified herein conforms to the above<br />
directive(s) and standards(s).<br />
Full Name: Fraser Chapman<br />
Position: R & D Manager<br />
April 2008<br />
<strong>1632</strong> <strong>Oxygen</strong> Transmitter 87
1. Interpretation<br />
In these conditions:<br />
(a) `Seller' means <strong>Novatech</strong> <strong>Controls</strong> Pty. Ltd.<br />
ABN 57 006 331 700 of 309 Reserve Road,<br />
Cheltenham Victoria, 3192 which is the seller<br />
of the goods.<br />
(b) `Buyer' means the buyer of the goods specified<br />
in the seller's quotation, or in the buyer's order<br />
for the goods.<br />
(c) `Goods' means the products and, if any,<br />
services specified in Buyer's, orders or Seller's<br />
order acknowledgments from time to time.<br />
(d) Nothing in these conditions shall be read or<br />
applied so as to exclude, restrict or modify or<br />
have the effect of excluding, restricting or<br />
modifying any condition, warranty, guarantee,<br />
right or remedy implied by law (including the<br />
Trade Practices Act 1974) and which by law<br />
cannot be excluded, restricted or modified.<br />
2. General<br />
These conditions (which shall only be waived in<br />
writing signed by the seller) prevail over all<br />
conditions of the buyer's order to the extent of any<br />
inconsistency.<br />
3. Terms of sale<br />
The goods and all other products sold by the seller<br />
are sold on these terms and conditions.<br />
4. Seller's quotations<br />
Unless previously withdrawn, seller's quotations are<br />
open for acceptance within the period stated in them<br />
or, when no period is so stated, within 60 days only<br />
after its date. The seller reserves the right to refuse<br />
any order based on this quotation within 7 days after<br />
the receipt of the order.<br />
5. Packing<br />
The cost of any special packing and packing<br />
materials used in relation to the goods are at the<br />
buyer's expense notwithstanding that such cost may<br />
have been omitted from any quotation.<br />
6. Shortage<br />
The buyer waives any claim for shortage of any<br />
goods delivered if a claim in respect for short<br />
delivery has not been lodged with seller within seven<br />
(7) days from the date of receipt of goods by the<br />
buyer.<br />
7. Drawings, etc.<br />
(a) All specifications, drawings, and particulars of<br />
weights and dimensions submitted to the buyer<br />
are approximate only and any deviation from<br />
any of these things does not vitiate any contract<br />
with the seller or form grounds for any claim<br />
against the seller.<br />
(b) Except as referred to in Clause 13.1 herein, the<br />
descriptions, illustrations and performances<br />
contained in catalogues, price lists and other<br />
advertising matter do not form part of the<br />
contract of sale of the goods or of the<br />
description applied to the goods.<br />
(c) Where specifications, drawings or other<br />
particulars are supplied by the buyer, the<br />
seller’s price is made on estimates of quantities<br />
required. If there are any adjustments in<br />
quantities above or below the quantities<br />
estimated by seller and set out in a quotation,<br />
then any such increase or decrease are to be<br />
adjusted on a unit rate basis according to unit<br />
prices set out in the quotation.<br />
8. Performance<br />
Any performance figures given by the seller are<br />
estimates only. The seller is under no liability for<br />
damages for failure of the goods to attain such<br />
figures unless specifically guaranteed in writing. Any<br />
such written guarantees are subject to the recognised<br />
tolerances applicable to such figures.<br />
<strong>Novatech</strong> <strong>Controls</strong> Pty. Ltd. ABN 57 006 331 700 Conditions of Sale<br />
9. Acknowledgment regarding facilities for<br />
repairs or parts<br />
The buyer acknowledges that the seller does not<br />
promise or represent that facilities for the repair of<br />
the goods, or that parts of the goods are or will be<br />
available. The buyer must ensure that each purchaser<br />
of the goods from the buyer receives notice that the<br />
seller does not promise that facilities for the repair of<br />
the goods will be available; or parts for the goods<br />
will be available.<br />
10. Delivery<br />
(a) The delivery times made known to the buyer<br />
are estimates only and the seller is not be liable<br />
for late delivery or non-delivery.<br />
(b) The seller is not be liable for any loss, damage<br />
or delay occasioned to the buyer or its<br />
customers arising from late or non-delivery or<br />
late installation of the goods.<br />
(c) The seller may at its option deliver the goods to<br />
the buyer in any number of instalments unless<br />
there is an agreement in writing between the<br />
parties to the effect that the buyer will not take<br />
delivery by instalments.<br />
(d) If the seller delivers any of the goods by<br />
instalments, and any one of those instalments is<br />
defective for any reason:<br />
(i) it is not a repudiation of the contract of<br />
sale formed by these conditions; and<br />
(ii) the defective instalment is a severable<br />
breach that gives rise only to a claim for<br />
compensation.<br />
11. Passing of risk<br />
Risk in the goods passes to the buyer upon the earlier<br />
of:<br />
(a) actual or constructive delivery of the goods to<br />
the buyer; or<br />
(b) collection of the goods from the seller or any<br />
bailee or agent of the seller by the buyer's agent,<br />
carrier or courier.<br />
12. Loss or damage in transit<br />
(a) The seller is not responsible to the buyer or any<br />
person claiming through the buyer for any loss<br />
or damage to goods in transit caused by any<br />
event of any kind by any person (whether or not<br />
the seller is legally responsible for the person<br />
who caused or contributed to that loss or<br />
damage).<br />
(b) The seller must provide the buyer with such<br />
assistance as may be necessary to press claims<br />
on carriers so long as the buyer:<br />
(i) has notified the seller and the carriers in<br />
writing immediately after loss or damage<br />
is discovered on receipt of goods; and<br />
(ii) lodges a claim for compensation on the<br />
carrier within three (3) days of the date of<br />
receipt of the goods.<br />
13. Guarantee<br />
13.1 The seller's liability for goods manufactured by<br />
it is limited to making good any defects by<br />
repairing the defects or at the seller's option by<br />
replacement, within a period as specified in<br />
Seller's catalogues or other product literature for<br />
specified cases or not exceeding twelve (12)<br />
calendar months after the goods have been<br />
dispatched (whichever is the lesser period) so<br />
long as:<br />
(a) defects have arisen solely from faulty materials<br />
or workmanship;<br />
(b) the damage does not arise from:<br />
(i) improper adjustment, calibration or<br />
operation by the buyer;<br />
(ii) the use of accessories including<br />
consumables, hardware, or software which<br />
were not manufactured by or approved in<br />
writing by the seller;<br />
(iii) any contamination or leakages caused or<br />
induced by the buyer;<br />
(iv) any modifications of the goods which were<br />
not authorised in writing by the seller;<br />
(v) any misuse of the goods by the buyer or<br />
anyone for whom the buyer has legal<br />
responsibility (including a minor);<br />
(vi) any use or operation of the goods outside<br />
of the physical, electrical or environmental<br />
specifications of the goods;<br />
(vii) inadequate or incorrect site preparation;<br />
and<br />
(viii) inadequate or improper maintenance of the<br />
goods.<br />
(ix) fair wear and tear of the product in an<br />
environment in respect of which the Seller<br />
has informed the Buyer in catalogues or<br />
other product literature that the period of<br />
usefulness of the product is likely to be<br />
shorter that twelve 12 months.<br />
(c) the goods have not received maltreatment,<br />
inattention or interference;<br />
(d) accessories of any kind used by the buyer are<br />
manufactured by or approved by the seller;<br />
(e) the seals of any kind on the goods remain<br />
unbroken; and<br />
(f) the defective parts are promptly returned free of<br />
cost to the seller.<br />
13.2 The seller is not liable for and the buyer<br />
releases the seller from any claims in respect of<br />
faulty or defective design of any goods supplied<br />
unless such design has been wholly prepared by<br />
the seller and the responsibility for any claim<br />
has been specifically accepted by the seller in<br />
writing. In any event the seller’s liability under<br />
this paragraph is limited strictly to the<br />
replacement of defective parts in accordance<br />
with para 13.1 of these conditions.<br />
13.3 Except as provided in these conditions, all<br />
express and implied warranties, guarantees and<br />
conditions under statute or general law as to<br />
merchantability, description, quality, suitability<br />
or fitness of the goods for any purpose or as to<br />
design, assembly, installation, materials or<br />
workmanship or otherwise are expressly<br />
excluded. The seller is not liable for physical or<br />
financial injury, loss or damage or for<br />
consequential loss or damage of any kind<br />
arising out of the supply, layout, assembly,<br />
installation or operation of the goods or arising<br />
out of the seller’s negligence or in any way<br />
whatsoever.<br />
14. Seller's liability<br />
14.1 The seller's liability for a breach of a condition<br />
or warranty implied by Div 2 of Pt V of the<br />
Trade Practices Act 1974 (other than s 69) is<br />
limited to:<br />
(a) in the case of goods, any one or more of the<br />
following:<br />
(i) the replacement of the goods or the supply<br />
of equivalent goods;<br />
(ii) the repair of the goods;<br />
(iii) the payment of the cost of replacing the<br />
goods or of acquiring equivalent goods;<br />
(iv) the payment of the cost of having the<br />
goods repaired; or<br />
(b) in the case of services:<br />
(i) the supplying of the services again; or<br />
(ii) the payment of the cost of having the<br />
services supplied again.
14.2 The seller's liability under s 74H of the Trade<br />
Practices Act 1975 is expressly limited to a<br />
liability to pay to the purchaser an amount equal<br />
to:<br />
(a) the cost of replacing the goods;<br />
(b) the cost of obtaining equivalent goods; or<br />
(c) the cost of having the goods repaired,<br />
whichever is the lowest amount.<br />
15. Prices<br />
(a) Unless otherwise stated all prices quoted by<br />
vendor are net, exclusive of Goods and Services<br />
Tax (GST) and the buyer agrees to pay to the<br />
seller any GST in addition to the price.<br />
(b) Prices quoted are those ruling at the date of<br />
issue of quotation and are based on rates of<br />
freight, insurance, customs duties, exchange,<br />
shipping expenses, sorting and stacking charges,<br />
cartage, the quotation, cost of materials, wages<br />
and other charges affecting the cost of<br />
production ruling on the date is made.<br />
(c) If the seller makes any alterations to the price of<br />
the goods or to any of their inputs either before<br />
acceptance of or during the currency of the<br />
contract, these alterations are for the buyer’s<br />
account.<br />
16. Payment<br />
The purchase price in relation to goods is payable net<br />
and payment of the price of the goods must be made<br />
on or before the thirtieth day from the date of invoice<br />
unless other terms of payment are expressly stated in<br />
these conditions in writing.<br />
17. Rights in relation to goods (Romalpa clause)<br />
The seller reserves the following rights in relation to<br />
the goods until all accounts owed by the buyer to the<br />
seller are fully paid:<br />
(a) ownership of the goods;<br />
(b) to enter the buyer's premises (or the premises of<br />
any associated company or agent where the<br />
goods are located) without liability for trespass<br />
or any resulting damage and retake possession<br />
of the goods; and<br />
(c) to keep or resell the goods including any goods<br />
repossessed pursuant to 17(b) above;<br />
If the goods are resold, or goods manufactured using<br />
the goods are sold, by the buyer, the buyer shall hold<br />
<strong>Novatech</strong> <strong>Controls</strong> Pty. Ltd. ABN 57 006 331 700 Conditions of Sale<br />
such part of the proceeds of any such sale as<br />
represents the invoice price of the goods sold or used<br />
in the manufacture of the goods sold in a separate<br />
identifiable account as the beneficial property of the<br />
seller and shall pay such amount to the seller upon<br />
request. Notwithstanding the provisions above the<br />
seller shall be entitled to maintain an action against<br />
the buyer for the purchase price and the risk of the<br />
goods shall pass to the buyer upon delivery.<br />
18. Buyer's property<br />
Any property of the buyer under the seller’s<br />
possession, custody or control is completely at the<br />
buyer’s risk as regards loss or damage caused to the<br />
property or by it.<br />
19. Storage<br />
The seller reserves the right to make a reasonable<br />
charge for storage if delivery instructions are not<br />
provided by the buyer within fourteen days of a<br />
request by the seller for such instructions. The parties<br />
agree that the seller may charge for storage from the<br />
first day after the seller requests the buyer to provide<br />
delivery instructions.<br />
20. Returned goods<br />
(a) The seller will not be under any duty to accept<br />
goods returned by the buyer and will do so only<br />
on terms to be agreed in writing in each<br />
individual case.<br />
(b) If the seller agrees to accept returned goods<br />
from the buyer under para (a) of this clause, the<br />
buyer must return the goods to the seller at the<br />
seller’s place of business referred to at the head<br />
of these conditions.<br />
21. Goods sold<br />
All goods to be supplied by the seller to the buyer are<br />
as described on the purchase order agreed by the<br />
seller and the buyer and the description on such<br />
purchase order modified as so agreed prevails over<br />
all other descriptions including any specification or<br />
enquiry of the buyer.<br />
22. Cancellation<br />
No order may be cancelled except with consent in<br />
writing and on terms which will indemnify the seller<br />
against all losses.<br />
23. Indemnity<br />
The buyer indemnifies on a continuing basis on a<br />
fully indemnity basis the seller from and against any<br />
liability, loss, expense or demand for or arising from<br />
any false, misleading, deceptive or misdescriptive<br />
representation or statement made by the buyer in<br />
respect of the goods to any person. This indemnity<br />
survives termination of this agreement by either part<br />
for any reason.<br />
24. Exclusion of representations and<br />
arrangements<br />
Except as referred to in Clause 13.1herein, these<br />
terms and conditions supersede and exclude all prior<br />
and other discussions, representations (contractual or<br />
otherwise) and arrangements relating to the supply of<br />
the goods or any part of the goods including, but<br />
without limiting the generality of the foregoing, those<br />
relating to the performance of the goods or any part<br />
of the goods or the results that ought to be expected<br />
from using the goods.<br />
25. No waiver<br />
The failure of any part to enforce the provisions of<br />
this agreement or to exercise any rights expressed in<br />
this agreement is not to be a waiver of such<br />
provisions or rights an does not affect the<br />
enforcement of this agreement.<br />
26. Force Majeure<br />
If by reason of any fact, circumstance, matter or thing<br />
beyond the reasonable control of the seller, the seller<br />
is unable to perform in whole or in part any<br />
obligation under this agreement the seller is relieved<br />
of that obligation under this agreement to the extent<br />
and for the period that it is so unable to perform and<br />
is not liable to the buyer in respect of such inability.<br />
27. Buyer Acknowledgement<br />
The Buyer acknowledges that the above provisions of<br />
these Conditions of Sale are reasonable and reflected<br />
in the price and the Buyer accepts the risks of the<br />
Buyer associated with these Conditions of sale and/or<br />
shall issue accordingly.<br />
28. Place of contract<br />
(a) The contract for sale of the goods is made in the<br />
state of Victoria Australia.<br />
(b) The parties submit all disputes arising between<br />
them to the courts of such state and any court<br />
competent to hear appeals from those courts of<br />
first instance.