Data Center LAN Migration Guide - Juniper Networks
Data Center LAN Migration Guide - Juniper Networks
Data Center LAN Migration Guide - Juniper Networks

You also want an ePaper? Increase the reach of your titles
YUMPU automatically turns print PDFs into web optimized ePapers that Google loves.
<strong>Data</strong> <strong>Center</strong> <strong>LAN</strong> <strong>Migration</strong> <strong>Guide</strong><br />
Step 5: Traffic engineer the network. Step 5 does not require steps 3 or 4 above to be completed before initiating this<br />
step. Traffic engineering may begin as soon as the MPLS network plane is established. However, as a best practice it<br />
is recommended to first migrate some of the existing traffic to the MPLS plane before configuring TE. This will allow<br />
you to experience firsthand the benefits and granular level of control you have over the network through the traffic<br />
engineering of an MPLS network. Start by assessing the existing traffic demand of applications across data center(s).<br />
Group traffic demand into priority categories, for instance, voice and video may be gathered into a “real time” priority<br />
category, while private data is grouped into a second and Internet traffic is grouped into a third category.<br />
Step 6: Monitor and manage. As with any network, you must continue to monitor and manage the network once it<br />
is deployed and running while supporting new service loads and demands. An advantage MPLS provides above and<br />
beyond IP is its capability to traffic engineer based upon utilization and application demands as the business evolves.<br />
For more information on MPLS, refer to: www.juniper.net/techpubs/software/junos/junos53/swconfig53-mplsapps/html/mpls-overview.html.<br />
For more information on VPLS, refer to: www.juniper.net/techpubs/en_US/junos10.2/information-products/<br />
pathway-pages/config-guide-vpns/config-guide-vpns-vpls.html.<br />
High-Performance Security Services Trigger Event<br />
Please refer to the best practices and related installation information outlined in the Upgrading Security Services in<br />
the Core section. as that trigger event covers the security services network insertion point.<br />
Completed <strong>Migration</strong> to a Simplified, High-Performance, Two-Tier Network<br />
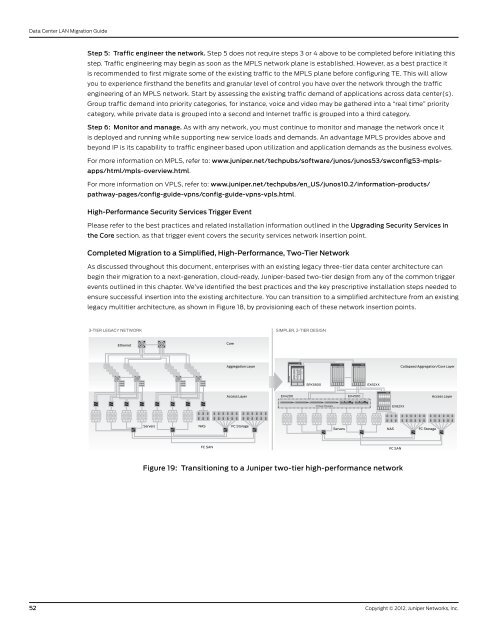
As discussed throughout this document, enterprises with an existing legacy three-tier data center architecture can<br />
begin their migration to a next-generation, cloud-ready, <strong>Juniper</strong>-based two-tier design from any of the common trigger<br />
events outlined in this chapter. We’ve identified the best practices and the key prescriptive installation steps needed to<br />
ensure successful insertion into the existing architecture. You can transition to a simplified architecture from an existing<br />
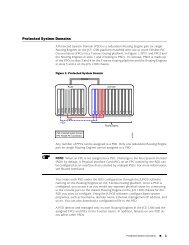
legacy multitier architecture, as shown in Figure 18, by provisioning each of these network insertion points.<br />
3-TIER LEGACY NETWORK<br />
Ethernet<br />
Core<br />
Aggregation Layer<br />
Servers NAS FC Storage<br />
FC SAN<br />
SIMPLER, 2-TIER DESIGN<br />
Figure 19: Transitioning to a <strong>Juniper</strong> two-tier high-performance network<br />
52 Copyright © 2012, <strong>Juniper</strong> <strong>Networks</strong>, Inc.<br />
SRX5800<br />
EX82XX<br />
Collapsed Aggregation/Core Layer<br />
Access Layer EX4200 EX4500<br />
Access Layer<br />
Virtual Chassis EX82XX<br />
Servers NAS FC Storage<br />
FC SAN