March 2018

Create successful ePaper yourself
Turn your PDF publications into a flip-book with our unique Google optimized e-Paper software.
Roof Windows<br />
ROOF WINDOW INSTALLATION:<br />
GET IT RIGHT FIRST TIME<br />
If not selected and installed correctly, a roof window can be a potential point of leaks and<br />
affect the thermal performance of the building. Lee Griffiths, Technical Sales Manager GBI at<br />
Dakea, discusses the factors to consider when selecting a roof window, and provides a stepby-step<br />
guide on how to install a roof window and get it right first time.<br />
Establishing the customer’s exact<br />
requirements from the outset sounds<br />
obvious but most definitely avoids<br />
disappointment further down the line.<br />
Consider the size and number<br />
of roof windows<br />
A good starting point is establishing the size of<br />
the roof window and the number of windows<br />
required. Bigger windows, of course, admit more<br />
daylight, but it is also worth considering a number<br />
of smaller windows instead, as a better overall<br />
effect can sometimes be achieved.<br />
Other factors worth discussing<br />
with your client<br />
If thermal performance is a<br />
priority there are roof<br />
windows that keep houses<br />
warm in the winter and<br />
prevent heat build-up in<br />
the summer. Systems that<br />
feature double-pane<br />
window glazing units filled<br />
with krypton and covered in a<br />
double low emission coating will<br />
achieve this.<br />
1<br />
Reviewing how the room will be used can also<br />
throw up questions when it comes to noise<br />
protection. At Dakea we have introduced our<br />
Noise Block technology - a 6mm thick, toughened<br />
outer pane, flashing system and inner pane with<br />
two layers of noise-reducing film. This means<br />
external noise is reduced 50% more effectively<br />
than comparable windows on the market.<br />
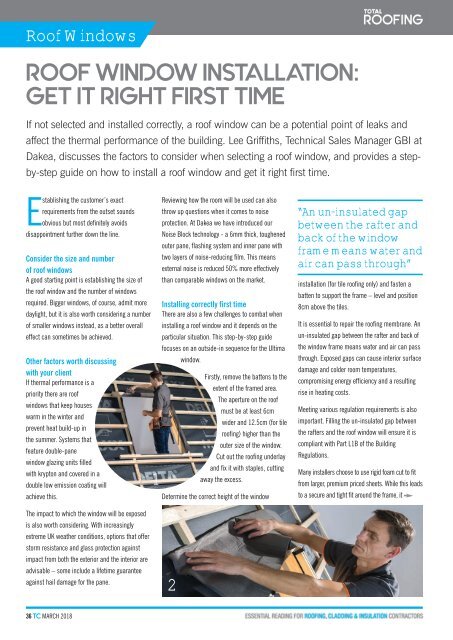
Installing correctly first time<br />
There are also a few challenges to combat when<br />
installing a roof window and it depends on the<br />
particular situation. This step-by-step guide<br />
focuses on an outside-in sequence for the Ultima<br />
window.<br />
Firstly, remove the battens to the<br />
extent of the framed area.<br />
The aperture on the roof<br />
must be at least 6cm<br />
wider and 12.5cm (for tile<br />
roofing) higher than the<br />
outer size of the window.<br />
Cut out the roofing underlay<br />
and fix it with staples, cutting<br />
away the excess.<br />
Determine the correct height of the window<br />
“An un-insulated gap<br />
between the rafter and<br />
back of the window<br />
frame means water and<br />
air can pass through”<br />
installation (for tile roofing only) and fasten a<br />
batten to support the frame – level and position<br />
8cm above the tiles.<br />
It is essential to repair the roofing membrane. An<br />
un-insulated gap between the rafter and back of<br />
the window frame means water and air can pass<br />
through. Exposed gaps can cause interior surface<br />
damage and colder room temperatures,<br />
compromising energy efficiency and a resulting<br />
rise in heating costs.<br />
Meeting various regulation requirements is also<br />
important. Filling the un-insulated gap between<br />
the rafters and the roof window will ensure it is<br />
compliant with Part L1B of the Building<br />
Regulations.<br />
Many installers choose to use rigid foam cut to fit<br />
from larger, premium priced sheets. While this leads<br />
to a secure and tight fit around the frame, it<br />
The impact to which the window will be exposed<br />
is also worth considering. With increasingly<br />
extreme UK weather conditions, options that offer<br />
storm resistance and glass protection against<br />
impact from both the exterior and the interior are<br />
advisable – some include a lifetime guarantee<br />
against hail damage for the pane.<br />
2<br />
36 TC MARCH <strong>2018</strong>