
You also want an ePaper? Increase the reach of your titles
YUMPU automatically turns print PDFs into web optimized ePapers that Google loves.
<strong>Tilt</strong>-up <strong>Technical</strong> <strong>Manual</strong><br />
www.MeadowBurke.com<br />
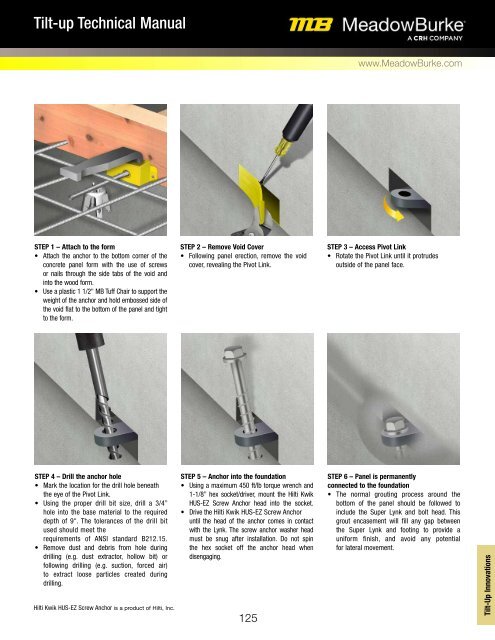
STEP 1 – Attach to the form<br />
• Attach the anchor to the bottom corner of the<br />
concrete panel form with the use of screws<br />
or nails through the side tabs of the void and<br />
into the wood form.<br />
• Use a plastic 1 1/2" MB Tuff Chair to support the<br />
weight of the anchor and hold embossed side of<br />
the void flat to the bottom of the panel and tight<br />
to the form.<br />
STEP 2 – Remove Void Cover<br />
• Following panel erection, remove the void<br />
cover, revealing the Pivot Link.<br />
STEP 3 – Access Pivot Link<br />
• Rotate the Pivot Link until it protrudes<br />
outside of the panel face.<br />
STEP 4 – Drill the anchor hole<br />
• Mark the location for the drill hole beneath<br />
the eye of the Pivot Link.<br />
• Using the proper drill bit size, drill a 3/4”<br />
hole into the base material to the required<br />
depth of 9". The tolerances of the drill bit<br />
used should meet the<br />
requirements of ANSI standard B212.15.<br />
• Remove dust and debris from hole during<br />
drilling (e.g. dust extractor, hollow bit) or<br />
following drilling (e.g. suction, forced air)<br />
to extract loose particles created during<br />
drilling.<br />
Hilti Kwik HUS-EZ Screw Anchor is a product of Hilti, Inc.<br />
STEP 5 – Anchor into the foundation<br />
• Using a maximum 450 ft/lb torque wrench and<br />
1-1/8” hex socket/driver, mount the Hilti Kwik<br />
HUS-EZ Screw Anchor head into the socket.<br />
• Drive the Hilti Kwik HUS-EZ Screw Anchor<br />
until the head of the anchor comes in contact<br />
with the Lynk. The screw anchor washer head<br />
must be snug after installation. Do not spin<br />
the hex socket off the anchor head when<br />
disengaging.<br />
125<br />
STEP 6 – Panel is permanently<br />
connected to the foundation<br />
• The normal grouting process around the<br />
bottom of the panel should be followed to<br />
include the Super Lynk and bolt head. This<br />
grout encasement will fill any gap between<br />
the Super Lynk and footing to provide a<br />
uniform finish, and avoid any potential<br />
for lateral movement.<br />
<strong>Tilt</strong>-Up Innovations