Entering Time (Web)

You also want an ePaper? Increase the reach of your titles
YUMPU automatically turns print PDFs into web optimized ePapers that Google loves.
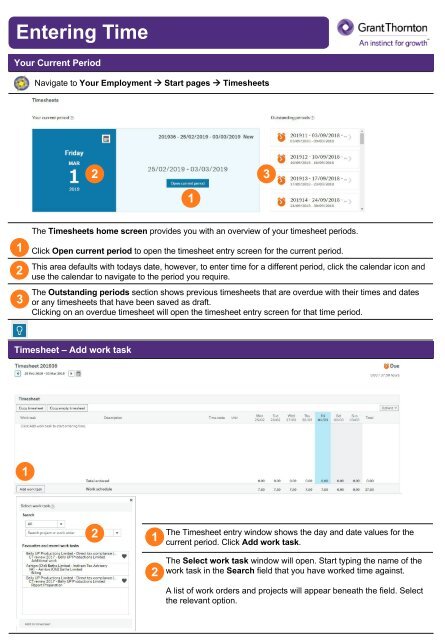
<strong>Entering</strong> <strong>Time</strong><br />
Your Current Period<br />
Navigate to Your Employment à Start pages à <strong>Time</strong>sheets<br />
2 3<br />
1<br />
1<br />
2<br />
3<br />
The <strong>Time</strong>sheets home screen provides you with an overview of your timesheet periods.<br />
Click Open current period to open the timesheet entry screen for the current period.<br />
This area defaults with todays date, however, to enter time for a different period, click the calendar icon and<br />
use the calendar to navigate to the period you require.<br />
The Outstanding periods section shows previous timesheets that are overdue with their times and dates<br />
or any timesheets that have been saved as draft.<br />
Clicking on an overdue timesheet will open the timesheet entry screen for that time period.<br />
<strong>Time</strong>sheet – Add work task<br />
1<br />
2<br />
1<br />
2<br />
The <strong>Time</strong>sheet entry window shows the day and date values for the<br />
current period. Click Add work task.<br />
The Select work task window will open. Start typing the name of the<br />
work task in the Search field that you have worked time against.<br />
A list of work orders and projects will appear beneath the field. Select<br />
the relevant option.
<strong>Entering</strong> <strong>Time</strong><br />
3<br />
Once you have selected a Work order from your search<br />
results, an Activity for the work undertaken must now<br />
be selected.<br />
3<br />
If you had selected a Project, the Work order section<br />
would contain multiple work orders and you would have<br />
to select the appropriate work order.<br />
4<br />
Click Add to timesheet.<br />
4<br />
<strong>Entering</strong> Hours<br />
1<br />
2<br />
3<br />
6<br />
7<br />
1 2<br />
The Description field will populate with a default description of the chosen activity. This text must be<br />
replaced with an accurate description of the work undertaken.<br />
Enter the number of Hours worked for this work order in the relevant day/date fields.<br />
The total hours entered on each row will update as you complete the timesheet with your hours.<br />
5<br />
3<br />
4<br />
4<br />
5<br />
6<br />
7<br />
This shows the total hours on your Work schedule. You cannot submit your timesheet until all of your work<br />
scheduled hours have been entered.<br />
You must indicate if an Independence check has been done by selecting Yes or No from the dropdown<br />
list.<br />
Once the time entry information for this work task is complete, you must click Add work task and repeat<br />
this process for the additional time entry rows.<br />
If you are entering work tasks against the same project, you can also click the blue Add work task link<br />
found next to the bold project description.<br />
When the timesheet for the period is complete and ready to be approved, click Submit.