Entering Expenses using Experience Pack

Create successful ePaper yourself
Turn your PDF publications into a flip-book with our unique Google optimized e-Paper software.
<strong>Entering</strong> <strong>Expenses</strong> <strong>using</strong> the <strong>Experience</strong> <strong>Pack</strong><br />
<strong>Expenses</strong><br />
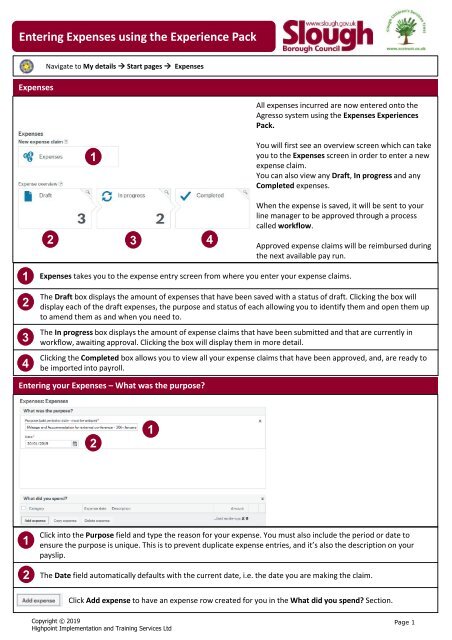
Navigate to My details → Start pages → <strong>Expenses</strong><br />
All expenses incurred are now entered onto the<br />
Agresso system <strong>using</strong> the <strong>Expenses</strong> <strong>Experience</strong>s<br />
<strong>Pack</strong>.<br />
1<br />
You will first see an overview screen which can take<br />
you to the <strong>Expenses</strong> screen in order to enter a new<br />
expense claim.<br />
You can also view any Draft, In progress and any<br />
Completed expenses.<br />
2<br />
3 4<br />
When the expense is saved, it will be sent to your<br />
line manager to be approved through a process<br />
called workflow.<br />
Approved expense claims will be reimbursed during<br />
the next available pay run.<br />
1<br />
2<br />
3<br />
4<br />
<strong>Expenses</strong> takes you to the expense entry screen from where you enter your expense claims.<br />
The Draft box displays the amount of expenses that have been saved with a status of draft. Clicking the box will<br />
display each of the draft expenses, the purpose and status of each allowing you to identify them and open them up<br />
to amend them as and when you need to.<br />
The In progress box displays the amount of expense claims that have been submitted and that are currently in<br />
workflow, awaiting approval. Clicking the box will display them in more detail.<br />
Clicking the Completed box allows you to view all your expense claims that have been approved, and, are ready to<br />
be imported into payroll.<br />
<strong>Entering</strong> your <strong>Expenses</strong> – What was the purpose?<br />
2<br />
1<br />
1<br />
2<br />
Click into the Purpose field and type the reason for your expense. You must also include the period or date to<br />
ensure the purpose is unique. This is to prevent duplicate expense entries, and it’s also the description on your<br />
payslip.<br />
The Date field automatically defaults with the current date, i.e. the date you are making the claim.<br />
Click Add expense to have an expense row created for you in the What did you spend? Section.<br />
Copyright © 2019<br />
Highpoint Implementation and Training Services Ltd<br />
Page 1
<strong>Entering</strong> <strong>Expenses</strong> <strong>using</strong> the <strong>Experience</strong> <strong>Pack</strong><br />
<strong>Entering</strong> your <strong>Expenses</strong> – What did you spend?<br />
1<br />
1 2 3 4<br />
1<br />
2<br />
3<br />
4<br />
In the Category field, click the drop-down arrow to select from a choice of categories that suits the type of expense.<br />
In Expense date, select the date that the expense was incurred by clicking on the calendar icon.<br />
In the Description field, overtype the information in brackets with an explanation of what the expense claim was<br />
for.<br />
In the Amount field, enter the amount of the expense.<br />
5<br />
6<br />
5<br />
6<br />
7<br />
Click the icon at the right side of a row in the What did you spend? table to view and update the Cost<br />
Categories section.<br />
Your Position will default in. If you have multiple positions, your main position will be selected.<br />
The Cost centre and Tax code will default in and shouldn’t be amended.<br />
In the Receipt field, press Space to open the lookup in order to select whether the receipt is a VAT receipt or not.<br />
Once all the information for the expense item has been entered, you can now upload the receipt and attach it to<br />
the item on the expense claim. It’s mandatory to attach receipts for all expenses apart from Mileage.<br />
Copyright © 2019<br />
Highpoint Implementation and Training Services Ltd<br />
Page 2
<strong>Entering</strong> <strong>Expenses</strong> <strong>using</strong> the <strong>Experience</strong> <strong>Pack</strong><br />
Expense Overview<br />
1<br />
2<br />
4<br />
3<br />
5<br />
1<br />
2<br />
3<br />
4<br />
5<br />
Clicking the Receipts box within the <strong>Expenses</strong> overview section allows you to import and upload the receipts to<br />
attach to the expense claim.<br />
Once clicked, the Receipts window opens and you can upload the receipts to the expense claim by clicking Upload<br />
receipts.<br />
A Windows explorer window opens which allows you to browse your computer or network for the expense receipt.<br />
Once you’ve selected your receipt, a copy of it will appear in the Receipts window which indicates it has been<br />
successfully attached.<br />
The Receipts section will update to show that there is a receipt available but that it isn’t matched. The receipt(s)<br />
must now be matched to their expense item(s) by clicking in the Receipts section again.<br />
Receipt Window<br />
3<br />
1<br />
2<br />
Copyright © 2019<br />
Highpoint Implementation and Training Services Ltd<br />
Page 3
<strong>Entering</strong> <strong>Expenses</strong> <strong>using</strong> the <strong>Experience</strong> <strong>Pack</strong><br />
1<br />
2<br />
3<br />
When an expense receipt has been uploaded, an image of the receipt itself will open in a separate window for you<br />
to verify that its correct. The bottom section contains a table which is used to match the receipt to the expense<br />
item. Use the left and right facing arrows to scroll to the correct receipt image, and then tick the expense item that<br />
it matches.<br />
Tick the box at the beginning of the expense row that matches the receipt and click Match to receipt. An image will<br />
appear stating that the expense has been matched to this receipt.<br />
Click the X in the top right corner of the Receipts window. A Paperclip symbol will appear at the right side of the<br />
expense item row to indicate that receipt has been attached.<br />
Saving your Expense<br />
Once the expense claim is complete, click Send for approval at the bottom of the screen. The<br />
expense claim will be sent into workflow for approval so you are reimbursed.<br />
The system will then issue you a Success message.<br />
Alternatively, you could Save as draft should you wish to open and amend it in future.<br />
Copyright © 2019<br />
Highpoint Implementation and Training Services Ltd<br />
Page 4
<strong>Entering</strong> <strong>Expenses</strong> <strong>using</strong> the <strong>Experience</strong> <strong>Pack</strong><br />
Mileage Claims – Private Car for Business<br />
1 2 3 4<br />
5<br />
6 7 8<br />
1<br />
2<br />
3<br />
4<br />
5<br />
6<br />
7<br />
8<br />
In the Category field, click the drop-down arrow and select Mileage Private Car for Business.<br />
In Expense date, select the date that the mileage expense was incurred by clicking on the calendar icon or by<br />
entering the date.<br />
Enter a Description of the trip where your mileage occurred. This must include the from and to destinations.<br />
In the Quantity field, enter the number of miles. This will update the Amount field automatically.<br />
The vehicle type MUST be entered, otherwise the rate field will remain 0.00, and you won’t get paid. This will<br />
default in as long as your vehicle has been set up in Agresso. If this is empty or incorrect, you must select the value<br />
lookup.<br />
Your Position will default in. If you have multiple positions, your main position will be selected. The Cost centre<br />
will default in and shouldn’t be amended.<br />
Borough – In/Out is a lookup field and when selecting the space bar, you’ll see the options IN or OUT. You must<br />
select as to whether the mileage occurred IN or OUT of the Borough.<br />
In the Vehicle Registration field, by typing ahead part of your vehicle license registration or description, you can<br />
select your vehicle. This vehicle is required as the Council must know the emission caused by this trip.<br />
If you haven’t registered your vehicle, please see the document “How To Create Vehicle Registration License Plate”<br />
first.<br />
Notes<br />
- Mileage is the only category where it’s not mandatory to attach a receipt. Rather than create an expense claim for<br />
every single mileage claim, best practice is to group them up and Save them as draft. This allows you to reopen<br />
and add to your claim, and send it for approval at the end of the month.<br />
- If you have various trips in a week, use the Copy expense option. Select the line first and then click Copy expense.<br />
This will duplicate the current selected expense row, therefore saving you time so you don’t have to create it from<br />
scratch.<br />
Copyright © 2019<br />
Highpoint Implementation and Training Services Ltd<br />
Page 5