CRAFT DOC_compressed

You also want an ePaper? Increase the reach of your titles
YUMPU automatically turns print PDFs into web optimized ePapers that Google loves.
The part is elongated and hammered<br />
into a thinner cylinder, yet not as narrow<br />
as the limbs. The neck is slightly bent<br />
and flattened to provide surface area for<br />
fixing the head later on.<br />
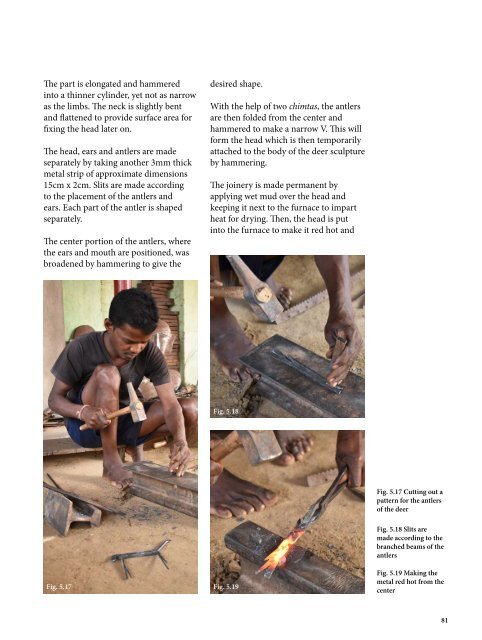
The head, ears and antlers are made<br />
separately by taking another 3mm thick<br />
metal strip of approximate dimensions<br />
15cm x 2cm. Slits are made according<br />
to the placement of the antlers and<br />
ears. Each part of the antler is shaped<br />
separately.<br />
The center portion of the antlers, where<br />
the ears and mouth are positioned, was<br />
broadened by hammering to give the<br />
desired shape.<br />
With the help of two chimtas, the antlers<br />
are then folded from the center and<br />
hammered to make a narrow V. This will<br />
form the head which is then temporarily<br />
attached to the body of the deer sculpture<br />
by hammering.<br />
The joinery is made permanent by<br />
applying wet mud over the head and<br />
keeping it next to the furnace to impart<br />
heat for drying. Then, the head is put<br />
into the furnace to make it red hot and<br />
Fig. 5.18<br />
Fig. 5.17 Cutting out a<br />
pattern for the antlers<br />
of the deer<br />
Fig. 5.18 Slits are<br />
made according to the<br />
branched beams of the<br />
antlers<br />
Fig. 5.17 Fig. 5.19<br />
Fig. 5.19 Making the<br />
metal red hot from the<br />
center<br />
81