The New Spruce Forge Manual of Locksmithing: A Blacksmith’s Guide to Simple Lock Mechanisms
The New Spruce Forge Manual of Locksmithing: a Blacksmith’s Guide to Simple Lock Mechanisms is a totally revised and expanded version of the original work from 1999. This new hardcover edition, at 304 pages and with more than 800 color photos and illustrations, is more than double the size of the original manual. It is divided into two distinct sections: Technical Information - This section is a reference manual in itself that covers the specific tools and techniques needed to build all the parts for each lock, as well as providing the information needed to understand the assembly instructions outlined in the second section. The Locks: Patterns & Instructions - This section provides the plans and detailed instructions for each of the 14 lock projects in this new edition. The clear assembly instructions describe when and how to use the technical information provided in section one. The authors have maintained their original trademark style that relies on well-illustrated step-by-step instructions that guide you through the whole lock-making process. They have also kept their low-tech approach that demonstrates how to go about creating good work using only a handful of simple tools. Making blacksmith locks is an age-old skill the authors of this manual are helping to preserve by passing on their knowledge to this book’s readers. The New Spruce Forge Manual of Locksmithing is also an excellent introduction to benchwork, which is a useful skill for any blacksmith to acquire. This manual will become a valuable, trusted and often referred to sourcebook in your blacksmithing library. Hardcover, 304 pages, more than 800 photos and illustrations.
The New Spruce Forge Manual of Locksmithing: a Blacksmith’s Guide to Simple Lock Mechanisms is a totally revised and expanded version of the original work from 1999. This new hardcover edition, at 304 pages and with more than 800 color photos and illustrations, is more than double the size of the original manual.
It is divided into two distinct sections:
Technical Information - This section is a reference manual in itself that covers the specific tools and techniques needed to build all the parts for each lock, as well as providing the information needed to understand the assembly instructions outlined in the second section.
The Locks: Patterns & Instructions - This section provides the plans and detailed instructions for each of the 14 lock projects in this new edition. The clear assembly instructions describe when and how to use the technical information provided in section one.
The authors have maintained their original trademark style that relies on well-illustrated step-by-step instructions that guide you through the whole lock-making process. They have also kept their low-tech approach that demonstrates how to go about creating good work using only a handful of simple tools.
Making blacksmith locks is an age-old skill the authors of this manual are helping to preserve by passing on their knowledge to this book’s readers. The New Spruce Forge Manual of Locksmithing is also an excellent introduction to benchwork, which is a useful skill for any blacksmith to acquire. This manual will become a valuable, trusted and often referred to sourcebook in your blacksmithing library.
Hardcover, 304 pages, more than 800 photos and illustrations.

Create successful ePaper yourself
Turn your PDF publications into a flip-book with our unique Google optimized e-Paper software.
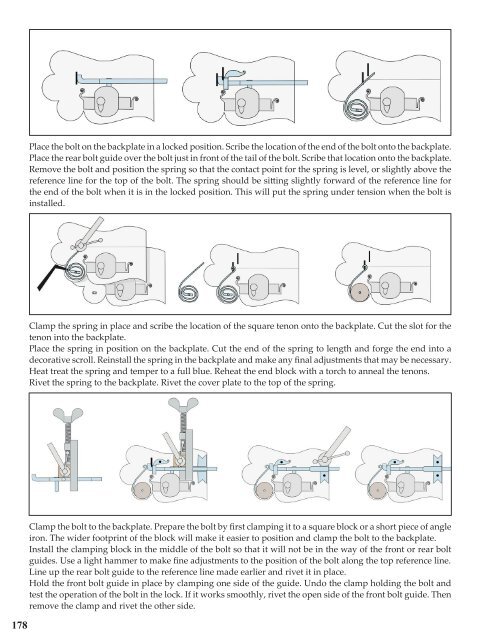
Place the bolt on the backplate in a locked position. Scribe the location <strong>of</strong> the end <strong>of</strong> the bolt on<strong>to</strong> the backplate.<br />
Place the rear bolt guide over the bolt just in front <strong>of</strong> the tail <strong>of</strong> the bolt. Scribe that location on<strong>to</strong> the backplate.<br />
Remove the bolt and position the spring so that the contact point for the spring is level, or slightly above the<br />
reference line for the <strong>to</strong>p <strong>of</strong> the bolt. <strong>The</strong> spring should be sitting slightly forward <strong>of</strong> the reference line for<br />
the end <strong>of</strong> the bolt when it is in the locked position. This will put the spring under tension when the bolt is<br />
installed.<br />
Clamp the spring in place and scribe the location <strong>of</strong> the square tenon on<strong>to</strong> the backplate. Cut the slot for the<br />
tenon in<strong>to</strong> the backplate.<br />
Place the spring in position on the backplate. Cut the end <strong>of</strong> the spring <strong>to</strong> length and forge the end in<strong>to</strong> a<br />
decorative scroll. Reinstall the spring in the backplate and make any final adjustments that may be necessary.<br />
Heat treat the spring and temper <strong>to</strong> a full blue. Reheat the end block with a <strong>to</strong>rch <strong>to</strong> anneal the tenons.<br />
Rivet the spring <strong>to</strong> the backplate. Rivet the cover plate <strong>to</strong> the <strong>to</strong>p <strong>of</strong> the spring.<br />
178<br />
Clamp the bolt <strong>to</strong> the backplate. Prepare the bolt by first clamping it <strong>to</strong> a square block or a short piece <strong>of</strong> angle<br />
iron. <strong>The</strong> wider footprint <strong>of</strong> the block will make it easier <strong>to</strong> position and clamp the bolt <strong>to</strong> the backplate.<br />
Install the clamping block in the middle <strong>of</strong> the bolt so that it will not be in the way <strong>of</strong> the front or rear bolt<br />
guides. Use a light hammer <strong>to</strong> make fine adjustments <strong>to</strong> the position <strong>of</strong> the bolt along the <strong>to</strong>p reference line.<br />
Line up the rear bolt guide <strong>to</strong> the reference line made earlier and rivet it in place.<br />
Hold the front bolt guide in place by clamping one side <strong>of</strong> the guide. Undo the clamp holding the bolt and<br />
test the operation <strong>of</strong> the bolt in the lock. If it works smoothly, rivet the open side <strong>of</strong> the front bolt guide. <strong>The</strong>n<br />
remove the clamp and rivet the other side.