The New Spruce Forge Manual of Locksmithing: A Blacksmith’s Guide to Simple Lock Mechanisms
The New Spruce Forge Manual of Locksmithing: a Blacksmith’s Guide to Simple Lock Mechanisms is a totally revised and expanded version of the original work from 1999. This new hardcover edition, at 304 pages and with more than 800 color photos and illustrations, is more than double the size of the original manual. It is divided into two distinct sections: Technical Information - This section is a reference manual in itself that covers the specific tools and techniques needed to build all the parts for each lock, as well as providing the information needed to understand the assembly instructions outlined in the second section. The Locks: Patterns & Instructions - This section provides the plans and detailed instructions for each of the 14 lock projects in this new edition. The clear assembly instructions describe when and how to use the technical information provided in section one. The authors have maintained their original trademark style that relies on well-illustrated step-by-step instructions that guide you through the whole lock-making process. They have also kept their low-tech approach that demonstrates how to go about creating good work using only a handful of simple tools. Making blacksmith locks is an age-old skill the authors of this manual are helping to preserve by passing on their knowledge to this book’s readers. The New Spruce Forge Manual of Locksmithing is also an excellent introduction to benchwork, which is a useful skill for any blacksmith to acquire. This manual will become a valuable, trusted and often referred to sourcebook in your blacksmithing library. Hardcover, 304 pages, more than 800 photos and illustrations.
The New Spruce Forge Manual of Locksmithing: a Blacksmith’s Guide to Simple Lock Mechanisms is a totally revised and expanded version of the original work from 1999. This new hardcover edition, at 304 pages and with more than 800 color photos and illustrations, is more than double the size of the original manual.
It is divided into two distinct sections:
Technical Information - This section is a reference manual in itself that covers the specific tools and techniques needed to build all the parts for each lock, as well as providing the information needed to understand the assembly instructions outlined in the second section.
The Locks: Patterns & Instructions - This section provides the plans and detailed instructions for each of the 14 lock projects in this new edition. The clear assembly instructions describe when and how to use the technical information provided in section one.
The authors have maintained their original trademark style that relies on well-illustrated step-by-step instructions that guide you through the whole lock-making process. They have also kept their low-tech approach that demonstrates how to go about creating good work using only a handful of simple tools.
Making blacksmith locks is an age-old skill the authors of this manual are helping to preserve by passing on their knowledge to this book’s readers. The New Spruce Forge Manual of Locksmithing is also an excellent introduction to benchwork, which is a useful skill for any blacksmith to acquire. This manual will become a valuable, trusted and often referred to sourcebook in your blacksmithing library.
Hardcover, 304 pages, more than 800 photos and illustrations.
You also want an ePaper? Increase the reach of your titles
YUMPU automatically turns print PDFs into web optimized ePapers that Google loves.
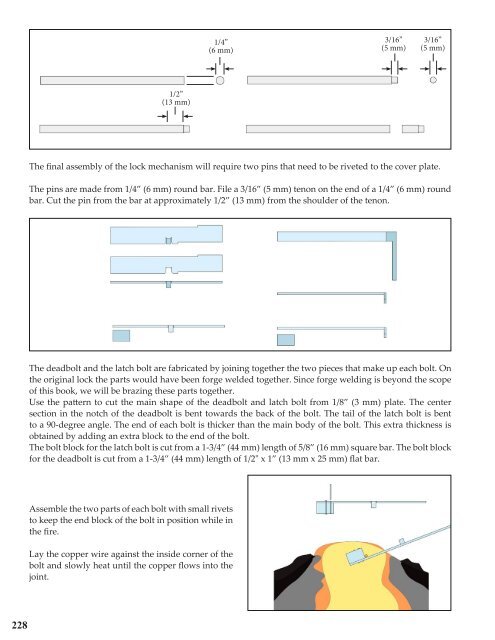
1/4”<br />
(6 mm)<br />
3/16”<br />
(5 mm)<br />
3/16”<br />
(5 mm)<br />
1/2”<br />
(13 mm)<br />
<strong>The</strong> final assembly <strong>of</strong> the lock mechanism will require two pins that need <strong>to</strong> be riveted <strong>to</strong> the cover plate.<br />
<strong>The</strong> pins are made from 1/4” (6 mm) round bar. File a 3/16” (5 mm) tenon on the end <strong>of</strong> a 1/4” (6 mm) round<br />
bar. Cut the pin from the bar at approximately 1/2” (13 mm) from the shoulder <strong>of</strong> the tenon.<br />
<strong>The</strong> deadbolt and the latch bolt are fabricated by joining <strong>to</strong>gether the two pieces that make up each bolt. On<br />
the original lock the parts would have been forge welded <strong>to</strong>gether. Since forge welding is beyond the scope<br />
<strong>of</strong> this book, we will be brazing these parts <strong>to</strong>gether.<br />
Use the pattern <strong>to</strong> cut the main shape <strong>of</strong> the deadbolt and latch bolt from 1/8” (3 mm) plate. <strong>The</strong> center<br />
section in the notch <strong>of</strong> the deadbolt is bent <strong>to</strong>wards the back <strong>of</strong> the bolt. <strong>The</strong> tail <strong>of</strong> the latch bolt is bent<br />
<strong>to</strong> a 90-degree angle. <strong>The</strong> end <strong>of</strong> each bolt is thicker than the main body <strong>of</strong> the bolt. This extra thickness is<br />
obtained by adding an extra block <strong>to</strong> the end <strong>of</strong> the bolt.<br />
<strong>The</strong> bolt block for the latch bolt is cut from a 1-3/4” (44 mm) length <strong>of</strong> 5/8” (16 mm) square bar. <strong>The</strong> bolt block<br />
for the deadbolt is cut from a 1-3/4” (44 mm) length <strong>of</strong> 1/2" x 1” (13 mm x 25 mm) flat bar.<br />
Assemble the two parts <strong>of</strong> each bolt with small rivets<br />
<strong>to</strong> keep the end block <strong>of</strong> the bolt in position while in<br />
the fire.<br />
Lay the copper wire against the inside corner <strong>of</strong> the<br />
bolt and slowly heat until the copper flows in<strong>to</strong> the<br />
joint.<br />
228


