


You also want an ePaper? Increase the reach of your titles
YUMPU automatically turns print PDFs into web optimized ePapers that Google loves.
Y ou<br />
Software Installation<br />
5<br />
must install drivers in order for <strong>Conectiv</strong> to operate properly. Please consult the included Quick Start <strong>Guide</strong> for<br />
installation instructions.<br />
Once the drivers are installed, you may need to configure your audio software to route signals to and from <strong>Conectiv</strong>. Refer to<br />
your program’s user guide to learn how to do this.<br />
Note: Windows XP and Mac OS X will recognize the <strong>Conectiv</strong> interface as a generic USB audio device if it is connected<br />
before you install the drivers. Operation without drivers is not recommended because some of <strong>Conectiv</strong>’s features will not be<br />
accessible in this mode. If you have already connected the interface to your computer, make sure to unplug it before beginning<br />
with the driver installation.<br />
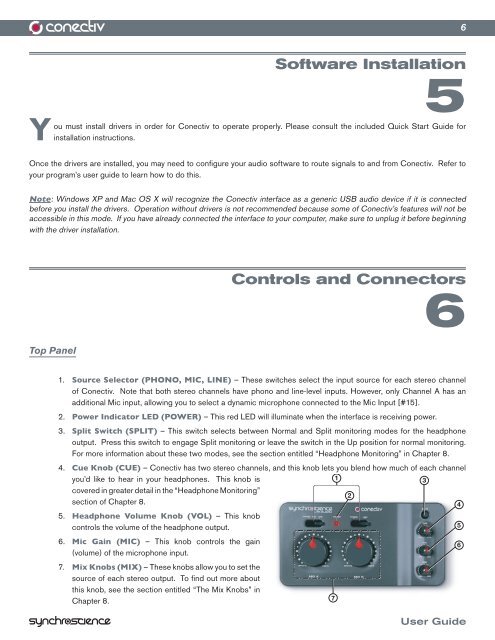
Top Panel<br />
Controls and Connectors<br />
6<br />
1. Source Selector (PHONO, MIC, LINE) – These switches select the input source for each stereo channel<br />
of <strong>Conectiv</strong>. Note that both stereo channels have phono and line-level inputs. However, only Channel A has an<br />
additional Mic input, allowing you to select a dynamic microphone connected to the Mic Input [#15].<br />
2. Power Indicator LED (POWER) – This red LED will illuminate when the interface is receiving power.<br />
3. Split Switch (SPLIT) – This switch selects between Normal and Split monitoring modes for the headphone<br />
output. Press this switch to engage Split monitoring or leave the switch in the Up position for normal monitoring.<br />
For more information about these two modes, see the section entitled “Headphone Monitoring” in Chapter 8.<br />
4. Cue Knob (CUE) – <strong>Conectiv</strong> has two stereo channels, and this knob lets you blend how much of each channel<br />
you’d like to hear in your headphones. This knob is<br />
1<br />
3<br />
covered in greater detail in the “Headphone Monitoring”<br />
section of Chapter 8.<br />
5. Headphone Volume Knob (VOL) – This knob<br />
2<br />
4<br />
controls the volume of the headphone output.<br />
5<br />
6. Mic Gain (MIC) – This knob controls the gain<br />
(volume) of the microphone input.<br />
7. Mix Knobs (MIX) – These knobs allow you to set the<br />
source of each stereo output. To find out more about<br />
this knob, see the section entitled “The Mix Knobs” in<br />
Chapter 8.<br />
7<br />
6<br />
6<br />
<strong>User</strong> <strong>Guide</strong>


