Line 6 PODStudio & TonePort MIDI Setup Guide (Rev 2 ... - Thomann
Line 6 PODStudio & TonePort MIDI Setup Guide (Rev 2 ... - Thomann
Line 6 PODStudio & TonePort MIDI Setup Guide (Rev 2 ... - Thomann

You also want an ePaper? Increase the reach of your titles
YUMPU automatically turns print PDFs into web optimized ePapers that Google loves.
3•1<br />
<strong>MIDI</strong> <strong>Setup</strong> <strong>Guide</strong>: Controlling Ableton Live TM<br />
ConTrollIng ableTon lIve sofTware<br />
This chapter includes instructions for using your <strong>Line</strong> 6 UX2/UX8/KB37 with the Ableton Live<br />
software, including the Ableton Live Lite - <strong>Line</strong> 6 Edition, which comes included with some <strong>Line</strong> 6<br />
devices. The special <strong>Line</strong> 6 Edition of this software offers some pre-defined <strong>MIDI</strong> controller functions<br />
with your <strong>Line</strong> 6 hardware. We’ve provided examples here as well for customizing your <strong>Line</strong> 6 POD<br />
Studio/<strong>TonePort</strong> controller mappings, using any Live version’s <strong>MIDI</strong> Map Mode, controlling effects<br />
Plug-In parameters and more. These functions are also available in other popular DAW applications,<br />
and often the procedure is similar for configuring the behavior, therefore, the following tips should be<br />
a useful guide for using your POD Studio or <strong>TonePort</strong> to control other applications as well! Also see<br />
the following chapter for more specific instructions on configuring other popular <strong>MIDI</strong>/DAW software<br />
for use with your <strong>Line</strong> 6 device.<br />
If you received the Ableton Live Lite - <strong>Line</strong> 6 Edition with your <strong>Line</strong> 6 product, you can upgrade to the<br />
latest Live Lite - <strong>Line</strong> 6 Edition version free at http://www.ableton.com/free-line6-upgrade. If you want<br />
to try the following examples with the latest Ableton Live full version, you can download a free Demo<br />
version at http://www.ableton.com/downloads.<br />
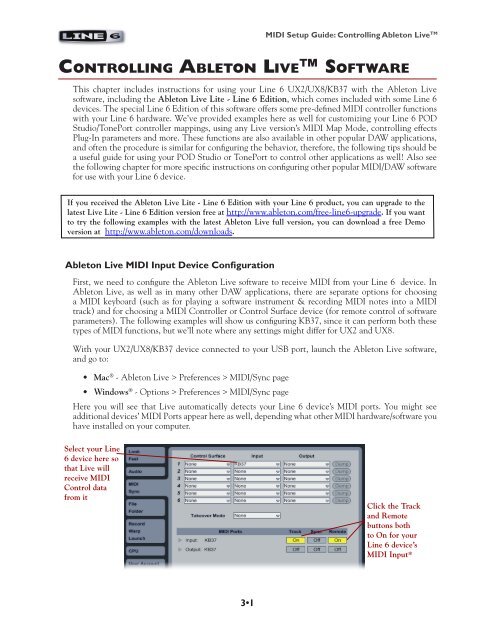
Ableton Live <strong>MIDI</strong> Input Device Configuration<br />
First, we need to configure the Ableton Live software to receive <strong>MIDI</strong> from your <strong>Line</strong> 6 device. In<br />
Ableton Live, as well as in many other DAW applications, there are separate options for choosing<br />
a <strong>MIDI</strong> keyboard (such as for playing a software instrument & recording <strong>MIDI</strong> notes into a <strong>MIDI</strong><br />
track) and for choosing a <strong>MIDI</strong> Controller or Control Surface device (for remote control of software<br />
parameters). The following examples will show us configuring KB37, since it can perform both these<br />
types of <strong>MIDI</strong> functions, but we’ll note where any settings might differ for UX2 and UX8.<br />
With your UX2/UX8/KB37 device connected to your USB port, launch the Ableton Live software,<br />
and go to:<br />
• Mac ® - Ableton Live > Preferences > <strong>MIDI</strong>/Sync page<br />
• Windows ® - Options > Preferences > <strong>MIDI</strong>/Sync page<br />
Here you will see that Live automatically detects your <strong>Line</strong> 6 device’s <strong>MIDI</strong> ports. You might see<br />
additional devices’ <strong>MIDI</strong> Ports appear here as well, depending what other <strong>MIDI</strong> hardware/software you<br />
have installed on your computer.<br />
Select your <strong>Line</strong><br />
6 device here so<br />
that Live will<br />
receive <strong>MIDI</strong><br />
Control data<br />
from it<br />
Click the Track<br />
and Remote<br />
buttons both<br />
to On for your<br />
<strong>Line</strong> 6 device’s<br />
<strong>MIDI</strong> Input*