Line 6 PODStudio & TonePort MIDI Setup Guide (Rev 2 ... - Thomann
Line 6 PODStudio & TonePort MIDI Setup Guide (Rev 2 ... - Thomann
Line 6 PODStudio & TonePort MIDI Setup Guide (Rev 2 ... - Thomann

You also want an ePaper? Increase the reach of your titles
YUMPU automatically turns print PDFs into web optimized ePapers that Google loves.
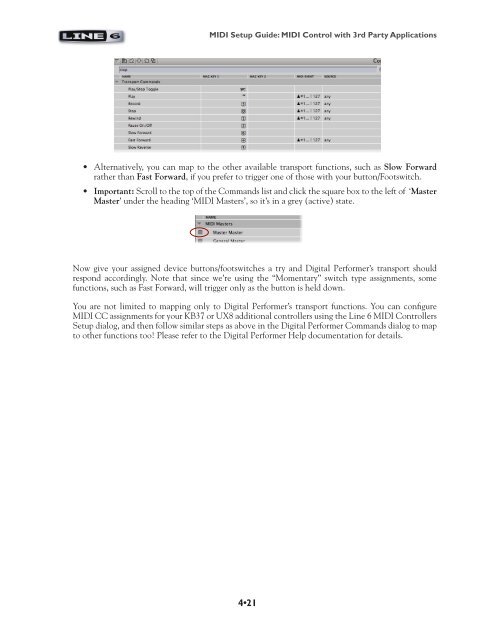
<strong>MIDI</strong> <strong>Setup</strong> <strong>Guide</strong>: <strong>MIDI</strong> Control with 3rd Party Applications<br />
• Alternatively, you can map to the other available transport functions, such as Slow Forward<br />
rather than Fast Forward, if you prefer to trigger one of those with your button/Footswitch.<br />
• Important: Scroll to the top of the Commands list and click the square box to the left of ‘Master<br />
Master’ under the heading ‘<strong>MIDI</strong> Masters’, so it’s in a grey (active) state.<br />
Now give your assigned device buttons/footswitches a try and Digital Performer’s transport should<br />
respond accordingly. Note that since we’re using the “Momentary” switch type assignments, some<br />
functions, such as Fast Forward, will trigger only as the button is held down.<br />
You are not limited to mapping only to Digital Performer’s transport functions. You can configure<br />
<strong>MIDI</strong> CC assignments for your KB37 or UX8 additional controllers using the <strong>Line</strong> 6 <strong>MIDI</strong> Controllers<br />
<strong>Setup</strong> dialog, and then follow similar steps as above in the Digital Performer Commands dialog to map<br />
to other functions too! Please refer to the Digital Performer Help documentation for details.<br />
4•21