Line 6 PODStudio & TonePort MIDI Setup Guide (Rev 2 ... - Thomann
Line 6 PODStudio & TonePort MIDI Setup Guide (Rev 2 ... - Thomann
Line 6 PODStudio & TonePort MIDI Setup Guide (Rev 2 ... - Thomann

Create successful ePaper yourself
Turn your PDF publications into a flip-book with our unique Google optimized e-Paper software.
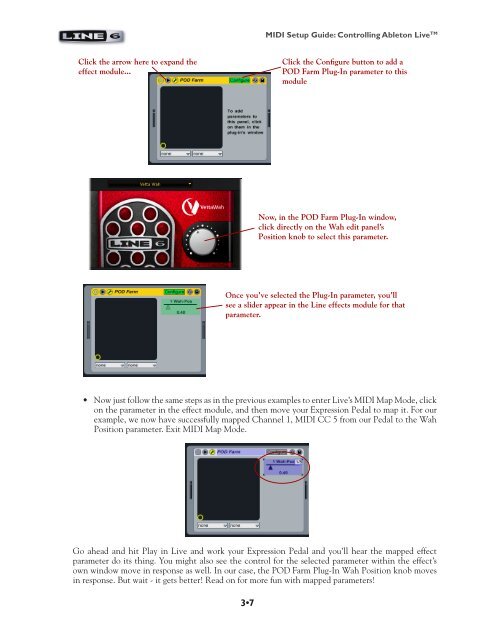
Click the arrow here to expand the<br />
effect module...<br />
3•7<br />
<strong>MIDI</strong> <strong>Setup</strong> <strong>Guide</strong>: Controlling Ableton Live TM<br />
Click the Configure button to add a<br />
POD Farm Plug-In parameter to this<br />
module<br />
Now, in the POD Farm Plug-In window,<br />
click directly on the Wah edit panel’s<br />
Position knob to select this parameter.<br />
Once you’ve selected the Plug-In parameter, you’ll<br />
see a slider appear in the <strong>Line</strong> effects module for that<br />
parameter.<br />
• Now just follow the same steps as in the previous examples to enter Live’s <strong>MIDI</strong> Map Mode, click<br />
on the parameter in the effect module, and then move your Expression Pedal to map it. For our<br />
example, we now have successfully mapped Channel 1, <strong>MIDI</strong> CC 5 from our Pedal to the Wah<br />
Position parameter. Exit <strong>MIDI</strong> Map Mode.<br />
Go ahead and hit Play in Live and work your Expression Pedal and you’ll hear the mapped effect<br />
parameter do its thing. You might also see the control for the selected parameter within the effect’s<br />
own window move in response as well. In our case, the POD Farm Plug-In Wah Position knob moves<br />
in response. But wait - it gets better! Read on for more fun with mapped parameters!