Line 6 PODStudio & TonePort MIDI Setup Guide (Rev 2 ... - Thomann
Line 6 PODStudio & TonePort MIDI Setup Guide (Rev 2 ... - Thomann
Line 6 PODStudio & TonePort MIDI Setup Guide (Rev 2 ... - Thomann

Create successful ePaper yourself
Turn your PDF publications into a flip-book with our unique Google optimized e-Paper software.
<strong>MIDI</strong> <strong>Setup</strong> <strong>Guide</strong>: <strong>MIDI</strong> Control with 3rd Party Applications<br />
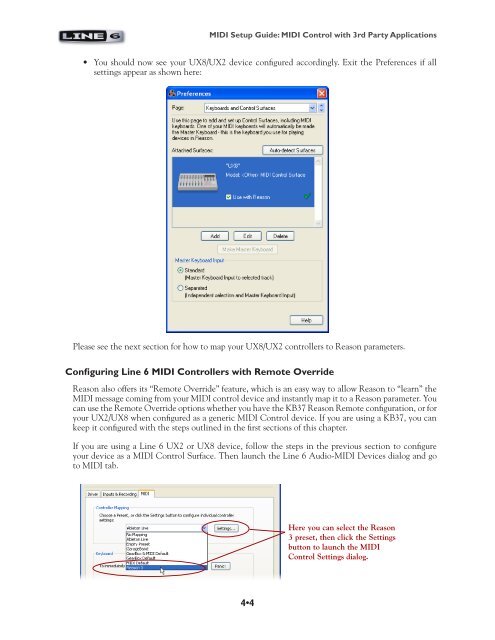
• You should now see your UX8/UX2 device configured accordingly. Exit the Preferences if all<br />
settings appear as shown here:<br />
Please see the next section for how to map your UX8/UX2 controllers to Reason parameters.<br />
Configuring <strong>Line</strong> 6 <strong>MIDI</strong> Controllers with Remote Override<br />
Reason also offers its “Remote Override” feature, which is an easy way to allow Reason to “learn” the<br />
<strong>MIDI</strong> message coming from your <strong>MIDI</strong> control device and instantly map it to a Reason parameter. You<br />
can use the Remote Override options whether you have the KB37 Reason Remote configuration, or for<br />
your UX2/UX8 when configured as a generic <strong>MIDI</strong> Control device. If you are using a KB37, you can<br />
keep it configured with the steps outlined in the first sections of this chapter.<br />
If you are using a <strong>Line</strong> 6 UX2 or UX8 device, follow the steps in the previous section to configure<br />
your device as a <strong>MIDI</strong> Control Surface. Then launch the <strong>Line</strong> 6 Audio-<strong>MIDI</strong> Devices dialog and go<br />
to <strong>MIDI</strong> tab.<br />
4•4<br />
Here you can select the Reason<br />
3 preset, then click the Settings<br />
button to launch the <strong>MIDI</strong><br />
Control Settings dialog.