Customer Guide - visit site - Grande Communications
Customer Guide - visit site - Grande Communications
Customer Guide - visit site - Grande Communications

You also want an ePaper? Increase the reach of your titles
YUMPU automatically turns print PDFs into web optimized ePapers that Google loves.
<strong>Customer</strong> <strong>Guide</strong>
Welcome To <strong>Grande</strong> <strong>Communications</strong><br />
Thank you for choosing <strong>Grande</strong> <strong>Communications</strong>. Please take a few moments to read this<br />
guide and learn about your new service(s). This guide will be your resource for everything<br />
<strong>Grande</strong> <strong>Communications</strong> has to offer. The more you know and use all the options available,<br />
the more value and flexibility you will enjoy with our TV, Internet and Phone services.<br />
With focus on our customers, we have held true to the belief that our support teams must<br />
be in Texas to provide help to the Texans we serve; our 24/7 customer and technical<br />
support calls will always be answered by someone right here in Texas.<br />
Your TV Service<br />
<strong>Grande</strong> TV Overview 1<br />
Using Your Remote Control 2<br />
Using Your TiVo Remote Control 3<br />
Your Scientific Atlanta Digital Receiver 4<br />
Your Motorola Digital Receiver 6<br />
Your TiVo Premiere 8<br />
FlexScreen 11<br />
On Demand Services 11<br />
High-Definition TV (HDTV) 12<br />
Connecting Your Components 13<br />
Troubleshooting Tips 16<br />
FAQs 16<br />
Your Internet Service<br />
Getting Connected 19<br />
Your <strong>Grande</strong> Home Page 20<br />
Using <strong>Grande</strong> Webmail 21<br />
Setting Up Email 24<br />
Email Phishing 28<br />
Online Security 28<br />
Wireless Home Networking 29<br />
Troubleshooting Tips 30<br />
FAQs 30<br />
Your Phone Service<br />
Using Your Phone Service 33<br />
Outage Protection Service 34<br />
Your Online Phone Manager 34<br />
Your Calling Features 36<br />
Your Voicemail Service 42<br />
Understanding Your Equipment 45<br />
Troubleshooting Tips 46<br />
FAQs 47<br />
How To Read Your<br />
Monthly Bill 48<br />
Your TV Service<br />
With your new <strong>Grande</strong> <strong>Communications</strong> TV service there’s something<br />
for everyone. And we have the features to help you maximize your<br />
state-of-the-art entertainment experience.<br />
Interactive <strong>Guide</strong> on Digital Receivers<br />
The interactive guide is a tool you can use to easily find the shows or<br />
channels you want to watch, see what is on at specific times, or search<br />
a particular network. Use the guide to quickly find what you’re looking<br />
for so you never miss a minute of the programming that is important to you.<br />
Note: If you are in Austin, San Marcos, San Antonio or Waco, and use<br />
a Scientific Atlanta digital receiver model, check out that section for<br />
information. If you are in Corpus Christi, Midland, Odessa or Dallas<br />
and use a Motorola digital receiver model you can refer to that section.<br />
TiVo<br />
Available throughout the <strong>Grande</strong> footprint, TiVo Premiere from <strong>Grande</strong><br />
is a new way to watch your favorite TV shows, <strong>Grande</strong> On Demand, Web<br />
Videos, Music and Photos right on your TV – whenever you want them.<br />
From a device so smart, it knows what you want and even helps you<br />
discover new programs you’ll love.<br />
Table Of Contents<br />
<strong>Grande</strong> TV Overview 1<br />
Using Your Remote Control 2<br />
Using Your TiVo Remote Control 3<br />
Your Scientific Atlanta Digital Receiver 4<br />
Your Motorola Digital Receiver 6<br />
Your TiVo Premiere 8<br />
FlexScreen 11<br />
On Demand Services 11<br />
High-Definition TV (HDTV) 12<br />
Connecting Your Components 13<br />
Troubleshooting Tips 16<br />
FAQS 16<br />
Parental Controls<br />
Along with the simple interactive guide, we also offer parental controls.<br />
You choose the programming appropriate for your children to view and<br />
block the content you don’t want them to view.<br />
FlexScreen<br />
FlexScreen is the newest way to watch your favorite programs on any<br />
screen, any time, anywhere. Watch over 100,000 clips, movies, and<br />
shows! Whether you’re anywhere in your house or on the go,<br />
FlexScreen is there for you.<br />
On Demand<br />
<strong>Grande</strong> TV customers with a digital receiver can enjoy On Demand –<br />
total programming at your fingertips. Watch your favorite shows backto-back<br />
while enjoying the fast-forward, pause and rewind functions on<br />
your remote.<br />
Note: On Demand service is not available in Dallas.<br />
High-Definition Programming<br />
<strong>Grande</strong> provides HD programming at no extra cost!<br />
Your TV Service<br />
1
2<br />
Your TV Service Your TV Service<br />
Using Your Remote Control<br />
Your remote helps you navigate <strong>Grande</strong> TV services. Below is an overview of your remote’s capabilities:<br />
POWER/MODE: AUX, DVD, AUD, TV or CBL<br />
Press once to select a home entertainment<br />
component to control. CBL controls the Motorola<br />
or Scientific Atlanta digital receiver.<br />
GUIDE & MENU: Press to go to the Interactive<br />
Program <strong>Guide</strong>.<br />
SETTINGS: Press to customize your Interactive<br />
Program <strong>Guide</strong>.<br />
ARROWS: Press to navigate menus and listings and<br />
control playback of live TV and recorded programs.<br />
VOLUME: Press + or - to raise or lower the<br />
volume.<br />
MUTE: Press once to turn sound on or off.<br />
FAV (Favorite): Press to see pre-selected channels<br />
or programs.<br />
PIP buttons: Press to control Picture-in-Picture<br />
functions.<br />
Programming Your Remote<br />
ON/OFF<br />
AUX DVD AUD<br />
SETTINGS<br />
SYSTEM<br />
GUIDE<br />
A<br />
B<br />
OK/SEL<br />
MUTE LAST<br />
VOL CH<br />
DAY<br />
FAV<br />
ON<br />
DEMAND<br />
DAY<br />
M1 M2 M3<br />
LIST<br />
LIVE<br />
REW PLAY FF<br />
STOP<br />
PAUSE<br />
REC<br />
ON-OFF SWAP PIP<br />
MOVE + CH<br />
VIDEO<br />
SOURCE<br />
1. Turn on all the electronic devices you want the remote to operate<br />
(i.e. TV, DVD, AUDIO).<br />
2. Press the OK/SEL button and the MUTE button together until the<br />
POWER/MODE button illuminate in slow rotation (AUX, DVD, AUD,<br />
TV, CBL).<br />
3. Press and hold the CHANNEL UP button until one device turns off.<br />
While you are pressing the CHANNEL UP button, the POWER/MODE<br />
buttons will illuminate in fast rotation. As soon as one device turns<br />
off, release the CHANNEL UP button.<br />
1<br />
GHI<br />
4<br />
PQRS<br />
7<br />
*<br />
MENU INFO<br />
ABC<br />
2<br />
JKL<br />
5<br />
TUV<br />
8<br />
LIGHT<br />
C<br />
POWER<br />
TV CBL<br />
EXIT<br />
D<br />
PAGE<br />
DEF<br />
3<br />
MNO<br />
6<br />
WXYZ<br />
9<br />
0 #<br />
-<br />
POWER: Press to turn your digital receiver,<br />
compatible TV, VCR and other device(s) on or off.<br />
INFO: Press to obtain detailed program information.<br />
EXIT: Press to exit out of your digital receiver’s menu<br />
and guide.<br />
PAGE: Press to navigate settings or the Program<br />
<strong>Guide</strong>.<br />
OK/SEL: Press to choose options, PPV events and to<br />
tune to programs from the Program <strong>Guide</strong>.<br />
CHANNEL: Press + or - to change the channel up or<br />
down.<br />
LAST: Press to go back to a previous screen or<br />
area.<br />
DVR & VOD PLAYBACK<br />
BUTTONS: Use these buttons to navigate through<br />
your DVR recordings or On Demand programming.<br />
4. Press the MUTE button. If the device that turned off in Step 3:<br />
a. Turns back on, press the OK/SEL button to lock this code. The<br />
POWER/MODE buttons will blink three times and then will turn off.<br />
b. Does not turn back on, press the CHANNEL DOWN button one<br />
click at a time until that device turns back on. Each time you press<br />
the CHANNEL DOWN button, the POWER/MODE buttons will<br />
illuminate once in reverse fast rotation (AUX, DVD, AUD, TV, CBL).<br />
5. Repeat steps 2-4 for each of the remaining electronic devices you<br />
want the remote to operate.<br />
Using Your TiVo Remote Control<br />
TiVo: Takes you to the TiVo Central ® screen, the<br />
<strong>Guide</strong> Menu for all TiVo features and settings.<br />
TV Pwr: If programmed, turns TV or A/V receiver on/<br />
off. Your TiVo Premiere is always on.<br />
Arrows: Navigate TiVo menus and program guide.<br />
Left arrow goes back.<br />
Thumbs Up/Thumbs Down: Rate shows for TiVo<br />
Suggestions.<br />
Pause: Press to freeze show. Press again to resume<br />
watching.<br />
Rewind: Rewinds show. Press it up to three times<br />
for three speeds.<br />
Slow: Plays show in slow motion.<br />
Replay: Repeats last 8 seconds of show. Press and<br />
hold to jump to beginning of show.<br />
On Demand: Provides direct access to <strong>Grande</strong> On<br />
Demand library.<br />
Programming Your TiVo Remote<br />
Programming TV Power & Volume Functions<br />
1. Go to TiVo Central and select “Settings & Messages”.<br />
Zoom<br />
Vol<br />
Slow<br />
On Demand<br />
S wa p<br />
Ch<br />
A D<br />
B C<br />
2. Select Settings > Remote, CableCARD & Devices ><br />
Remote Control Setup.<br />
3. Follow on-screen instructions.<br />
Live TV/Swap: Takes you to live TV. If you’re<br />
watching live TV, use it to switch to another tuner.<br />
Info: Displays detailed info on show being watched.<br />
Press again to clear.<br />
<strong>Guide</strong>: Takes you to the program guide. Press again<br />
to clear the guide.<br />
Select: Choose menu options or shows to record.<br />
Record: Start/stop recording.<br />
Play: Starts playing show from My Shows list.<br />
Fast-Forward: Fast-forwards through show. Press up<br />
to three times for three speeds.<br />
Advance: Moves forward in 30-second increments.<br />
Press and hold to jump to end of show.<br />
A, B, C, D: In TiVo with HD menus, sort and filter<br />
views. Look for the on-screen tips.<br />
Enter/Last: Returns to last channel viewed in live TV.<br />
Also works like Select button in guide view.<br />
3
4<br />
Your TV Service Your TV Service<br />
Your Scientific Atlanta Digital Receiver<br />
This section covers the Scientific Atlanta digital receiver used in Austin, San Marcos, San Antonio and Waco.<br />
Interactive Program <strong>Guide</strong><br />
Your interactive program guide lets you see what’s on TV, access<br />
program information, record shows or movies (with DVR feature) and<br />
purchase pay-per-view movies or events, all with the click of a button.<br />
This guide also lists programs and program information for every<br />
channel up to 7 days in advance.<br />
To Access the Interactive Program <strong>Guide</strong><br />
1. Press the GUIDE button on the remote.<br />
To get detailed information on a program<br />
1. From the <strong>Guide</strong> Menu, use the UP/DOWN, LEFT/RIGHT arrow<br />
buttons to move the selector box around the screen and to<br />
highlight a selection.<br />
2. When your selection is highlighted, press the INFO button on the<br />
remote to view detailed information and additional options on your<br />
selection.<br />
To Browse<br />
1. Press the GUIDE button to go to the <strong>Guide</strong> Menu.<br />
2. Use the UP/DOWN, LEFT/RIGHT arrow buttons to highlight<br />
Theme, Title or Channel and press the OK/SEL button.<br />
3. Use the UP/DOWN, LEFT/RIGHT arrow buttons to sort through the<br />
listings that appear. When you see something you want to watch,<br />
press the SELECTION button.<br />
Setting Reminders<br />
1. From the <strong>Guide</strong> Menu, highlight the future program for which you<br />
want to set a reminder and press the OK/SEL button.<br />
2. When the menu screen appears, press the arrow buttons to choose<br />
“Set a Reminder for”.<br />
3. Press the OK/SEL button. A clock indicates that a reminder<br />
has been set.<br />
Note: Every time this program is scheduled to air, a reminder will pop<br />
up to notify you one minute before the program begins.<br />
Setting Favorites<br />
1. From the <strong>Guide</strong> Menu, press the SETTINGS button on the remote.<br />
2. Use the UP/DOWN, LEFT/RIGHT arrow buttons to highlight<br />
“Viewer: Favorites” and press the OK/SEL button.<br />
3. Use the UP/DOWN, LEFT/RIGHT arrow buttons to highlight<br />
channels. Press the OK/SELbutton to add a channel to your<br />
“Favorites” list. A favorite channel is noted by a blue ribbon.<br />
4. Press the A button to accept your favorite list.<br />
NOTE: Your Scientific<br />
Atlanta digital receiver<br />
may look different than<br />
the receiver shown here<br />
as models may vary.<br />
Multiple Options to View or Access your Favorite Channels<br />
1. If you would like to view a list of your Favorite channels, select<br />
Favorites from the <strong>Guide</strong> Menu or HEART from the Quick menu.<br />
2. Select Favorites from the <strong>Guide</strong> Menu or HEART from the Quick Menu<br />
to see a list of your Favorite channels.<br />
3. While you are in TV listings, press the FAV button on your remote to<br />
move the highlight to your next Favorite channel.<br />
4. While watching TV, press FAV to quickly tune to your Favorites.<br />
Parental Controls<br />
Parent locks allow you to restrict viewing and purchases of TV<br />
programming based on your viewing preferences. Set a personalized<br />
4-digit pin and you can place locks on selected ratings, channels and<br />
titles, and even hide adult titles from being displayed on-screen.<br />
Creating a Parental Control PIN<br />
1. Press the GUIDE button and then the SETTINGS button on the<br />
remote.<br />
2. Use the UP/DOWN, LEFT/RIGHT arrow buttons to highlight<br />
Block:PIN and then press the OK/SEL button.<br />
3. Highlight Enable and press the OK/SEL button.<br />
4. Choose a four-digit PIN that you will remember.<br />
Note: Follow steps 1 and 2 to change your PIN. Confirm the change<br />
by entering your new PIN a second time.<br />
Turning Parental Control On<br />
1. While watching TV, press the SETTINGS button.<br />
2. Use the UP/DOWN, LEFT/RIGHT arrow buttons to highlight Turn<br />
Off/On Parental Control.<br />
3. Press the OK/SEL button to change settings ON or OFF. Then<br />
enter your Parental Control PIN.<br />
Setting Parental Controls – Block Channels<br />
1. Press the GUIDE button and then the SETTINGS button on the<br />
remote.<br />
2. Use the UP/DOWN, LEFT/RIGHT arrow buttons to highlight Block:<br />
Channels and press the OK/SEL button on the remote.<br />
3. If you set up a Parental Control PIN, you will be required to enter it<br />
at this time.<br />
4. Use the UP/DOWN, LEFT/RIGHT arrow buttons to choose the<br />
channels to block. When your selection is highlighted, press the<br />
OK/SEL button.<br />
5. Press the A button to accept blocked channel. Then press the EXIT<br />
button to return to watching TV.<br />
Setting Parental Controls – Block Ratings<br />
1. Press the GUIDE button and then the SETTINGS button on the<br />
remote.<br />
2. Use the UP/DOWN, LEFT/RIGHT arrow buttons to highlight Block:<br />
Ratings and press the OK/SEL button on the remote.<br />
3. If you set up a Parental Control PIN, you will be required to enter it<br />
at this time.<br />
4. Use the UP/DOWN, LEFT/RIGHT arrow buttons to choose the<br />
rating to block.<br />
5. Press the OK/SEL button or the B button to block the rating.<br />
You will have to select each rating separately that you wish to<br />
block.<br />
6. Press the A button to accept.<br />
Note: Blocks do not take effect until Parental Control is turned on.<br />
Pay-Per-View (PPV)<br />
Ordering PPV<br />
1. From the <strong>Guide</strong> Menu, highlight the movie/event you want to pur<br />
chase and press the OK/SEL button on the remote.<br />
2. Press the B button to buy and the A button to confirm the purchase.<br />
A confirmation message will appear if the program is already in progress.<br />
Otherwise, an attention screen counts down until the program begins.<br />
Note: Check the Channel <strong>Guide</strong> at www.mygrande.com<br />
for a listing of your Pay-Per-View specific channels.<br />
5
6<br />
Your TV Service Your TV Service<br />
Your Motorola Digital Receiver Parental Controls<br />
This section covers the Motorola digital receiver used in Corpus Christi, Midland, Odessa and Dallas.<br />
Interactive Program <strong>Guide</strong><br />
Your interactive program guide gives you easy access to all the features of<br />
digital TV. It let’s you see TV listings by time, provides viewing options<br />
by category, search functions, Favorites, local weather, and more. You can<br />
narrow your search by using the theme, or other various subcategories.<br />
This guide also lists program and program information for every channel<br />
up to 14 days in advance<br />
To Access the Interactive Program <strong>Guide</strong><br />
1. Press GUIDE once on your remote.<br />
To get Detailed Information on a Program<br />
1. Press the GUIDE button on your remote to go to the program listings.<br />
2. Use the ARROW BUTTONS to move the selector box around the<br />
screen and to highlight a selection.<br />
3. Press INFO on your remote to see detailed program information for<br />
any highlighted title.<br />
Setting Reminders<br />
1. From an information screen, highlight the Bell icon and press<br />
OK/SEL. Follow the on-screen prompts to confirm the Reminder<br />
or set Reminder options.<br />
Note: Every time this program is scheduled to air, a reminder will pop<br />
up to notify you one minute before the program begins.<br />
Setting Favorites<br />
The Favorites feature allows you to quickly access the channels you have<br />
designated as your Favorites. To add channels to your Favorites list:<br />
1. Select Setup from the <strong>Guide</strong> Menu.<br />
2. Select Favorites Setup.<br />
NOTE: Your Motorola<br />
digital receiver may<br />
look different than the<br />
receiver shown here as<br />
models may vary.<br />
3. Highlight a channel and press OK/SEL or FAV. The HEART indicator<br />
will appear, designating the channel as a Favorite.<br />
To remove a channel from your Favorites, highlight the channel in the<br />
Favorites Setup and press OK/SEL or FAV. The HEART indicator<br />
disappears and the channel will no longer be designated as a Favorite.<br />
Multiple Options to View or Access your Favorite Channels<br />
1. If you would like to view a list of your Favorite channels, select<br />
Favorites from the <strong>Guide</strong> Menu or HEART from the Quick menu.<br />
2. Select Favorites from the <strong>Guide</strong> Menu or HEART from the Quick Menu<br />
to see a list of your Favorite channels.<br />
3. While you are in TV listings, press the FAV button on your remote to<br />
move the highlight to your next Favorite channel.<br />
4. While watching TV, press FAV to quickly tune to your Favorites.<br />
Parent locks allow you to restrict viewing and purchases of TV<br />
programming based on your viewing preferences. Set a personalized<br />
4-digit pin and you can place locks on selected ratings, channels and<br />
titles, and even hide adult titles from being displayed on-screen.<br />
Creating a Parental Control Locks PIN<br />
Setup and change your Parental Locks and Purchase PIN in the “PINS<br />
Setup” menu. Your Parental Locks PIN allows you to restrict viewing of<br />
programs to only those members of the household that have the PIN.<br />
Your Purchase PIN is used to restrict the purchase of pay programming.<br />
To Create your Parental Locks or Purchase PIN<br />
1. Select Setup from the <strong>Guide</strong> Menu.<br />
2. Select PINs Setup.<br />
3. Follow the on-screen prompts to setup, clear or change your PINS.<br />
Parental Locks Setup<br />
You can set Parental Locks anytime in the guide or while watching TV.<br />
Using the LOCK button or icon:<br />
1. Press the LOCK button on your remote or use the lock icon on an<br />
information screen.<br />
2. Enter your 4-digit Parental Locks PIN and Lock the channel, title or<br />
rating using the on-screen prompts.<br />
Using the Setup Menu:<br />
1. From the <strong>Guide</strong> Menu select Setup, then Locks Setup.<br />
2. Use the Arrows Buttons to make your selections and then press OK to<br />
confirm each setting.<br />
Pay-Per-View (PPV)<br />
Ordering PPV<br />
1. From the <strong>Guide</strong> Menu and Quick Menu, select PPV and go to the<br />
PPV menu.<br />
2. Select any of the PPV options to see programs available in a variety<br />
of categories.<br />
3. When you find a program of interest, highlight the title and press<br />
OK/SEL for the information screen.<br />
4. To purchase a program, highlight the BUY icon and follow the<br />
onscreen prompts to complete your order.<br />
If the program is scheduled to air at a future time, a Reminder is<br />
automatically set to notify you of your order before the program begins.<br />
Note: Check the Channel <strong>Guide</strong> at www.mygrande.com for a listing of<br />
your Pay-Per-View specific channels.<br />
7
8<br />
Your TV Service Your TV Service<br />
Your TiVo ® Premiere<br />
The starting point for the amazing TiVo Premiere features is the TiVo button on your TiVo remote control. Press this button once and you will be<br />
directed to the TiVo Central ® screen, where you can follow the on-screen directions to where ever you want to go!<br />
For more detailed instructions on using your TiVo Premiere, be sure to <strong>visit</strong> www.mygrande.com/tivo.<br />
Finding and Recording Shows<br />
Search & Record: Find what you Love to Watch<br />
From the TiVo Central screen, select Find TV, movies & videos, then<br />
select Search. Enter a few letters of the show title or actor name, and<br />
the TiVo service searches across TV, On Demand and Web to find<br />
matches. When you find something you like, select it to see the show’s<br />
information screen, then choose Get this show. You can record a single<br />
episode (select Record next episode) or every episode in the series<br />
(select Get a Season Pass).<br />
Season Pass ® Recordings: Record Every Episode of a Show<br />
Just select Get a Season Pass from a show’s information screen, and<br />
every episode of the series will be recorded, even if the date or time<br />
changes.<br />
<strong>Guide</strong>: Find out What’s on TV Now or Later<br />
Press the GUIDE button on your TiVo remote to find what’s on right<br />
now, and what’s coming up. Use the arrow keys to move around the<br />
guide. Press FORWARD and BACK to move right or left one page at a<br />
time. Press ADVANCE to move 24 hours ahead and REPLAY to move 24<br />
hours back.<br />
WishList ® Searches: Find Shows that Match your Areas of Interest<br />
Search by actor, director, keyword or category, and every time a show’s<br />
title or description matches your criteria, it’s recorded for you. To get<br />
started from the TiVo Central screen, select Find TV, movies & videos,<br />
then select WishList saved searches.<br />
Recording Options: Get Exactly the Results you Want<br />
You can choose whether or not to record re-runs, how many episodes<br />
of a series to keep, or even when to start or stop recording (a<br />
little early or a little late). Just choose Options when you set up a single<br />
recording or a Season Pass recording.<br />
Watching Shows<br />
Live TV: Return to Live TV at Any Time<br />
Press the LIVE TV button on your TiVo remote to watch live TV. Press<br />
LIVE TV again to switch tuners. While watching live TV, you can PAUSE,<br />
REWIND, and PLAY the video in slow motion.<br />
My Shows: All your Recorded or Downloaded Programs<br />
My Shows is the first menu item on the TiVo Central screen. Here you’ll<br />
find all of your recorded and downloaded shows and all of your TiVo<br />
recommended shows (TiVo Suggestions).<br />
Hint: You can get to the My Shows list by pressing the TiVo<br />
button on your remote control twice.<br />
Parental Controls: Controlling Access is Easy<br />
Restrict access to shows based on rating or simply restrict certain<br />
channels. From the TiVo Central screen, select Settings & Messages ><br />
Settings > Parental Controls.<br />
Getting Recommendations<br />
Discovery Bar: Get Personalized Recommendations<br />
The Discovery Bar is the bar of thumbnail images across the top of TiVo<br />
Central and most other TiVo with HD menus screens. The Discovery<br />
Bar helps you find new shows based on what shows you rate with the<br />
THUMBS UP and THUMBS DOWN buttons on your remote control. And<br />
it doesn’t contain only shows. You’ll also find thumbnails for actors,<br />
collections of related shows, and more. Press the UP arrow to move<br />
up to the Discovery Bar, then the LEFT and RIGHT ARROWS to move<br />
around. Press SELECT on an image that interests you to open an<br />
information screen about that item.<br />
TiVo Suggestions: Record Shows that Match your Preferences<br />
Based on the ratings you give to shows and movies, TiVo Suggestions<br />
automatically selects and records new content for you. It’s a great way<br />
to make new discoveries. Don’t worry, TiVo Suggestions won’t override<br />
your own recordings or steal valuable disk space. If you choose to<br />
auto-record TiVo Suggestions, you’ll find a list of recorded TiVo<br />
Suggestions in you’re My Shows list. TiVo Suggestions are marked with<br />
a Suggestions icon.<br />
Collections: Find Shows Based on Genre or Category<br />
From the TiVo Central screen, select Find TV, movies & videos, then<br />
select Browse TV & movies. You’ll find groups of shows on related<br />
subject matter recommended by the TiVo Service, partners, or video<br />
providers.<br />
Stream the Tunes you Love from the Internet, your<br />
PC or your Mac to the Best Speakers in the House<br />
Access the best of internet radio with Pandora ® Internet Radio & Live<br />
365. Pandora let’s you create custom Internet radio stations personalized<br />
just for you and Live 365 let’s you stream radio stations from your town<br />
and from around the world.<br />
You can also stream music from your PC or Mac to Your<br />
TiVo Premiere for free with the TiVo desktop Software available at<br />
www.mygrande.com/tivo.<br />
You can access all your music options from the TiVo Central screen,<br />
choose Music & Photos (for TiVo with HD menus) or Music, Photos &<br />
Showcases (for TiVo with SD menus), and select Pandora or Live 365.<br />
Follow the on screen instructions.<br />
Remote Scheduling to Program your TiVo<br />
Premiere from Anywhere<br />
Not at home? Take advantage of our Remote Scheduling feature to<br />
find shows and schedule recordings online using a tablet, laptop or<br />
smart phone.<br />
From your tablet or laptop, go to www.mygrande.com/tivo and click on<br />
the “Online Scheduling” link. Once on the TiVo <strong>site</strong>, click the “Find<br />
TV Shows” link. If you’re using a smart phone, go to m.tivo.com. Click<br />
on the “Search” link, sign in, and select the TiVo device you want to<br />
receive the recording request. Then simply pick the TV show you wish<br />
to record, choose a recording option, and your request will be sent!<br />
Take your TV Shows & Movies with you on your<br />
PC, Mac, iPad, iPhone, Android Phone or PSP<br />
It’s easy to transfer recorded TV shows, movies and music from your<br />
TiVo Premiere to your PC, Mac, iPad, iPhone, Android Phone or PSP.<br />
The first step is to download TiVo Desktop software (free) to your<br />
computer. (For the Mac, iPad, iPhone, Andriod Phone and PSP you<br />
will need TiVo Desktop Plus for an additional charge) To download this<br />
software, <strong>visit</strong> www.tivo.com.<br />
Once you’ve downloaded the correct software you can transfer most<br />
of the shows and movies to your favorite portable device. Please note,<br />
some shows are protected by content rights by the studios and cannot<br />
be transferred. The software will identify these shows for you.<br />
iPad TiVo App: Get Ultimate Control and Easily Search and Discover<br />
Favorite Shows & Movies<br />
The app brings the best of what TiVo has to offer on a second screen:<br />
so you can surface new content, view guides, schedule and manage<br />
recordings, get recommendations, or investigate a particular actor’s<br />
entire resume–all without interruption your program.<br />
Your iPad turns into the ultimate TiVo companion and takes your TV<br />
watching experience to a whole new level. Download the TiVo App for<br />
iPad from the Apple App Store.<br />
Note: To use the app, you’ll need to make sure that the “Network<br />
Remote Control” setting is enabled on your device. From TiVo Central,<br />
select Settings & Messages > Settings > Remote, CableCARD, & Devices ><br />
Network Remote Control.<br />
9
10<br />
Your TV Service Your TV Service<br />
Parental Controls<br />
Your TiVo Premiere DVR from <strong>Grande</strong> gives you two great ways to make<br />
sure your family has access to only those shows you want them to watch.<br />
Using Parental Controls<br />
From the TiVo Central screen, choose ‘Settings & Messages,’ then<br />
‘Settings,’ then ‘Parental Controls.’ (Or, select the padlock icon from<br />
the large channel banner.) The padlock icon in the channel banner<br />
shows the current state of Parental Controls.<br />
• Off No password or controls are set. The icon is dim and unlocked.<br />
• On Password and controls are set. The icon is bright and locked.<br />
• Temporarily Off Controls are set but turned off. The icon is bright and<br />
unlocked.<br />
Changing Parental Controls Settings<br />
Once Parental Controls are on, you must enter your Parental Controls<br />
password to change any Parental Controls settings.<br />
Turn on Parental Controls. Use the number buttons on the remote control<br />
to enter a four-digit password, then enter the same password again for<br />
confirmation.<br />
Turn off Parental Controls. Enter the password, and press SELECT.<br />
When Parental Controls are off, the password is deleted and anyone can<br />
view any shows or watch any channels.<br />
Temporarily turn off Parental Controls. Either enter the password<br />
to watch a show or channel, or select ‘Temporarily turn off Parental<br />
Controls’ from the Parental Controls screen. When Parental Controls<br />
are temporarily turned off, any show or channel can be viewed, but the<br />
password is still required to change Parental Controls settings.<br />
Auto Re-lock. When Parental Controls are temporarily turned off, they<br />
re-lock automatically after four hours of no remote control activity.<br />
Parental Controls won’t re-lock in the middle of a show. Use this setting<br />
to disable Auto Re-lock.<br />
Change the Password. While Parental Controls are on, select ‘Change<br />
Password’ from the Parental Controls screen. Enter a new password,<br />
then re-enter the new password to confirm.<br />
Setting rating for TV and movies. Movies originally meant for release<br />
to theaters have a different rating system from shows made for TV. Use<br />
rating limits to set rules for both rating systems, as well as for specific<br />
types of TV content. Select the rating type to change it.<br />
TV rating limit. Ratings shaded in green are not locked; ratings in red are<br />
locked. Use the UP/DOWN arrows to adjust which ratings are locked.<br />
Movie rating limit. Ratings shaded in green are not locked; ratings in<br />
red are locked. Use the UP/DOWN arrows to adjust which ratings are<br />
locked.<br />
Block by TV content. Types of content marked by broadcasters as able<br />
to be blocked are listed. Select each type of content you want to block<br />
and use the UP/DOWN arrows to adjust which ratings are blocked<br />
(shaded in red). Ratings in gray do not apply to that type of content.<br />
For example, a TV-Y show would not have V-Violence content so there<br />
is nothing to block.<br />
Block Unrated Programs. Some movies and TV shows are unrated.<br />
Use this setting to block all unrated movies or TV shows.<br />
Manage Other Ratings. Additional regional ratings may be available.<br />
Pay-Per-View<br />
Ordering PPV<br />
1. Browse through the channel guide for the PPV program you are<br />
interested in viewing.<br />
2. When you find a program of interest, highlight the title and press<br />
SELECT.<br />
3. Press SELECT again to view the PPV information.<br />
4. Follow the on-screen instructions.<br />
Note: Check the Channel <strong>Guide</strong> at www.mygrande.com for a listing of<br />
your Pay-Per-View specific channels.<br />
FlexScreen<br />
FlexScreen is the newest way to watch your favorite programs on any<br />
screen, any time, anywhere. Watch over 100,000 clips, movies, and<br />
shows! Whether you’re anywhere in your house or on the go,<br />
FlexScreen is there for you.<br />
• Watch TV and more wherever you want.<br />
• Available on all your favorite devices (smartphone, tablet, laptop).<br />
• All you need is an Internet connection and a <strong>Grande</strong> username.<br />
Note: Content provider restrictions apply.<br />
About FlexScreen<br />
• Included free with your HBO or Cinemax premium channel subscription.<br />
• HBO GO and MAX GO are services that allow HBO or Cinemax<br />
subscribers to watch their content on:<br />
• Computers: Macs & PCs.<br />
• Mobile devices like the iPad, iPhone or Android Phones and tablets.<br />
• Internet streamer devices like ROKU box.<br />
• Video game consoles like XBOX360.<br />
How to Use FlexScreen<br />
1. Go to www.mygrande.com/flexscreen and click on “Get the HBO Go<br />
App” or “Get the Max Go App”.<br />
2. Follow the on-screen instructions.<br />
Note: To use FlexScreen you need a username and password. If you<br />
already have a @mygrande.net or @grandecom.net email address,<br />
you already have a <strong>Grande</strong> username. Your username is the first part<br />
of your <strong>Grande</strong> email address before the @ symbol.<br />
For example, if your email address is: username_xyz@mygrande.net,<br />
then your username is ‘username_xyz’. Your password is your current<br />
<strong>Grande</strong> email password.<br />
Please contact <strong>Grande</strong> <strong>Customer</strong> Service is you do not have a<br />
username. If you do have a username but forgot your password, go to<br />
http://password.mygrande.net to reset it.<br />
On Demand Services<br />
<strong>Grande</strong>’s On Demand lets you choose from thousands of movies and<br />
programs, many of them free. Use your remote to pause, rewind or<br />
fast-forward your program, similar to how you use a DVR or DVD.<br />
You can watch what you want, when you want. And, if you have HBO,<br />
Showtime, Cinemax or Starz, you can enjoy On Demand programming<br />
from those channels as part of your service.<br />
Note: On Demand is not available in Dallas.<br />
Using On Demand<br />
(on Scientific Atlanta and Motorola Digital Receivers)<br />
(Motorola)<br />
You must have Preferred TV or Premier TV and either a Scientific<br />
Atlanta (in Austin, San Marcos, Waco, San Antonio) or Motorola digital<br />
receiver (in Corpus Christi, Midland and Odessa) to access <strong>Grande</strong>’s On<br />
Demand service. Follow these steps to access On Demand:<br />
1. Tune to Channel 1.<br />
(Scientific Atlanta)<br />
2. Scroll through the category options to select your desired category.<br />
3. Press OK/SEL to make your selection and move to the next screen.<br />
4. While watching you can use your remote to PAUSE, STOP,<br />
FAST-FORWARD or REWIND.<br />
5. Press STOP to exit currently playing program and return to the On<br />
Demand menu.<br />
6. Press LAST to return to prior On Demand screen.<br />
Note: Movies, events and other programs are typically available for 48<br />
hours after rental. Adult programs are available for 8 hours after rental.<br />
You can watch a program as many times as you like within the rental<br />
period. To resume watching a previously rented program, go to that<br />
program’s category and select “My Rentals” or “Saved Programs.”<br />
11
12<br />
Your TV Service Your TV Service<br />
Using On Demand (with TiVo Premiere)<br />
Your TiVo Premiere integrates <strong>Grande</strong> On Demand into TiVo’s search,<br />
browse & discover tools so it is easy to find your favorite TV shows<br />
and movies any time day or night. The fastest way to access the <strong>Grande</strong><br />
On Demand library is to press the ON DEMAND button on your remote<br />
control.<br />
You can also get to <strong>Grande</strong> On Demand from the TiVo menu. When using<br />
TiVo with HD menus, from the TiVo Central screen choose Find TV,<br />
movies & videos then <strong>Grande</strong> On Demand. When using TiVo with SD<br />
menus, on the TiVo Central screen choose <strong>Grande</strong> On Demand.<br />
Using Parental Controls On Demand<br />
You can easily set a Parental Controls in order to prevent unauthorized<br />
users from buying any content that must be purchased - such as<br />
movies, adult movies or events. If you subscribe to HBO, Showtime,<br />
Cinemax or Starz, you may want to block access to these On Demand<br />
channels as they may contain mature programming. For more<br />
information on parental controls, please go to page 10 in this booklet.<br />
High-Definition Television (HDTV)<br />
<strong>Grande</strong>’s HDTV service delivers movie theater quality to your living<br />
room with Dolby ® Digital 5.1 surround sound and 1080i transmission for<br />
crystal clear picture resolution. That’s ten times sharper than standard<br />
definition TV and a 33% larger wide-screen image. Our HD service<br />
includes your favorite broadcast channels as well as many more<br />
popular channels:<br />
HDTV Requirements<br />
You must have both an HDTV television and either an HD digital receiver,<br />
a TiVo Premiere or HD cable card to enjoy HDTV. Simply plugging<br />
your HDTV television into an active outlet will not deliver an HD signal<br />
to your HD television. Additionally, not all <strong>Grande</strong> digital receivers are<br />
HD digital receivers. If you are not sure you have the correct receiver,<br />
please contact <strong>Grande</strong> <strong>Customer</strong> Service.<br />
(Motorola)<br />
(Scientific Atlanta)<br />
NOTE: Your digital receiver may look different than the receiver shown<br />
here as models may vary.<br />
Connecting Your HDTV<br />
There are two types of cables that can be used to connect your HD<br />
receiver to your HDTV television.<br />
1. Component Cable – <strong>Grande</strong> uses this cable that has 5 RCA<br />
connectors.<br />
2. HDMI Cable – This cable combines all 5 ends into one connector.<br />
HDTV Screen Dimensions<br />
Watching standard definition channels on HDTV may result indifferent<br />
screen dimensions and you may see bars on both sides of your screen.<br />
Refer to your TV manual for instructions on how to stretch your picture<br />
to fill the entire screen. Stretching the picture can cause distortion.<br />
This is not a result of your <strong>Grande</strong> service.<br />
Connecting Your Components<br />
If you have an HD digital receiver (either Scientific Atlanta or Motorola)<br />
or a TiVo Premiere, and an HDMI input on your TV, you can use a single<br />
HDMI cable instead of component cables. Both cables will produce high<br />
quality results. The diagrams below illustrate how to set up connection<br />
with either component or HDMI cables.<br />
To Connect HD Using Component Cables<br />
To Connect HD Using an HDMI Cable<br />
IN<br />
Cable input<br />
IN<br />
Cable input<br />
OUT<br />
Video cables Audio cables<br />
IN<br />
OUT<br />
IN<br />
HDMI cable<br />
HDTV back<br />
HDTV back<br />
HD Receiver<br />
back<br />
HD Receiver<br />
back<br />
13
14<br />
Your TV Service Your TV Service<br />
In addition to setting up your TV with your HD digital receiver or TiVo<br />
Premiere, you can set up your home theater system, DVD player, stereo<br />
system or game system. The diagrams below illustrate how to set up<br />
these types of connections.<br />
To Connect an HD Receiver with Your Home<br />
Theater System<br />
IN<br />
Cable input<br />
Home Theater<br />
Receiver back<br />
HD Video cables<br />
If you have anHD<br />
receiver and aTV with<br />
HDMI input, you can use<br />
a single HDMI cable<br />
instead ofacomponent<br />
cable. Both cables will<br />
produce the same<br />
quality results.<br />
Digital<br />
Audio<br />
cable<br />
OUT<br />
IN<br />
Video<br />
OUT<br />
IN<br />
Audio cables<br />
IN<br />
OUT<br />
Video Video Audio<br />
(for VCR or<br />
DVD playback)<br />
IN<br />
Video<br />
OUT<br />
HDTV back<br />
HD Receiver<br />
back<br />
Audio cables<br />
VCR back<br />
To Connect a DVD Player<br />
IN<br />
Cable<br />
OUT<br />
Coaxial OR<br />
IN<br />
To Connect a Stereo<br />
IN<br />
OUT<br />
IN<br />
OUT<br />
IN#1<br />
IN#2<br />
IN<br />
IN<br />
Digital<br />
OUT Receiver<br />
back<br />
TV back<br />
Audio &Video<br />
DVD back<br />
OUT<br />
To Connect a Game System<br />
OUT<br />
OUT IN<br />
Cable<br />
Cable<br />
Cable<br />
Audio<br />
Coaxial OR<br />
&Video<br />
Audio<br />
Coaxial<br />
&Video<br />
OR Audio<br />
Coaxial<br />
&Video<br />
OR Audio &Video<br />
OUT<br />
IN<br />
OUT<br />
IN<br />
Digital<br />
Receiver<br />
back<br />
Cable<br />
Coaxial OR Audio &Video<br />
VCR back<br />
Audio &Video<br />
IN<br />
OUT<br />
Audio &Video<br />
IN<br />
Stereo<br />
back<br />
TV back<br />
IN<br />
OUT<br />
Digital<br />
IN<br />
Receiver<br />
back<br />
VCR back<br />
IN<br />
OUT<br />
Audio &Video<br />
IN<br />
IN<br />
OUT<br />
IN<br />
Digital<br />
OUT Receiver<br />
back<br />
VCR back<br />
IN<br />
Coaxial OR<br />
Stereo<br />
Audio &Video<br />
OUT back<br />
Audio &Video<br />
IN<br />
TV back<br />
IN<br />
Cable<br />
OUT<br />
IN<br />
OUT<br />
OUT<br />
IN<br />
OUT<br />
Coaxial<br />
IN<br />
OUT<br />
OR<br />
IN<br />
TV back<br />
Digital<br />
Receiver<br />
back<br />
Coaxial OR<br />
Audio &Video<br />
Coaxial<br />
OR<br />
IN<br />
VCR back<br />
Audio &Video<br />
IN#1<br />
IN#2<br />
TV back<br />
Audio &Video<br />
IN Game back<br />
OUT<br />
IN<br />
OUT<br />
Digital<br />
Receiver<br />
back<br />
VCR back<br />
Audio &Video<br />
IN#1<br />
IN#2<br />
TV back<br />
Audio &Video<br />
IN Game back<br />
15
16<br />
Your TV Service Your TV Service<br />
Troubleshooting Tips<br />
Problem: No sound.<br />
Possible Cause: MUTE is accidently pressed on your remote control or<br />
television.<br />
Try This: Press MUTE on the remote control to restore the volume level.<br />
Problem: No picture.<br />
Possible Cause: Cable signal may not be reaching your home.<br />
Try This: Check the signal on each TV in your home to verify if all TVs<br />
are impacted or just one. On any impacted TVs, check to make sure<br />
cables are connected properly and your TV(s) is tuned to the cable<br />
channel (3 or 4). If you still aren’t receiving a cable signal on any or all<br />
TVs, please contact <strong>Grande</strong> <strong>Customer</strong> Service.<br />
Problem: Picture or sound quality issues.<br />
Possible Cause: Cable is disconnected or loose.<br />
Try This: Reconnect the cable from your wall outlet to the back of your<br />
digital receiver. Make sure the digital receiver is ON.<br />
Problem: REC is displayed on the front LED display on my digital<br />
receiver and I cannot change any settings via my remote.<br />
Possible Cause: The record button was pressed on the remote control<br />
but there is not a DVR or any other recording device to activate the function.<br />
Try This: Press EXIT twice to remove REC. You should now be able to<br />
use your remote.<br />
Problem: Remote control doesn’t work.<br />
Possible Cause: Obstruction between the remote and the digital<br />
receiver; the remote isn’t set to Cable TV mode; dead batteries.<br />
Try This: Make sure nothing is on the digital receiver or blocking a clear<br />
line of sight between the receiver and the remote; OR press CBL on<br />
your remote; OR change the batteries in your remote control.<br />
Problem: Cannot find the secondary language option.<br />
Possible Cause: The SAP (secondary audio program) is located on<br />
your TV.<br />
Try This: Consult your television user guide to find out if your TV has<br />
this feature. If it does, it can easily be turned ON or OFF on the<br />
television itself.<br />
Problem: On some of my channels the audio does not match the<br />
program being displayed or I do not have audio.<br />
Possible Cause: SAP (secondary audio program) is enabled.<br />
Try This: Pressing SETTINGS once, highlight “Disable SAP” and click SEL/OK.<br />
Problem: On some of my channels the audio does not match the<br />
program being displayed or I do not have audio.<br />
Possible Cause: SAP (secondary audio program) is enabled.<br />
Try This: Pressing SETTINGS once, highlight “Disable SAP” and click SEL/OK.<br />
Problem: Error 221, 222 or 301 on screen while trying to purchase<br />
On Demand content.<br />
Possible Cause: This error means that your account is past due or you<br />
have reached your credit limit.<br />
Try This: Contact <strong>Grande</strong> <strong>Customer</strong> Service or use your online bill<br />
payment tool to resolve this situation. You will be able to purchase On<br />
Demand programs within one hour of making a payment.<br />
FAQs<br />
What are the icons at the bottom of the screen?<br />
These icons are called Quick Menu icons. They are available to help you<br />
find what you’re looking for faster. The Quick Menu lets you quickly go to<br />
other areas of the guide, such as Movies or Favorites Menu. Once you<br />
have selected a program title by highlighting it and press OK/SEL or INFO,<br />
you can use the Action Icons on the information screens to set Reminders<br />
and Parental Controls, schedule Recordings, BUY programs and more.<br />
How do I tell what the icons mean?<br />
You will find descriptive text beneath the row of icons when you have an<br />
icon highlighted. This information changes as you move the yellow<br />
highlight using the arrow buttons on your remote. On program<br />
information screens, the Action Icons are specific to the program. For<br />
example, a BUY Icon will appear only for On Demand and Pay-Per-View<br />
programs. Playback Icons will appear only for recorded programs or<br />
rented On Demand titles.<br />
I can’t see the entire program title in the listings.<br />
Some program titles are too long to fit in the space provided in the grid.<br />
You might see “…” to indicate there is more to the title. For example,<br />
“Third Rock From the Sun” might appear as “Third Rock…” Highlight<br />
the program and check the Instant Information area at the top of the<br />
screen for program title and other valuable information, including rating,<br />
actors, start/end times, etc.<br />
What is the graphic bar that appears when I change channels?<br />
The Flip Bar appears for a few seconds as you’re changing channels to<br />
provide important information about programs. You will find the name<br />
of the current program, start and end times, channel number, rating and<br />
current time.<br />
What is the red light on the upper left front of my box and/or what is<br />
the envelope on the screen?<br />
Occasionally, your TV provider may send a Message to inform you about<br />
new services and special promotions. To read the message, go to the<br />
<strong>Guide</strong> Menu and select Messages. Once you have read the message,<br />
you can keep or delete.<br />
How do I get information on programs?<br />
You can access information by pressing the INFO button on your remote.<br />
Press INFO once for instant information or twice for complete information.<br />
How do I set my digital audio language?<br />
You can choose the language that displays on the screen button and<br />
descriptions, and also change the secondary digital audio that is<br />
available with certain networks and programs. Choose Audio Setup<br />
from the Setup menu and change the default setting. Choose from<br />
English, Spanish, Portuguese or French. This feature is only supported<br />
on certain digital channels that provide secondary audio. If the chosen<br />
audio language is not available, the default audio language will be heard.<br />
Do my Parental Controls & Purchase PIN settings stay the same for<br />
On Demand purchases as with regular programs?<br />
Yes, PINs and settings apply to On Demand ratings and purchases.<br />
I only watched 15 minutes of my On Demand program before it<br />
expired. How can I watch the rest of the program?<br />
You will have to order the program again. On Demand programs are<br />
only available for the time listed on the screen when you purchased the<br />
program and will not be extended.<br />
If I get to the end of an On Demand program and want to watch it<br />
again, can I restart at the beginning?<br />
Yes, as long as your viewing period has not expired. You may watch the<br />
program as many times as you like during the viewing period.<br />
How do I return to watching an On Demand program after I’ve tuned<br />
to another channel?<br />
Select My Rentals from the On Demand menu and choose the program<br />
you want to continue watching. You can either begin watching where<br />
you left off by selecting Resume, or start over with Restart.<br />
Some of the programs appear in the listing with a check mark or a<br />
dollar sign next to the title. What does this mean?<br />
You may see a check mark or dollar sign to indicate a program you have<br />
ordered.<br />
How many On Demand or Pay-Per-View programs can I order at one<br />
time?<br />
The default credit limit is $150. You can order as many as you want up<br />
until that credit limit is reached.<br />
I tried to order an On Demand program and received an error screen<br />
that read “Unable to Process Request”. What does this mean?<br />
This message occurs when the digital receiver is unable to communicate<br />
with the On Demand system. Try turning off your receiver, turning<br />
it on, and trying to order On Demand again. If the message appears<br />
again, note the time it appears, the action you took, and contact <strong>Grande</strong><br />
<strong>Customer</strong> Service.<br />
How many hours of programs can I record with a DVR?<br />
Most DVR’s will record up to approximately 90 hours of Standard<br />
Definition recordings and 12-20 hours of High Definition programming.<br />
TiVo Premiere can record up to 45 hours of High Definition programming.<br />
How do I know if my TV is HD-ready?<br />
Most new television support HD. Consult your TV user manual or TV<br />
manufacturer to determine whether your television supports HD.<br />
I bought a new TV. Do I just connect it to my <strong>Grande</strong> Digital Reciever<br />
or TiVo Premiere and it works?<br />
Yes. <strong>Grande</strong> Digital Recevers and TiVo Premiere service is compatible<br />
with most new TV brands.<br />
What Input do I need to set on my TV?<br />
Check your TV manufacturer’s guide. This should show you where to<br />
locate your TV input.<br />
Where can I find my Home Networking passcode?<br />
Your passcode information can be found in your service documentation<br />
left by your service installer or on the back cover of this book if written<br />
down during service installation.<br />
17
18<br />
Your Internet Service Your Internet Service<br />
Your Internet Service<br />
Your Internet service will provide you with an online experience<br />
that’s fun, delivers unlimited access to a wealth of educational<br />
resources. You can listen to music channels to suit the tastes of<br />
every family member, tune in to local weather, sports updates and<br />
online videos. And all this and is available through your computer.<br />
This guide to Your Internet Service will provide you with basic<br />
information on setting up individual Internet service like email,<br />
webmail, your <strong>Grande</strong> Home Page, online security and much more.<br />
Table Of Contents<br />
Getting Connected 19<br />
Your <strong>Grande</strong> Home Page 20<br />
Using <strong>Grande</strong> Webmail 21<br />
Setting Up Email 24<br />
Email Phishing 28<br />
Online Security 28<br />
Wireless Home Networking 29<br />
Troubleshooting Tips 30<br />
FAQS 30<br />
Power<br />
(Surge protector<br />
recommended)<br />
Modem<br />
Ethernet<br />
USB<br />
Cable Input<br />
IN<br />
Choose either an Ethernet<br />
(recommended) or USB<br />
cable. Do not use both!<br />
Computer<br />
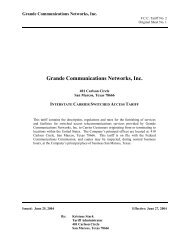
Getting Connected<br />
Connecting Your Equipment<br />
To connect your equipment, use the diagrams for Understanding Your<br />
Modem, Equipment Set Up for Internet and Equipment Set Up for<br />
Internet and TV.<br />
Equipment Set Up for Internet<br />
Power<br />
(Surge protector<br />
recommended)<br />
Equipment Set Up for Internet and TV<br />
Cable<br />
Modem<br />
Power<br />
(Surge protector<br />
recommended)<br />
Modem<br />
Ethernet<br />
USB<br />
Choose either an Ethernet<br />
(recommended) or USB<br />
cable. Do not use both!<br />
Splitter<br />
Ethernet<br />
Cable Input<br />
IN<br />
USB<br />
Computer<br />
Cable<br />
Cable Input<br />
IN<br />
Choose either an Ethernet<br />
(recommended) or USB<br />
cable. Do not use both!<br />
Cable box/TV<br />
Computer<br />
Cable<br />
Modem<br />
Power<br />
(Surge protector<br />
recommended)<br />
Note: If your <strong>Grande</strong> service technician set up your Internet connection<br />
directly from the wall outlet to the ethernet connection on your<br />
computer, then you have <strong>Grande</strong>’s fiber-to-the-home service and do<br />
not require a modem.<br />
Understanding Your Cable Modem<br />
If you are connecting using a USB cable, the USB driver for the cable<br />
modem must be installed for the computer to recognize the Internet<br />
properly.<br />
Important: As long as the Standby light is dark, you should never touch<br />
the Standby button on top of your modem unless instructed to do so by<br />
<strong>Grande</strong> <strong>Communications</strong>.<br />
Front View of your Cable Modem<br />
Splitter<br />
USB<br />
IN<br />
When the Power, SYNC, and Ready LEDs are lit, the cable modem is<br />
working Choose eitherproperly. an Ethernet The USB or ENET LED should also be lit depending<br />
(recommended) or USB<br />
on cable. what Do not use port both! is being used.<br />
1. Power<br />
Ethernet 2. USB<br />
3. ENET<br />
4. SEND<br />
5. RECV<br />
6. SYNC<br />
7. Ready<br />
Back View of Your Cable Modem<br />
1. Power<br />
2. ENET port<br />
3. USB port<br />
4. Cable port<br />
Cable<br />
Cable Input<br />
Cable box/TV<br />
Computer<br />
1 2 3 4 5 6 7<br />
1 2 3 4<br />
NOTE: Your cable modem may look different than the modem shown<br />
above. You can find more information about you cable modem<br />
www.mygrande.com/userguides.<br />
19
20<br />
Your Internet Service Your Internet Service<br />
Connecting Your Cable Modem<br />
1. Connect the coaxial cable that is dedicated to your cable modem to<br />
the cable connector on the back of the cable modem.<br />
2. Plug one end of the Ethernet cable into the Ethernet port on your<br />
computer. Please note that if you have a computer with both USB<br />
and Ethernet connectors, use only the Ethernet connector.<br />
3. Connect the other end of the cable to the Ethernet jack on the back<br />
of the cable modem.<br />
4. Once the Ethernet cable has been connected to the cable modem,<br />
connect the power cord into the modem’s power connector.<br />
5. Connect your computer’s power cord into your power outlet.<br />
6. If your modem has a power switch, turn it on. Wait while the modem<br />
synchronizes. This could take up to ten minutes.<br />
Testing Your Internet Connection<br />
After connecting your computer to the cable modem, test your Internet<br />
connection by opening your Internet browser (i.e. Microsoft Internet<br />
Explorer, Apple Safari, Mozilla Firefox or Google Chrome) and going to<br />
www.mygrande.net. The <strong>Grande</strong> portal page should appear and this<br />
means you have successfully connected to <strong>Grande</strong> Internet Service.<br />
Note: If the <strong>Grande</strong> Portal page does not appear, please check your<br />
modem connections and try again. If the problem persists, please try<br />
the troubleshooting tips at the end of the Internet section of this guide.<br />
Speed Test<br />
You can test the speed of your connection by using <strong>Grande</strong>’s Speed Test<br />
<strong>site</strong>. Open your browser window and go to http://speedtest.mygrande.net/.<br />
Click on the appropriate city where you are located and the test will start<br />
running. When the test is complete, it will show you the download and<br />
upload speedsof your connection.<br />
Actual download and upload speeds may vary. Many factors affect speed.<br />
Your <strong>Grande</strong> Username and Password<br />
As a <strong>Grande</strong> Internet customer you receive up to five @mygrande.net<br />
email addresses with your service. The first part of your email address<br />
(i.e. the part proceeding the @ sign) is your username. For example<br />
if your email address is jdoe@mygrande.net then “jdoe” is your<br />
username.<br />
You can change your password at any time:<br />
1. Open your Internet browser and go to https://admin.mygrande.net.<br />
2. Login using your current username and password.<br />
3. Click on the “password” button on your screen.<br />
4. Enter your new password and click the “change” button.<br />
5. Your new password is now active.<br />
Note: Your <strong>Grande</strong> Internet username and password are not the same<br />
as your <strong>Grande</strong> Online Bill Payment username and password.<br />
Important: Forgot your password? Please go to<br />
http://password.mygrande.net to reset your password.<br />
Your <strong>Grande</strong> Home Page<br />
<strong>Grande</strong> Communication’s mygrande.net home page is your one stop<br />
to check and send email, see the latest news, sports, entertainment,<br />
full episode and video clips you want. You can even personalize your<br />
mygrande.net home page to your specific interests – and with search<br />
powered by Google, you’re just a click away from anything you want<br />
to find.<br />
Logging in to mygrande.net Home Page<br />
Checking email or personalizing your home page is easy using your<br />
<strong>Grande</strong> username and password.<br />
1. Open your Internet browser and go to http://mygrande.net.<br />
2. Click on the “Log In” button on the upper right corner of the web page.<br />
3. Enter your <strong>Grande</strong> username and password in the box on the upper<br />
right hand corner of the page.<br />
4. Click on “Log In”.<br />
After logging in once, you will be able to personalize your homepage to<br />
see exactly what you want, without logging in again.<br />
Important: If you do not have a username or have forgotten your<br />
password, please contact <strong>Grande</strong> <strong>Customer</strong> Service.<br />
Setting You Home Page to mygrande.net<br />
1. Open your Internet browser and go to http://mygrande.net.<br />
2. Click on the link that reads “Make This My Home Page” on the top<br />
header of the web page.<br />
3. Follow the directions in the dialog box that appears on your screen.<br />
Customizing Your Home Page<br />
Once you have logged in, you can customize your home page:<br />
1. Click on the link “Personalize”, located below the “Portal Control”<br />
link on the right hand side.<br />
2. Select the content you want from the various categories. When you<br />
have completed your selections, click on “FINISH” to save your<br />
settings.<br />
3. You are done! You can go back at any time and make additional<br />
changes as you build a home page that is tailored just for you.<br />
Using <strong>Grande</strong> Webmail<br />
<strong>Grande</strong>’s Internet services come with up to 5 email accounts. <strong>Grande</strong><br />
<strong>Customer</strong> Service will set up your account and then you can begin send<br />
and receive emails from family and friends. If you are on the road away<br />
from your computer, or simply elect not to use an email application,<br />
then you can access your email through any Internet browser from<br />
anywhere in the world using <strong>Grande</strong>’s webmail service.<br />
How to Access your <strong>Grande</strong> Webmail<br />
1. Open your Internet browser and go to http://mygrande.net.<br />
2. Log in, using your <strong>Grande</strong> username and password.<br />
3. Click on the Email link.<br />
4. That’s it! You are in your <strong>Grande</strong> webmail.<br />
How to Receive Email<br />
After you have successfully logged in to your email account, the email<br />
system will automatically check for new messages. If you are expecting an<br />
email and suspect that it may have been sent after you logged in, then<br />
click on the “Refresh Inbox” icon.<br />
How to Send an Email<br />
After you have logged in to your <strong>Grande</strong> email account, you just a few<br />
simple steps away from sending an email.<br />
1. Click on the “New Message” icon.<br />
2. In the ‘To” box, type the email address of the person you want to<br />
receive the email.<br />
3. In the “Subject” box, type the subject of the email.<br />
4. Type your message.<br />
5. After the previous steps have been completed to your satisfaction,<br />
click on the “Send Message” button at the top or bottom of the<br />
message.<br />
6. Your email has been sent.<br />
21
22<br />
Your Internet Service<br />
Using <strong>Grande</strong> Webmail (continued...)<br />
How to Read your Emails<br />
1. Click on the “Subject” the email you would like to read. Once you<br />
do, that email will open.<br />
2. To open a different email, click on the “Inbox” button. This will take<br />
you back to your inbox folder where you can open another email by<br />
clicking on the “Subject”.<br />
How to Replay to an Email<br />
1. After you have opened an email, locate the “Reply to Sender” and<br />
‘Reply to All” text.<br />
2. If you want to reply only to the person that sent the email, click on<br />
the “Reply to Sender” text. On the flip side, if you want to reply to<br />
everyone included on the email, click on ‘Reply to All” text.<br />
3. After you click on this text, your email will already have the email<br />
address of the recipient and the “Subject” line populated.<br />
4. Type your message and then click on the “Send Message” button.<br />
How to Delete an Email<br />
1. Click on the white checkbox to the left of the email you wish to<br />
delete. A checkmark will now appear within the box. Follow this<br />
process for any email you wish to delete.<br />
2. After you have selected all the email you want to delete, click on the<br />
“Delete” text.<br />
3. Your emails have now been sent to a “Trash” folder that can be<br />
accessed by clicking on the “Folders” icon.<br />
4. You can set up your account to purge your deleted messages after<br />
a specified time period. This helps alleviate concerns of exceeding<br />
disk storage thresholds. Click on your “Options” icon to access<br />
“Maintenance Operations” and set your personal options.<br />
How to Create Other Folders<br />
Many users often create other folders to help organize email. After<br />
reading your mail, you can put it in a folder organized by theme, date, or<br />
whatever makes sense to you.<br />
1. Click on the checkbox next to the email you want copied or moved<br />
to a different folder. After you have clicked it, the box should be<br />
marked with a checkmark.<br />
2. Click on the Down arrow next to the “Messages To” text and click<br />
on “New Folder.”<br />
3. Click on “Move” or “Copy” depending on whether you want to<br />
move the email to a new folder or want another copy of the specific<br />
email in a new folder.<br />
4. A box will appear asking you to name the new folder. Type in your<br />
desired name and click “OK.”<br />
5. To view the folder, click on the down arrow by the “Open” text and<br />
click on the name of the new folder.<br />
How to Mark your Mail<br />
To help organize your email, you can color-code your mail by type. For<br />
example, if you feel that a certain message is very important, you can<br />
mark it as important. There are several options for marking your mail<br />
such as seen, unseen, important, not important, answered,<br />
unanswered, deleted, not deleted, draft, and not draft.<br />
1. Click on the email that you want to be marked. After you have<br />
clicked it, the box should be marked with a check.<br />
2. Click on the down arrow by the text “Mark As” and click your<br />
desired category. The email will now be a different color depending<br />
on the category you assigned.<br />
Managing Your Email<br />
Use the Email Administration web page to change your password; add<br />
or delete email accounts; set auto-forwarding options; manage your<br />
spam filters; whitelist (allow) or blacklist (disallow) email addresses<br />
and setup auto-responder messages.<br />
To access the Email Administration web page type<br />
https://admin.mygrande.net in to your Internet browser, making sure<br />
that you use https instead of the regular http. Type your <strong>Grande</strong> username<br />
and password in the appropriate text boxes and click “Log In.”<br />
Changing your Password<br />
Follow the steps below to change your email account password.<br />
1. Click the “Change” button under the Password title.<br />
2. Type a new Password In The “New Password” and “confirm” Text<br />
Boxes.<br />
3. Click “Change”.<br />
4. The Current Status Bar Will Change To “Password Changed”.<br />
Important: Email passwords are case sensitive.<br />
Managing Accounts<br />
Your <strong>Grande</strong> Internet Service may include up to 5 email accounts. You<br />
can use this option to view your current accounts, setup new accounts<br />
or delete accounts you no longer need.<br />
View Current Email Accounts<br />
When you enter the “Account Manage” option you will see all your valid<br />
email accounts with their current disk usage information as well as the<br />
first and last name assigned to each one of them.<br />
Creating a New Email Account<br />
Follow these steps to create a new email account:<br />
1. Enter a valid username. This is the first part of the email address<br />
(i.e. portion before the “@” symbol). The username must be<br />
between 3 and 16 characters and can contain only letters,<br />
numbers, a period, and underscores.<br />
2. Enter a password and confirm the password entered.<br />
3. Enter the first and last name.<br />
4. Click on “Add New Account”. The new account will be created and<br />
will now appear on the Email Address list.<br />
Note: You will only be able to create an email account if you have not<br />
reached your maximum limit.<br />
Deleting an Email Account<br />
Follow these steps to delete an email account:<br />
1. Click on the “Delete” button next to the email address you want to<br />
delete.<br />
2. Click “OK” on the confirmation message.<br />
3. Under the “Attention” area you should see a message reading<br />
“SUCCESS: This account has been deleted.”<br />
Reset a Password<br />
Follow these steps to reset an email password:<br />
Your Internet Service<br />
1. Click on the “Reset Password” button next to the email address<br />
you want to reset.<br />
2. Click “OK” on the confirmation message.<br />
3. The following message will appear: “If this username is used for a<br />
Dialup, DSL, or Webspace account please be aware that the pass<br />
word reset will affect these services.”<br />
4. Click “OK” on the confirmation message.<br />
5. The final confirmation message appears: “The password for<br />
‘Account’ was reset to ‘hpizns.’ This password can be used<br />
permanently, or ‘Account’ can log in to this <strong>site</strong> with the password<br />
‘hpizns’ and change it.”<br />
Forwarding your Email<br />
You can temporarily forward your incoming email to any email address<br />
you designate (i.e. forward your home email to the office while at work).<br />
Follow these steps to forward your incoming email:<br />
1. Click the “Manage” button under the Forwards bar.<br />
2. Type the forwarding email address in the “Forward” text field.<br />
3. If you would also like a copy kept in your email account, place a<br />
check mark in the “Local” box.<br />
4. Click the “Add” button under the Submit bar.<br />
Follow these steps to stop forwarding your incoming email:<br />
1. Click the “Manage” button under the Forwards bar.<br />
2. Delete the forwarding address from the “Forward” text box.<br />
3. Click the “Add” button under the Submit bar.<br />
33 23
24<br />
Your Internet Service<br />
Setting Up Email Filters<br />
<strong>Grande</strong> enable email filters (email security) by default. You may turn<br />
this feature off if it is critical that no email addressed to you is refused.<br />
To disable email security click on “Email Security Disabled (I will manage<br />
my own email security)”.<br />
Spam-Filter Management<br />
When this option is enable <strong>Grande</strong> attempts to determine whether your<br />
email is clean of spam. There are four options available:<br />
1. No Content Filtering: turns spam filters off.<br />
2. Quarantine to my Webmail JUNK folder: this filter will move spam<br />
messages into a Junk folder that you can browse whenever you<br />
choose.<br />
3. Tag my Subject Line: this filter will add the word “SPAM” to the<br />
subject line of any email that is identified as spam.<br />
4. Discard the email: if spam is found it will be automatically deleted.<br />
WhiteList Email Addresses<br />
With this option you can add email addresses or email domains that<br />
you would to bypass spam filters. Follow these steps to add addresses<br />
to the WhiteList:<br />
1. Click on the “Manage” button under the WhiteList column.<br />
2. Enter the list of email addresses using this format:<br />
user@domain.com, @domain.com, user@, or domain.com. Blank<br />
lines and any other invalid entries will automatically be removed.<br />
3. Click on “Yes” to enable the WhiteList.<br />
4. Click on “Save” to save your changes.<br />
BlackList Email Addresses<br />
With this option you can add email addresses or email domains that<br />
you would like to block. Follow these steps to add address to you<br />
BlackList:<br />
1. Click on the “Manage” button under the BlackList column.<br />
2. Enter the list of email addresses using this format:<br />
user@domain.com, @domain.com, user@, or domain.com. Blank<br />
lines and any other invalid entries will automatically be removed.<br />
3. Click on “Yes” to enable the BlackList.<br />
4. Click on “Save” to save your changes.<br />
Setting Up an Auto-Responder Message<br />
This feature allows you to create your own automated response message.<br />
Anyone that sends you an email will receive the response message.<br />
Follow these steps to create and activate your message:<br />
1. Click on the “Manage” button under the “Bouncer” column.<br />
2. Enter a custom message in the text box.<br />
3. Click on “Yes” to enable your automated response message.<br />
4. Click on “Save” to save your changes. Once enabled, when a<br />
new message is received in your mailbox, the sender will<br />
automatically receive your custom message.<br />
Setting Up Email Applications<br />
Set Up Windows Mail<br />
Windows Mail is the default email that comes standard with Internet<br />
Explorer. Follow the steps outlined below to set up a new account:<br />
1. In Windows Mail, click Tools > Accounts > Mail > Add > Email<br />
Account. This will start a mail wizard configuration screen.<br />
2. Enter your name as you wish it to appear in the “Display Name”<br />
field.<br />
3. Enter your <strong>Grande</strong> email address in the username@mygrande.net<br />
format in the email address field.<br />
4. Set up email servers window settings: Select POP in the drop-down<br />
list. Enter “mail.mygrande.net” in the “Incoming Mail Server<br />
(POP3)” field. Enter “mail.mygrande.net” in the “Outgoing Mail<br />
Server (SMTP)” field.<br />
5. Click “Next”. Your email is now configured to use any available<br />
connection.<br />
6. Enter the <strong>Grande</strong> username and password. Then click “Next”.<br />
7. You should see a congratulations message.<br />
8. Now click “Finish”. You should be able to send and receive email<br />
using your <strong>Grande</strong> email address.<br />
Set Up Outlook Express<br />
Follow the steps outlined below to set up Outlook Express with your<br />
<strong>Grande</strong> username and password:<br />
1. Open Outlook Express by double-clicking the Outlook Express icon<br />
on your desktop.<br />
2. The first time you start Outlook Express the Internet Connection<br />
Wizard will run. Select “Create a new Internet mail account” and<br />
click “Next” to continue.<br />
3. On the “Your Name” screen type in your name as you would like it<br />
to appear on your outgoing e-mail messages and click “Next” to<br />
continue.<br />
4. Type in your email address on the “Internet Email Address” screen.<br />
Click “Next” to continue.<br />
5. On the email server names screen, select POP3 from the drop<br />
down list.<br />
6. In the space provided below Incoming mail (POP3, IMAP or HTTP)<br />
server: enter: mail.mygrande.net.<br />
7. Type in mail.mygrande.net as your Outgoing mail (SMTP) server<br />
and click “Next” to continue.<br />
8. On the Internet mail logon screen, type in your <strong>Grande</strong> username in<br />
the field titled “Account Name”. Your user name is everything<br />
leading up to, but not including the @mygrande.net part of your<br />
e-mail address. For example, if your e-mail address is<br />
test_account@mygrande.net, you would enter test_account as your<br />
Account Name.<br />
9. In the “Password field”, enter your <strong>Grande</strong> password. If you do not<br />
wish to enter your password every time you check your email, put<br />
a check in the box labeled “Remember Password”. Click “Next” to<br />
continue.<br />
10. Congratulations, you have now set up Outlook Express as your<br />
email program. Click “Finish” to begin sending and receiving email.<br />
Set Up Outlook 2003<br />
Your Internet Service<br />
Follow the steps outlined below to set up Outlook 2003 with your<br />
<strong>Grande</strong> username and password:<br />
1. Open Microsoft Office Outlook 2003 by double-clicking the Outlook<br />
icon on your desktop.<br />
2. If the Email Accounts wizard doesn’t launch on its own, select “Tools”<br />
from the top menu, and “Email Accounts” from the drop down list.<br />
3. Select “Add” a new email account and click “Next” to continue.<br />
4. On the “Server Type” screen, select POP3 and then click “Next” to<br />
continue.<br />
5. On the “Internet e-mail settings (POP3)” page you will need to<br />
fill in your information for each of the six fields. For “Your Name”<br />
type in your name, for “Email Address” type in your <strong>Grande</strong><br />
provided email address. In the “username” field type in your<br />
<strong>Grande</strong> username (which is the part before @mygrande.net in your<br />
e-mail address) and in the “Password” field type in your password.<br />
For “Incoming mail server (POP3)” type in “mail.mygrande.net”.<br />
For “Outgoing Mail Server (SMTP)” type in “mail.mygrande.net”.<br />
After filling the six fields, click the “Test Account Settings” button.<br />
6. If anything shows up as Failed, return to the previous window and<br />
double-check your settings.<br />
7. At this point you have finished setting up Outlook 2003 and need<br />
to click the “Finish” button. You may now begin to use Outlook<br />
2003 to send and receive email.<br />
Set Up Outlook 2007<br />
Follow the steps outlined below to set up Outlook 2007 with your<br />
<strong>Grande</strong> username and password:<br />
1. Open Microsoft Office Outlook 2007 by double-clicking on the<br />
Outlook icon on your desktop.<br />
2. If the email account wizard doesn’t launch on its own, select<br />
“Tools” from the top menu, and “Account Settings…” from the<br />
drop-down list.<br />
3. On the “E-mail” tab, click the “New…” button.<br />
4. In the Outlook 2007 Startup wizard, click “Next” to continue.<br />
5. On the “Account Configuration” page, choose “Yes”, then click<br />
“Next” to continue.<br />
33 25
26<br />
Your Internet Service<br />
Set Up Outlook 2007 (continued...)<br />
6. On the “Auto Account Setup” page, put a check in “Manually<br />
configure server settings or additional server types”, then click<br />
“Next” to continue.<br />
7. On the “Choose E-mail Service” page, choose “Internet E-mail”,<br />
then click “Next” to continue.<br />
8. On the “Internet E-mail Settings” page, you will need to fill in your<br />
information for each of the six fields. For “Your Name” type in your<br />
name. For “E-mail Address”, enter your <strong>Grande</strong>-provided email<br />
address. Leave the “Account Type” as “POP3”. For “Incoming<br />
mail server”, type in “mail.mygrande.net”. For “Outgoing mail<br />
server (SMTP)”, type in “mail.mygrande.net”. In the “User Name”<br />
field, type in your <strong>Grande</strong> username (which is the part before the<br />
@ symbol in your email address). In the “Password” field, type in<br />
the password for your email address.<br />
9. After filling in the six fields, click the “Test Account Settings…”<br />
button. If anything shows up as Failed, return to the previous<br />
window and double-check your settings.<br />
10. At this point you have finished setting up Outlook 2007 and need<br />
to click the “Finish” button. You may now begin to use Outlook<br />
2007 to send and receive mail.<br />
Set Up Outlook 2010<br />
Follow the steps outlined below to set up Outlook 2010 with your<br />
<strong>Grande</strong> username and password:<br />
1. Open Microsoft Office Outlook 2010 by double-clicking on the<br />
Outlook icon on your desktop.<br />
2. If the email account wizard doesn’t launch on its own, select “File”<br />
from the top menu, and “Info” from the drop-down list. Under<br />
“Account Information”, click the button labeled “Add Account”.<br />
3. On the “Auto Account Setup” page, choose “Manually configure<br />
server settings or additional server types”, then click “Next” to<br />
continue.<br />
4. On the “Choose Service” page, choose “Internet E-mail”, then click<br />
“Next” to continue.<br />
5. On the “Internet E-mail Settings” page, you will need to fill in your<br />
information for each of the six fields. For “Your Name” type in your<br />
name. For “E-mail Address”, enter your <strong>Grande</strong>-provided email<br />
address. Leave the “Account Type” as “POP3”. For “Incoming<br />
mail server”, type in “mail.mygrande.net”. For “Outgoing mail<br />
server (SMTP)”, type in “mail.mygrande.net”. In the “User Name”<br />
field, type in your <strong>Grande</strong> username (which is the part before the<br />
@ symbol in your email address). In the “Password” field, type in<br />
the password for your email address.<br />
6. After filling in the six fields, click the “Test Account Settings…”<br />
button. If anything shows up as Failed, return to the previous<br />
window and double-check your settings.<br />
7. At this point you have finished setting up Outlook 2010 and need<br />
to click the “Finish” button. You may now begin to use Outlook<br />
2010 to send and receive mail.<br />
Set Up Outlook 2011 (Mac Only)<br />
Follow the steps outlined below to set up Outlook 2011 for Mac with<br />
your <strong>Grande</strong> username and password:<br />
1. Open Microsoft Office Outlook 2011.<br />
2. If the email account wizard doesn’t launch on its own, select “Out<br />
look” from the top menu, and “Preferences…” from the drop-down<br />
list.<br />
3. In the “Outlook Preferences” window, open “Accounts”.<br />
4. In the “Accounts” window, find the plus sign (+) in the bottom<br />
left-hand corner of the window. Click on the plus sign, and choose<br />
“E-mail…” from the drop-down menu.<br />
5. On the “Enter your account information” page, you will need to<br />
fill in your information for each of the five fields. For “E-mail<br />
address”, enter your <strong>Grande</strong>-provided email address. In the<br />
“Password” field, type in the password for your email address. In<br />
the “User name” field, type in your <strong>Grande</strong> username (which is<br />
the part before the @ symbol in your email address). For<br />
“Incoming server”, type in “mail.mygrande.net”. For “Outgoing<br />
server”, type in “mail.mygrande.net”.<br />
6. After filling in the five fields, click the “Add Account” button.<br />
7. On the “Accounts” window, enter an “Account description”, which<br />
can be anything you like. In the “Full name” field, type in your<br />
name.<br />
8. At this point you have finished setting up Outlook 2011 and need to<br />
close the “Accounts” window. You may now begin to use Outlook<br />
2011 to send and receive mail.<br />
Set Up OS X Mail<br />
Follow the steps outlined below to set up OS X Mail:<br />
1. Click the “Mail” icon in the Dock (Menu) bar.<br />
2. Select “Preferences” from the Mail menu.<br />
3. After clicking the “Mail” icon, the Mail Setup screen automatically<br />
appears. To configure your email settings, enter your name in the<br />
“Full Name” field and your username@mygrande.net in the “Email<br />
Address” field.<br />
4. Now set your “Incoming Mail Server” and “Outgoing Mail Server<br />
(SMTP)” to “mail.mygrande.net” and select “POP” from the<br />
“Account Type” drop-down list.<br />
5. Enter your <strong>Grande</strong> username and <strong>Grande</strong> password in their<br />
respective fields.<br />
6. Click the “OK” button.<br />
7. Your inbox will be displayed. Click the “Get Mail” icon to check for<br />
new email.<br />
Set Up Entourage (Mac) Mail<br />
Follow the steps outlined below to set up a new Entourage (Mac) Mail<br />
account:<br />
1. When Entourage is launched for the first time, the Entourage Setup<br />
Assistant will run. On the first screen, enter your First name and<br />
Last name in the spaces provided and then click the right arrow to<br />
continue.<br />
2. On the “Home Information” screen, enter your home address<br />
information, and then click the right arrow to continue.<br />
3. On the “Work Information” screen, enter your work address<br />
information, and the click the right arrow to continue.<br />
4. On the next “Welcome Screen”, select “I want to start using<br />
Entourage without importing anything” and click the right arrow to<br />
continue. If you do in fact want to import information into<br />
Entourage, you can do so at any time by selecting File > Import<br />
from within Entourage.<br />
Your Internet Service<br />
5. On the “Junk Mail Filter” screen, decide if you want to enable the<br />
Junk Mail Filter and then click the right arrow to continue.<br />
6. On the “Your Name” screen, enter your name as you would like it to<br />
appear on your outgoing email messages, and then click the right<br />
arrow to continue.<br />
7. On the “Your Email Address” screen, select “I already have an email<br />
address that I’d like to use” and then enter your mygrande.net<br />
email address in the space provided. Once completed, click the<br />
right arrow to continue.<br />
8. On the “Mail Servers” screen, make sure that POP is selected in the<br />
“My Incoming Mail Server” is a(n)__server drop-down list. In<br />
“Incoming Mail Server” field, enter “mail.mygrande.net”. In the<br />
“Outgoing Mail (SMTP)” field, enter “mail.mygrande.net”. Click the<br />
right arrow to continue.<br />
9. On the “Account ID and Password” screen, enter your username in<br />
the “Account ID” field. Your username is every thing leading up to,<br />
but not including the @mygrande.net part of your email address.<br />
For example, if your email address is test_account@mygrande.net,<br />
you would enter test_account as your Account ID. In the<br />
“Password” field, enter in your <strong>Grande</strong> assigned password. If you<br />
do not wish to enter your password every time you check your<br />
email, put a check in the box labeled “Save Password in my Mac<br />
OS keychain”. Click the right arrow to continue.<br />
10. On the last screen, enter an Account Name in the space provided.<br />
The name you provide should be descriptive so you can easily<br />
identify this account should you need to make changes.<br />
Click “Finish” to begin using Entourage.<br />
33 27
28<br />
Your Internet Service<br />
Email Phishing<br />
Phishing is the term used by Internet scammers who imitate legitimate<br />
companies in emails to entice people to share user names, passwords,<br />
account information or credit card numbers. The term Phishing comes<br />
from the fact that Internet scammers are using increasingly sophisticated<br />
lures as they “fish” for users’ private information. The most common<br />
ploy is to copy the look and feel of a web page from a major <strong>site</strong> and<br />
use that design to set up a nearly identical page that appears to be part<br />
of the company’s <strong>site</strong>.<br />
There are several steps you can take to make sure you never fall for one<br />
of these scams:<br />
• Always be suspicious of any email or phone call that asks for your<br />
personal account information, such as a usernames, passwords,<br />
and account numbers. Emails, phone calls, text messages, instant<br />
message, or Web logs that appear to come from a reliable source<br />
may not always be authentic.<br />
• <strong>Grande</strong> will never ask for billing or payment information through<br />
email.<br />
• Always be extra cautious when giving out your personal<br />
information on the phone.<br />
• Always ensure that you are using a secure server when submitting<br />
credit card information. You can be sure you are using a secure<br />
server by checking the beginning of the web address in your<br />
Internet browser address bar – it should be https:// rather than just<br />
http://.<br />
• Contact your bank or credit card company if you think you may<br />
have replied to a fraudulent email with sensitive personal information.<br />
Online Security<br />
We want you to have a secure, hassle-free online experience. <strong>Grande</strong><br />
<strong>Communications</strong> can help with our SecureIT Security Package that we<br />
offer to our Internet customers for free. SecureIT is an advanced,<br />
all-in-one Internet security tool from a leading security software provider<br />
that can help protect your computer from harmful viruses, hackers and<br />
privacy threats.<br />
SecureIT Includes:<br />
• Full anti-virus protection leveraging the largest continuously up<br />
dated library of virus definitions to keep your PC or laptop safe.<br />
• A software firewall that monitors the connections of your PC/laptop<br />
and ensure that only allowed and safe data and traffic can be<br />
passed between your computer and the world.<br />
• Spyware and pop-up blocking technology that stops unwanted ads<br />
and potentially malicious spyware dead in their tracks. Together,<br />
these services act like an alarm system and police squad to protect<br />
your PC.<br />
• Anti-phishing database watches for suspect <strong>site</strong>s and alerts you<br />
when you hit a destination that might be fraudulent. This live<br />
protection protects you in a manner often overlooked by<br />
conventional security solutions.<br />
• Microsoft Windows Updates Alerting, which makes sure you have<br />
the latest updates from Microsoft for your PC.<br />
Downloading and Installing SecureIT<br />
When you activate your Internet service with <strong>Grande</strong> you will be sent an<br />
email to your <strong>Grande</strong> email address. This email will contain instructions<br />
and the software key to download SecureIT.<br />
SecureIT Basic will support up to 3 different computers for each account,<br />
enabling your whole family to be protected. It will run on any Windows<br />
platform, but is not Mac compatible. SecureIT Plus will supply additional<br />
support on a per computer basis.<br />
Important: Please contact <strong>Grande</strong> <strong>Customer</strong> Service if you have not<br />
received the installation email.<br />
Wireless Home Networking<br />
<strong>Grande</strong> offers Wireless Home Networking service. This service allows<br />
you to connect multiple PC’s, laptops, gaming consoles, tablets and<br />
other wireless devices throughout your house using a wireless router<br />
provided by <strong>Grande</strong>.<br />
<strong>Grande</strong> will provide a disk to help you connect your PC to your home<br />
networking router. The disk <strong>Grande</strong> provides will let you set up passwords<br />
to help protect your wireless security and assist you in identifying your<br />
wireless network.<br />
Configuring the Wireless Router<br />
Follow the instructions below to configure your router:<br />
1. Turn off your modem or unplug your cable modem. This will<br />
prepare the modem to connect a new device.<br />
2. Connect your modem, router and computer together. Once your<br />
modem is unplugged, connect the modem to the router’s Internet<br />
(or WAN) port and connect your computer to any Ethernet port on<br />
the router.<br />
3. Configure your router for a broadband connection.<br />
a. If your router requires a set up prior to use, follow the instructions<br />
in the router’s manual or installation CD.<br />
b. Choose “Automatic Configuration” or “DHCP” for the connection<br />
type. Your router is configured to automatically receive<br />
connection information from <strong>Grande</strong> <strong>Communications</strong>.<br />
4. Power cycling your modem and router.<br />
a. Unplug the router’s power cable.<br />
Your Internet Service<br />
b. Unplug the modem’s power cable and wait for 30 seconds. If you<br />
have <strong>Grande</strong> <strong>Communications</strong> Phone service, you must reset<br />
the phone modem. Insert a paper clip in the recessed button<br />
on the back of the modem to reboot.<br />
c. Plug in the modem’s power cable and wait for its lights to stop<br />
flashing.<br />
d. Plug in the router’s power cable and wait for 20 seconds.<br />
Protecting your Home Network<br />
A broadband connection is ideal for sharing across multiple computers<br />
in your home. If you’re running a wireless network, we strongly recommend<br />
that you secure your wireless network by changing the settings that<br />
come with your wireless router. Otherwise, anyone in the vicinity can<br />
easily detect and gain access to your home network and you may be<br />
held liable for their online actions or at risk for security breaches.<br />
Connecting a Wireless Device<br />
If your wireless router and wireless device both support Wi-Fi Protected<br />
Setup (WPS), start by pressing and holding the WPS button on the router<br />
for 3 seconds. You may notice a light near the WPS button begin to flash.<br />
Next, press and hold the WPS button on your wireless device for 3<br />
seconds. The device will attempt to communicate with the router.<br />
After 30 seconds the device and the router should have completed the<br />
pairing process and the wireless device should be able to access the Internet.<br />
If either your wireless router or wireless device do not support the WPS<br />
function you’ll need to enter the information about the wireless network<br />
manually.<br />
Refer to your manufacturer’s documentation regarding accessing the<br />
wireless options on your wireless device. Your device should either<br />
show you a list of available wireless networks or prompt you to enter<br />
the name or SSID of a wireless network.<br />
If the device shows a list of networks, pick the name of your wireless<br />
network from the list then enter the network’s password if the device<br />
asks for one.<br />
If you need to enter the name or SSID of the wireless network, key in<br />
the name or SSID of your wireless network then enter the network’s<br />
password if the device asks for one. After entering the information the<br />
wireless device should be able to access the Internet.<br />
33 29
30<br />
Your Internet Service<br />
Troubleshooting Tips<br />
Problem: The cable modem is not working.<br />
Normal operating light sequence on our D3 and D2 Arris modems are<br />
Power (solid)<br />
US (solid)<br />
Online (solid)<br />
Link (blinking)<br />
Try this: Your cable modem should operate continuously without<br />
maintenance. You can leave the power to the modem on even when<br />
your computer is off. If your cable modem isn’t working, try these<br />
troubleshooting measures:<br />
1. Check your <strong>Grande</strong> services. If there is an outage it may affect all<br />
of your services. If this is the case, please contact <strong>Grande</strong> <strong>Customer</strong><br />
Service.<br />
2. Check your cable connections. If your coaxial, Ethernet, or USB<br />
connections are loose, you may not be able to send or receive data.<br />
3. Reset the modem by unplugging the power to the modem. Wait 30<br />
seconds and then plug it in. If you have a router, unplug the router,<br />
wait 30 seconds, and then plug it back in.<br />
4. Some modems have a standby mode. Make sure the modem is not<br />
in standby, which is indicated by an LED on the modem. There may<br />
be a standby button that has been activated that will cause the<br />
modem to lose connectivity.<br />
5. Reboot your computer. Shutting down and restarting your<br />
computer may resolve many computer problems.<br />
6. If you have a surge protector, make sure it is plugged in and does<br />
not need to be reset.<br />
Problem: I am unable to login to my home page.<br />
Try this: Verify that you are using the correct username, password,<br />
with attention to upper/lower case letters. If this doesn’t work, check<br />
another web<strong>site</strong> to verify the Internet connection is working properly. If<br />
you still cannot access your home page, please contact <strong>Grande</strong><br />
<strong>Customer</strong> Service.<br />
Problem: I have forgotten my Password when logging into my Home<br />
Page.<br />
Try this: Go to https://password.mygrande.net/ to reset your password.<br />
FAQ’s<br />
What are the system requirements?<br />
For a PC:<br />
• Windows 98 SE II to Windows 7<br />
• 512 Megabytes of available hard disk space<br />
• 756 Megabytes of RAM (we recommend at least 1 gigabyte)<br />
• 1.8 GHz processor or higher<br />
• 1 Ethernet Port or 1 available USB Port<br />
Check your computer’s capabilities by going to the start menu and<br />
clicking on “Control Panel” and selecting the “Systems” icon.<br />
For a Mac:<br />
• OS9.2 to Lion<br />
• 512 Megabytes of available Hard disk space<br />
• 756 Megabytes of RAM (we recommend at least 1 gigabyte)<br />
• 1.8 GHz processor or higher<br />
• 1 Ethernet Port or 1 available USB Port<br />
• View your computer’s capabilities by clicking on the Apple icon on your<br />
toolbar and selecting Apple System Profilers.<br />
What Internet browsers can I use?<br />
<strong>Grande</strong> Internet supports most browsers so you can use what best<br />
meets your needs. Many of our customers use Microsoft Internet<br />
Explorer, Google Chrome, Safari or Firefox.<br />
Why can’t I get to the Internet via my router?<br />
First, make sure the modem is plugged in, has power and an active link<br />
light. If the link light is active, you may need to power cycle your router.<br />
Also check the Ethernet or wireless connection to the computer. If you<br />
are unable to fix the router with a power cycle, refer to the troubleshooting<br />
section inside your owner’s manual or contact your router manufacturer<br />
for more support. If you are using a <strong>Grande</strong> provided router, please<br />
contact <strong>Grande</strong> <strong>Customer</strong> Service.<br />
Why can’t I connect some of my wireless computers to the router?<br />
Wireless signal is limited by obstructions such as walls and floors,<br />
as well as distance. You may need to move your router to acquire a<br />
stronger wireless signal. This could also indicate a problem with the<br />
computer trying to connect. If you are unable to correct the problem<br />
and you are using <strong>Grande</strong> Home Networking service, please contact<br />
<strong>Grande</strong> <strong>Customer</strong> Service.<br />
Can you help me find my wireless network? I have a <strong>Grande</strong><br />
provided wireless router.<br />
Using the provided Cisco Connect software you should be able to<br />
access the router administration page and locat the network information.<br />
If you cannot access the router administration page, please refer to the<br />
instructions in the Wireless Home Networking section on page 29 of<br />
this booket.<br />
<strong>Grande</strong> will setup two devices for you during the initial <strong>Grande</strong> Home<br />
Networking installation. If you need to connect more devices please<br />
read the instructions on the Wireless Home Networking section.<br />
Should you require further assistance, please contact <strong>Grande</strong> <strong>Customer</strong><br />
Service.<br />
How do I power cycle my cable modem?<br />
Your Internet Service<br />
When you power cycle your cable modem you are resetting your cable<br />
modem which may resolve some connectivity issues. Follow the<br />
directions below to power cycle your cable modem:<br />
1. Make sure the coaxial cable is plugged securely into the modem<br />
and the wall outlet (a loose connection could result in lost or slow<br />
connectivity).<br />
2. Unplug the cable modem from the power source.<br />
3. Leave the modem unplugged for two minutes.<br />
4. Plug the cable modem directly into the wall outlet.<br />
5. Wait up to approximately five minutes for the modem to regain<br />
sync (it usually takes less than two minutes and for many people, it<br />
takes less than one minute to gain sync).<br />
6. Check the lights on your modem to ensure the cable lights are<br />
steady.<br />
7. If the lights are illuminated, try <strong>visit</strong>ing various Web <strong>site</strong>s.<br />
8. If you are unable to connect to Web <strong>site</strong>s, continue to the next step.<br />
9. Properly shut down the computer and turn off the power by<br />
pushing the on/off button on the computer.<br />
10. Restore the power and turn on the computer.<br />
11. Try several addresses on the Web.<br />
If you are using a <strong>Grande</strong> Internet Phone Modem, to power cycle you<br />
must use a paper clip to hold down the reset button for 6-8 seconds in<br />
order to perform a reset.<br />
Note: If you have <strong>Grande</strong> TV Service, verify you are receiving TV<br />
programming with a clear picture. If you are not receiving your <strong>Grande</strong><br />
TV programming, your data service will not function. Call <strong>Grande</strong><br />
<strong>Customer</strong> Service for further assistance.<br />
33 31
32<br />
Your Phone Service<br />
Your Phone Service<br />
With <strong>Grande</strong> <strong>Communications</strong>, you’ll enjoy great Phone service<br />
and great value. Our service delivers maximum flexibility with<br />
packages designed to meet your unique needs. Whether you are<br />
looking for unlimited calling to anywhere in the US, Voicemail,<br />
access to our Online Phone Manager, we have what you need for<br />
your calling needs.<br />
Table Of Contents<br />
Using Your Phone Service 33<br />
Outage Protection Services 34<br />
Your Online Phone Manager 34<br />
Your Calling Features 36<br />
Your Voicemail Service 42<br />
Understanding Your Equipment 45<br />
Troubleshooting Tips 46<br />
FAQS 47<br />
Using Your Phone Service<br />
Welcome to your new Phone service from <strong>Grande</strong> <strong>Communications</strong>.<br />
With so many features available, please take a few moments to<br />
familiarize yourself so you can start enjoying your service to the fullest.<br />
Service Options<br />
We offer a variety of service options and features to meet your specific<br />
needs. Our most popular bundles include unlimited calls within the U.S.<br />
and Canada, plus 16 calling features.<br />
Note: Some of our features are not available in Dallas.<br />
International Calling<br />
In addition to great domestic long distance calling plans, you will also<br />
enjoy amazingly low international rates to over 260 countries. To see a<br />
complete list of our international rates go to<br />
www.mygrande.com/intlrates.<br />
Mexico Savings Plan<br />
<strong>Customer</strong>s with Optimum and Essential Phone service will receive<br />
special discounted rates when calling to Mexico. For more details go to<br />
www.mygrande.com/intlrates.<br />
To Call Someone in a Country with an International Access Code:<br />
Enter: 011 (the international access code) + the country code + the city<br />
code + the local phone number.<br />
For example, if you are calling Paris, France, dial 011(the international<br />
access code), 33 (the country code for France), 1 (the city code for<br />
Paris) + the local telephone number.<br />
To see a complete list of our international country codes go to<br />
www.mygrande.com/intlrates.<br />
911 Emergency Calling<br />
<strong>Grande</strong> <strong>Communications</strong> Phone service provides 911 Emergency calling<br />
to police, fire and medical services. Our 911 emergency calling will<br />
automatically relay your phone number and address in the event you are<br />
unable to do so, provided your public safety system supports this feature.<br />
In locations where this service is not available, you will be asked for<br />
your phone number and address.<br />
Your Phone Service<br />
As an added protection during a power outage, we provide battery<br />
backup. This backup provides up to 8 hours of standby time and up to<br />
4 hours of talk time for your <strong>Grande</strong> <strong>Communications</strong> Phone service, so<br />
even if you don’t have power, you can still dial 911.<br />
Note: As with any phone service, a cordless phone will not work in a<br />
power outage so you should have a working non-cordless phone in<br />
your home at all times.<br />
Important: In order to not disrupt access to 911 Emergency calling,<br />
do not move your phone modem without notifying <strong>Grande</strong> <strong>Customer</strong><br />
Service.<br />
Directory Assistance<br />
By dialing 411 you will gain access to any listed number in the United<br />
States. Provide the city and state, and we will find the desired listing<br />
including the area code. Directory assistance calls are charged on a<br />
per-use basis.<br />
Directory Listing<br />
<strong>Grande</strong> <strong>Communications</strong> offers primary and non-published directory<br />
listings within your local while pages. Your phone number, or primary<br />
directory listing, is provided at no charge in the telephone directory<br />
published by the local phone carrier within your local Texas area.<br />
Non-published directory listings are available upon your request for a<br />
monthly fee. Your name, address and phone number will not be published<br />
in the phone directory or street address directory and will not be<br />
obtainable by the general public.<br />
Operator Services<br />
<strong>Grande</strong> <strong>Communications</strong> Operators are available for you at all times.<br />
Just dial 0 and you will connect to an Operator that can help you place<br />
any of the following calls:<br />
Collect Calls – The Operator will connect the call for you and request<br />
payment from the called party.<br />
Person-to-Person Calls – The Operator will connect you to a particular<br />
person.<br />
Bill to Third-Party Calls – The Operator contacts one phone number<br />
and requests that the call charged to another phone number.<br />
Operator assisted calls are charged on a per use basis.<br />
33
34<br />
Your Phone Service Your Phone Service<br />
Call Trace<br />
Call Trace ensures the phone number of your last incoming caller is<br />
traced to provide necessary information to law enforcement agencies.<br />
To use Call Trace<br />
1. When you receive a harassing or offensive call, hang up immediately.<br />
2. Leave the phone on the hook for about 10 seconds to ensure that the<br />
call terminates.<br />
3. Lift the receiver and listen for the dial tone. If you do not hear a dial tone,<br />
the call may not yet be terminated and you will need to repeat Step 2.<br />
4. Dial *57.<br />
5. Fill out the “Letter of Authorization for Call Trace” form located in the<br />
“Law Enforcement Agency Handbook” document at<br />
www.mygrande.com/policies.<br />
6. Provide the form to your local law enforcement agency.<br />
Important: The information provided by Call Trace will not be available to<br />
you directly. It will only be available to law enforcement authorities<br />
possessing a valid subpoena or other valid legal authorization. If the<br />
call is life threatening, call your local law enforcement authorities<br />
immediately.<br />
Outage Protection Service<br />
<strong>Grande</strong> Phone services include Outage Protection Service. In case of<br />
a service outage, this protection service will redirect incoming calls to<br />
another phone number so you never miss an important call. You must<br />
activate this service using either the Online Phone Manager or the<br />
* codes as detailed below.<br />
Activate Outage Protection Service<br />
1. Lift the phone and listen for dial tone.<br />
2. Dial *94 and wait for the announcement.<br />
3. Enter the phone number where calls should be forwarded followed<br />
by #.<br />
4. Wait for confirmation announcement and hang up.<br />
Outage Protection service is activated.<br />
Deactivate Outage Protection Service<br />
1. Lift the phone and listen for dial tone.<br />
2. Dial *95.<br />
3. Listen to the deactivation message and hang up.<br />
Outage Protection service is deactivated.<br />
Outage Protection Service Status<br />
1. Lift your phone and listen for dial tone.<br />
2. Dial *14.<br />
3. Listen to the status announcement and hang up.<br />
Note: You can use the Online Phone Manager to activate and<br />
deactivate Outage Protection Service.<br />
Your Online Phone Manager<br />
Managing your account is just a click away with Online Phone Manager.<br />
You can listen to messages, manage your calling features, view your call<br />
history, and much more.<br />
Accessing Online Phone Manager<br />
To access Online Phone Manager go to http://phonemanager.mygrande.net<br />
or click on the Online Phone Manager links on the <strong>Grande</strong> Portal<br />
(www.mygrande.net).<br />
The first time you access the Online Phone Manager, you will be<br />
prompted for your <strong>Grande</strong> ID, password, Account Number and your<br />
Account PIN to register your email address.<br />
<strong>Grande</strong> Username and Password<br />
Your <strong>Grande</strong> Username is the same as your <strong>Grande</strong> Home Page<br />
(www.mygrande.net) username or the first part of your email address<br />
before the “@” symbol.<br />
Example: If your email address is johndoe@mygrande.net then your<br />
<strong>Grande</strong> Username is “johndoe”.<br />
Account PIN<br />
The Account PIN, also referred to as your CPNI Passcode, will be<br />
required the first time you use the Online Phone Manager. The<br />
Account PIN can be found on the top right section of your Bill<br />
Statement. Whenever you contact <strong>Grande</strong> <strong>Communications</strong> you will be<br />
required to provide this PIN to authenticate yourself.<br />
Important: If you do not have your <strong>Grande</strong> Username or passcodes<br />
you will need to contact <strong>Grande</strong> <strong>Communications</strong> <strong>Customer</strong> Support to<br />
create them for you.<br />
Managing your Voicemail<br />
Our Online Phone Manager lets you control advanced features for your<br />
Voicemail.<br />
• List to your Voicemail online.<br />
• Erase Voicemail messages.<br />
• Change the number of rings before a call goes to Voicemail.<br />
• Turn Voicemail On or Off.<br />
• Set up an automatic email notification when you have a new Voicemail.<br />
• Set up email forwarding so you can actually get an email containing an<br />
attachment with a new Voicemail message.<br />
• Change your Voicemail passcode.<br />
Managing your Calling Features<br />
Our Online Phone Manager makes it easy for you to activate or<br />
deactivate your <strong>Grande</strong> phone features.<br />
• Turn Anonymous Call Rejection On or Off.<br />
• Control Call Forwarding Options.<br />
• Turn Do Not Disturb On or Off.<br />
• Set-up Priority Ringing features.<br />
• Create a Selective Call Rejection list.<br />
• Turn Caller ID Blocking On/Off for calls.<br />
• Set up your Speed Dial keys from 2-9 and 00-99.<br />
• Turn Call Waiting On/Off for all calls.<br />
Your Call History<br />
You can view a detail of each call you have made or received using the<br />
Call History capabilities of Online Phone Manager.<br />
35
36<br />
Your Phone Service Your Phone Service<br />
Your Calling Features<br />
<strong>Grande</strong> <strong>Communications</strong> Phone service offers a powerful set of calling<br />
features that give you more control. Whether you want to see who’s<br />
calling, or you want to have a special dial tone associated for your favorite<br />
caller – <strong>Grande</strong> has the calling features you need. Different features are<br />
available either on our Optimum or Essential Phone Services, as noted<br />
below.<br />
Caller ID<br />
Caller ID lets you see the date, time and telephone number of the<br />
person calling before you answer the call or in the call history on your<br />
phone. You must have a phone with Caller ID capabilities or an add-on<br />
Caller ID unit in order to use this service.<br />
Caller ID Displays<br />
Your Caller ID may display various codes instead of an actual telephone<br />
number when you receive incoming calls:<br />
• P, Private, Blocked, Anonymous or No data: This means the<br />
caller’s number was blocked by the caller from displaying or could<br />
not be delivered by the network.<br />
• E or Error: The phone or Caller ID unit cannot identify the caller’s<br />
number.<br />
• Out of Area: The call is coming from an area that does not<br />
sup- port Caller ID.<br />
Important: Caller ID can be used with most answering machines as long<br />
as you set your machine to pick up after the second ring.<br />
Caller ID Blocking<br />
Get the security you need by permanently or temporarily blocking your<br />
phone number from appearing on the Caller ID unit of the number<br />
you call. You can block your phone number on a call-by-call basis or<br />
permanently.<br />
Blocking Caller ID Permanently<br />
1. Lift the phone and listen for dial tone.<br />
2. Dial *31 and wait for confirmation announcement and hang up.<br />
You phone number will not appear on the Caller ID unit of anyone you<br />
call from your home.<br />
Unblocking Caller ID Permanently<br />
1. Lift the phone and listen for dial tone.<br />
2. Dial *36 and wait for confirmation announcement and hang up.<br />
You phone number will now appear on the Caller ID unit of anyone you<br />
call from your home.<br />
Note: You can also activate and deactivate Caller ID Blocking from the<br />
Online Phone Manager.<br />
Temporarily Blocking Caller ID<br />
1. Lift the phone and listen for dial tone.<br />
2. Dial *67 and wait for confirmation tone.<br />
3. Dial the phone number of the person you are calling. Your phone<br />
number will not appear on the Caller ID unit of the person you are<br />
calling.<br />
4. When you hang up, Caller ID Blocking is terminated.<br />
Temporarily Unblocking Caller ID<br />
If you have set your phone service to block your Caller ID permanently<br />
via our Online Phone Manager or through *31, you may temporarily<br />
unblock your phone number on a call-by-call basis.<br />
1. Lift the phone and listen for dial tone.<br />
2. Dial *65 and wait for the confirmation tone.<br />
3. Dial the number you wish to call. Your number will appear on the<br />
Caller ID unit of the number you call. When you hang up, this<br />
function is cancelled. The next call you make will be ‘Private’ unless<br />
you again unblock your Caller ID.<br />
Call Waiting<br />
Call Waiting lets you accept an incoming call while you are talking to<br />
another caller. A special beeping tone alerts you of a second caller. You<br />
can either answer the second caller or continue talking.<br />
To do this, you will use the switchhook on a non- cordless phone or<br />
the flash button on a cordless phone (located on the keypad). The<br />
switchhook is the button that disconnects your call when you hang up.<br />
When you press the switchhook, make sure you press it firmly and then<br />
release it to activate the feature. Pressing for too long may disconnect<br />
the call.<br />
Answer Call waiting<br />
1. You will hear a special beeping tone letting you know a second<br />
caller is waiting.<br />
2. Quickly press and release the Switchhook or Flash button on your<br />
phone.<br />
3. Your first caller will automatically be placed on hold while you get<br />
connected to your second caller.<br />
5. If you need to alternate between the two callers, simply press the<br />
Switchhook or Flash button. While talking to each caller the<br />
conversations remain private.<br />
6. To end either call, hang up. The phone will then ring and when you<br />
answer, the remaining caller will be on the line.<br />
Cancel Call Waiting (per Call)<br />
1. Lift the phone and listen for dial tone.<br />
2. Dial *70.<br />
3. Listen for confirmation tone.<br />
4. Enter the phone number you would like to call. Call Waiting<br />
automatically turns back on when you hang up.<br />
Disable Call Waiting (Permanent)<br />
1. Lift the phone and listen for dial tone.<br />
2. Dial *39.<br />
3. Listen for confirmation announcement and hang up.<br />
Enable Call Waiting<br />
1. Lift the phone and listen for dial tone.<br />
2. Dial *43.<br />
3. Listen for confirmation announcement and hang up.<br />
Important: Activating Call Forwarding Always will disable Call Waiting.<br />
When you cancel Call Forwarding Always, your Call Waiting will be<br />
reactivated.<br />
Note: You can use the Online Phone Manager to cancel Call Waiting<br />
for all calls.<br />
Call Waiting ID<br />
Caller ID also works with Call Waiting. When you hear a call waiting<br />
tone, capable phones will display the incoming call information.<br />
Three-Way Calling<br />
Get everyone connected with Three-Way Calling. You can connect a<br />
third participant to your phone call, regardless of who initiated the call.<br />
To do this, you will use the switchhook on a non-cordless phone or the<br />
flash button on a cordless phone (located on the keypad). The switchhook<br />
is the button that disconnects your call when you hang up. When you<br />
press the switchhook, make sure you press it firmly and then release it<br />
to activate the feature. Pressing for too long may disconnect the call.<br />
Connect with Three-Way Calling<br />
1. Press the Switchhook briefly. The current call is placed on hold and you<br />
will hear dial tone. If your phone is equipped with a Flash button,<br />
pressing the Flash button is the same as pressing the Switchhook.<br />
2. Dial the third participant and wait for them to answer.<br />
3. Once they have answered, press the Switchhook or the Flash button<br />
briefly and connect all three parties.<br />
4. If the third participant’s phone line is busy or no one answers the<br />
phone, press the Switchhook or the Flash button briefly to<br />
disconnect the call and return to the original participant.<br />
37
38<br />
Your Phone Service Your Phone Service<br />
Disconnecting the Third Participant<br />
1. When you are ready to get back to a two-party call, press the<br />
Switchhook or the Flash button twice briefly.<br />
2. The third participant is disconnected and you remain connected to<br />
your original participant.<br />
Important: All participants can be local, long distance or international.<br />
Depending on your phone service you will be charged for any long<br />
distance or international calls you initiate. Any of the three call participants<br />
can disconnect from the call at any time. If you hang up, the call is<br />
terminated between all participants.<br />
Call Forwarding<br />
No more worries about missing important calls when you are away<br />
from home when you have Call Forwarding. You can forward your home<br />
phone number to any number of your choice.<br />
Important:<br />
• You can forward calls to a local or long distance phone number,<br />
but long distance charges may apply depending on your level of<br />
service.<br />
• Any calls forwarded to an international number will be billed as if you<br />
called that phone number directly.<br />
• You can continue to make outgoing calls when any of the Call<br />
Forwarding features are activated.<br />
Call Forwarding Always<br />
You can forward your calls to another phone number if you don’t want<br />
to miss an important call. Your calls will stay forwarded until you<br />
cancel the forwarding option.<br />
Activate Calling Forwarding Always<br />
1. Lift the phone and listen for dial tone.<br />
2. Dial *72 and wait for the announcement.<br />
3. Enter the phone number where you want calls forwarded followed<br />
by #.<br />
4. Wait for confirmation announcement and hang up.<br />
Call Forwarding Always has been activated.<br />
Deactivating Call Forwarding Always<br />
1. Lift your phone and listen for dial tone.<br />
2. Dial *73.<br />
3. When you hear the announcement, Call Forwarding Always has<br />
been deactivated.<br />
Call Forwarding Status<br />
You can verify if your Call Forwarding status is either enabled or<br />
disabled:<br />
1. Lift your phone and listen for dial tone.<br />
2. Dial *011.<br />
3. Listen to the status announcement and hang up.<br />
Note: You can use the Online Phone Manager to activate and<br />
deactivate Call Forwarding Always.<br />
Call Forwarding No Answer<br />
Call Forwarding No Answer redirects calls to a phone number you<br />
designate when your phone is not answered within the first 4 rings.<br />
Calls are redirected unto you cancel the forwarding option.<br />
Activate Call Forwarding No Answer<br />
1. Lift the phone and listen for dial tone.<br />
2. Dial *92 and wait for the announcement.<br />
3. Enter the phone number where you want your calls forwarded<br />
followed by #.<br />
4. Wait for confirmation announcement and hang up.<br />
Your Call Forwarding No Answer is now activated.<br />
Deactivate Call Forwarding No Answer<br />
1. Lift the phone and listen for dial tone.<br />
2. Dial *93.<br />
3. When you hear the deactivation announcement, your<br />
Call Forwarding No Answer has been cancelled.<br />
Call Forwarding No Answer Status<br />
To see if your Call Forwarding No Answer status is enabled or disabled,<br />
simply dial *13.<br />
1. Lift your phone and listen for dial tone.<br />
2. Dial *13.<br />
3. Listen to the status announcement and hang up.<br />
Number of rings on Call Forwarding No Answer<br />
You can set the number of rings before a call evokes the Call<br />
Forwarding No Answer feature. The valid numbers are 0, 2-20.<br />
1. Lift your phone and listen for dial tone.<br />
2. Dial *98.<br />
3. Listen to the announcement and enter a valid number (0, 2-20).<br />
4. Listen to the confirmation announcement and hang up.<br />
Note: You can use the Online Phone Manager to activate and<br />
deactivate Call Forwarding No Answer.<br />
Call Forwarding Busy<br />
Another way to never miss a phone call is to redirect incoming calls<br />
to another phone number when you are on your phone. Without Call<br />
Forwarding Busy, the caller would receive a busy signal. If you aren’t on<br />
your phone, then calls will be directed to your phone number as usual.<br />
Activate Call Forwarding Busy<br />
1. Lift the phone & listen for dial tone.<br />
2. Dial *90 and wait for the announcement.<br />
3. Enter the phone number where calls should be followed by #.<br />
4. Wait for confirmation announcement and hang up.<br />
Call Forwarding Busy is activated.<br />
Deactivate Call Forwarding Busy<br />
1. Lift the phone and listen for dial tone.<br />
2. Dial *91.<br />
3. When you hear deactivation announcement, Call Forwarding Busy<br />
is cancelled.<br />
Call Forwarding Busy Status<br />
You can always know to the status (enable or disabled) of your Call<br />
Forwarding Busy feature by dialing *12.<br />
1. Lift your phone and listen for dial tone.<br />
2. Dial *12.<br />
3. Listen to the status announcement and hang up.<br />
Note: You can use the Online Phone Manager to activate and<br />
deactivate Call Forwarding Busy.<br />
Selective Call Forwarding<br />
Use Selective Call Forwarding to forward calls from specific numbers on<br />
a forwarding list to the phone number that you designate. All other calls<br />
ring through to your phone.<br />
Adding Phone Numbers to Selective Call Forwarding<br />
To use Selective Call Forwarding you will need to add at least one phone<br />
number to your list.<br />
1. Go to: https://phonemanager.mygrande.net and log in.<br />
2. Click on Call Forwarding and enter the desired phone number and<br />
name on the Selective Call Forwarding section.<br />
3. Save your changes and enable the feature.<br />
Selective Call Forwarding is now enabled<br />
Activate Selective Call Forwarding<br />
1. Lift the phone and listen for dial tone.<br />
2. Dial *63 and wait for the announcement.<br />
Selective Call Forwarding is activated.<br />
39
40<br />
Your Phone Service Your Phone Service<br />
Deactivate Selective Call Forwarding<br />
1. Lift the phone and listen for dial tone.<br />
2. Dial *83.<br />
3. When you hear deactivation announcement, Selective Call<br />
Forwarding is cancelled.<br />
Important:<br />
• You can dial outgoing calls to phone numbers on your forwarding list.<br />
• You will receive a reminder ring on your phone when incoming<br />
calls pass through. However, you will not be able to answer the<br />
call from your phone.<br />
• Since one ring signal is sent to your phone for phone numbers on<br />
the forwarding list, answering machines or fax machines<br />
connected to your phone line should be set not to respond to<br />
incoming calls on the first two rings.<br />
• You can forward your phone to a local or non- local number. How<br />
ever, depending on your phone service you will be billed for calls<br />
forwarded to long distance or international numbers, similar to<br />
dialing that number directly.<br />
• The Selective Call Forwarding list overrides any other enabled<br />
Call Forwarding feature for incoming numbers contained on the<br />
list.<br />
• If a number is contained on both the Selective Call Forwarding list<br />
and the Selective Call Reject list, Selective Call Reject takes<br />
precedence in the processing of that number.<br />
Note: You must use the Online Phone Manager to add phone<br />
numbers on your forwarding list before you can enable Selective Call<br />
Forwarding functions.<br />
Speed Dial<br />
You can quickly dial up to 108 pre-programmed phone numbers from<br />
any phone in your home.<br />
Set Up Speed Dial 8 (digits 2-9)<br />
1. Lift the phone and listen for dial tone.<br />
2. Dial *74 to program digits 2 to 9 as your Speed Dial keys.<br />
3. Wait for dial tone and enter the digit you want to assign as the Speed<br />
Dial key (e.g. 2-9) followed by the phone number to be programmed.<br />
4. Wait for confirmation announcement and hang up. The Speed Dial<br />
key has been set up to the phone number you just entered.<br />
5. Write down the Speed Dial key you assigned to each phone number.<br />
6. Repeat steps 1 through 5 for each phone number you want to as<br />
sign a Speed Dial key.<br />
To use Speed Dial 8 (2-9) from the phone after programming, you<br />
should dial the Speed Dial code number, then # (e.g. 2#).<br />
Set Up Speed Dial 100 (digits 00-99)<br />
1. Lift the phone and listen for dial tone.<br />
2. Dial *75 to program digits 00 to 99 as your Speed Dial keys.<br />
3. Wait for dial tone and enter the digits you want to assign as the<br />
Speed Dial key (e.g. 00-99) followed by the phone number to be<br />
programmed.<br />
4. Wait for confirmation announcement and hang up. The Speed Dial<br />
key has been set up to the phone number you just entered.<br />
5. Write down the Speed Dial key you assigned to each phone number.<br />
6. Repeat steps through 5 for each phone number you want to assign a<br />
Speed Dial key.<br />
To use Speed Dial 100 (00-99) from the phone after programming, you<br />
should dial the Speed Dial code number, then # (e.g. #02).<br />
Important:<br />
• You can program a total of 108 Speed Dial keys. The telephone<br />
keys are 2-9 and 00-99.<br />
• You can set up Speed Dial to local, long distance or international<br />
phone numbers. Make sure to include all digits you regularly dial.<br />
Note: You can assign and manage your Speed Dial keys through the<br />
Online Phone Manager.<br />
Call Return (*69)<br />
With Call Return (*69) you can automatically dial back the most recent<br />
phone number that called you.<br />
Using Call Return<br />
1. Lift the phone and listen for dial tone.<br />
2. Dial *69.<br />
3. You will hear the most recent number that called you.<br />
4. Follow the instructions and press 1.<br />
5. If the called phone number is busy or no one answers the call,<br />
hang up the phone and repeat Step 1.<br />
Important:<br />
• Call Return only works on local phone number.<br />
• Call Return may not work if the original caller used a phone number<br />
blocking feature.<br />
• To delete the Call Return number (the most recent number that<br />
called you) dial *89.<br />
Auto Redial (*59)<br />
Auto Redial dials the phone number of your most recent outgoing call.<br />
Using Auto Redial<br />
1. Lift the receiver and listen for dial tone.<br />
2. Dial *59.<br />
3. You will hear the standard tone indicating you are calling the most<br />
recent phone number you called.<br />
4. If the called phone number is busy or no one answers the call,<br />
hang up the phone and repeat Step 1.<br />
Important: Auto Redial cannot be used to call 911.<br />
Do Not Disturb<br />
When you activate Do Not Disturb, all incoming calls are automatically<br />
sent to Voicemail so your phone does not ring.<br />
Activate Do Not Disturb<br />
1. Lift the phone and listen for dial tone.<br />
2. Dial *78.<br />
3. Wait for confirmation announcement and hang up.<br />
Do Not Disturb is activated.<br />
Cancel Do Not Disturb<br />
1. Lift the phone and listen for dial tone.<br />
2. Dial *79.<br />
3. Wait for deactivation announcements and hang up.<br />
Do Not Disturb is cancelled.<br />
Important:<br />
• A ring signal is not sent to your phone while Do Not Disturb is<br />
activated. Any answering machines or fax machines connected to<br />
this phone line will not be able to respond to incoming calls.<br />
• Do Not Disturb overrides all Call Forwarding settings.<br />
Note: You can also activate and deactivate Do Not Disturb from the<br />
Online Phone Manager.<br />
Selective Call Rejection<br />
Selective Call Rejection blocks incoming phone numbers you specify<br />
to be blocked. Your phone does not ring when these calls arrive. The<br />
caller is disconnected after hearing a short message stating that you are<br />
not accepting calls at this time.<br />
You must use the Online Phone Manager to activate all Selective<br />
Rejection function.<br />
Adding Phone Numbers to Selective Call Rejection<br />
To use Selective Call Rejection you will need to add at least one phone<br />
number to your list.<br />
1. Go to https://phonemanager.mygrande.net and log in.<br />
2. Click on Selective Call Rejection and enter the desired phone<br />
number(s) and name(s).<br />
3. Save your changes and enable the feature.<br />
Selective Call Rejection is now enabled.<br />
41
42<br />
Your Phone Service Your Phone Service<br />
Anonymous Call Rejection<br />
You can stop receiving unidentified calls with Anonymous Call<br />
Rejection. When incoming calls do not have a caller’s name or phone<br />
number. Anonymous Call Rejection will automatically route these calls<br />
to a short message stating that you are not accepting calls at this time<br />
and your phone will not ring.<br />
Activate Anonymous Call Rejection<br />
1. List the phone and listen for dial tone.<br />
2. Dial *77.<br />
3. Wait for confirmation announcement and hang up.<br />
Anonymous Call Rejection is activated.<br />
Deactivate Anonymous Call Rejection<br />
1. Lift the phone and listen for dial tone.<br />
2. Dial *87.<br />
3. Wait for confirmation announcement and hang up.<br />
Anonymous Call Rejection is deactivated.<br />
Important:<br />
• Anonymous Call Rejection specifically blocks calls from phones<br />
that have made the caller’s phone number private.<br />
• This service does not apply to calls originating from phones where<br />
Caller ID service is not offered.<br />
Note: You can also activate and deactivate Anonymous Call Rejection<br />
from the Online Phone Manager.<br />
Priority Ringing<br />
With Priority Ringing, you can set up a list of special callers so your<br />
phone will ring with a special tone when they call.<br />
Note: You can only setup Priority Ring using Online Phone Manager.<br />
Adding Phone Numbers to Priority Ringing<br />
To use Priority Ringing you will need to add at least one phone number<br />
to your list.<br />
1. Go to: https://phonemanager.mygrande.net/and log in.<br />
2. Click on Priority Ringing and enter the desired phone number and name.<br />
3. Save your changes to enable the feature.<br />
Priority Ringing is now enabled.<br />
Important:<br />
• A caller will not be aware you have Priority Ringing. The caller<br />
hears the regular, familiar ring.<br />
• Priority Ringing may not work with all phones.<br />
Your Voicemail Service<br />
<strong>Grande</strong> <strong>Communications</strong> offers a powerful Voicemail service so you’ll<br />
never miss an important call, whether you’re out of town or on the<br />
other line. With our advanced tools, you can even get email alerts when<br />
you have new Voicemail and listen to Voicemail from most Internetconnected<br />
devices.<br />
Voicemail is included with our Optimum Phone Service and available as<br />
an optional service with our Essential Phone service.<br />
Note: As a default, your new voicemail password will be set to 9999.<br />
Voicemail Service Features<br />
Our Voicemail service has all the standard features you need to manage<br />
your calls:<br />
• Listen to messages at home, away from home or online.<br />
• Message playback controls (rewind/fast-forward).<br />
• Send messages to other <strong>Grande</strong> <strong>Communications</strong> users.<br />
• Create multiple personal greetings.<br />
• Advanced mailbox management tools.<br />
• Use online phone manger to listen, download and e-mail your<br />
voice messages.<br />
Note: Voicemail is enabled by default thus if you plan to use a personal<br />
answering machine <strong>Grande</strong> voicemail should be disabled.<br />
Types of Voicemail Messages<br />
• New – messages that have not yet been reviewed.<br />
• Skipped – new messages you choose to skip are saved in a special<br />
category.<br />
• Saved – messages that have been reviewed and saved.<br />
• Deleted – messages that have been reviewed and deleted. Messages<br />
may be undeleted until you hang up or return to the <strong>Guide</strong> Menu.<br />
Message Notification<br />
Your Voicemail service will notify you that you have a new message.<br />
When you pick up the phone to hear a dial tone, you will hear a stutter-tone<br />
indicating you have a new message. If your phone is equipped with a<br />
message waiting light, it will also be lit.<br />
Note: You can also choose to get a new Voicemail message delivered<br />
to you via email using the Online Phone Manager.<br />
To clear the Message waiting indicator:<br />
1. Lift the phone and listen for dial tone.<br />
2. Dial *99.<br />
3. Listen to the confirmation announcement and hang up.<br />
Note: You can use the Online Phone Manager to receive notification<br />
of new Voicemails or to get copies of Voicemail messages via your<br />
email.<br />
Voicemail Storage/Time Rules<br />
You can store up to 60 minutes of recorded new and saved messages<br />
in your mailbox at any one time. The maximum message length is 2<br />
minutes. Saved messages will be stored for a maximum of 60 days<br />
and then deleted. When a mailbox is full, no new messages can be<br />
recorded.<br />
Accessing Your voicemail<br />
From home<br />
1. Lift the phone and listen for dial tone.<br />
2. Dial *86.<br />
3. When prompted, enter your Passcode, then press #.<br />
Away From home<br />
1. Dial your <strong>Grande</strong> <strong>Communications</strong> phone<br />
number.<br />
2. Press the # key anytime during your recorded greeting.<br />
3. When prompted, enter your Passcode then press #.<br />
Voicemail <strong>Guide</strong> Menu Options<br />
When you access Voicemail, you will start at the Voicemail Box menu.<br />
There are several options:<br />
MESSAGE OPTION KEY<br />
Listen to Messages 1<br />
Change your mailbox busy greeting 2<br />
Change your mailbox no answer greeting 3<br />
Compose and send a new message 5<br />
Delete all messages 7<br />
Change your Passcode 8<br />
Record your name 9<br />
Repeat Options #<br />
Important: When using the Voicemail system, you can enter a menu<br />
choice at any time. You do not need to wait for the announcement to<br />
finish playing.<br />
Setting Up Your Voicemail<br />
The first time you use your Voicemail you will be required to set it up by<br />
changing the default Passcode and your name.<br />
1. Lift the phone and listen for dial tone.<br />
2. Dial *86 from home.<br />
3. When prompted, enter your default Passcode, which is 9999, then<br />
press #.<br />
4. Listen to the instructions for creating a new Passcode and enter<br />
your new 4 -10 digit Passcode, then press #.<br />
5. When prompted, re-enter your new Passcode, then press #. Be<br />
sure to write down your Passcode so you do not forget it.<br />
Setting Up Your Greetings<br />
You can set up your Voicemail so that callers hear a different personal<br />
greeting if you don’t answer, if the line is busy, or if you will be away<br />
from the phone for an extended period.<br />
43
44<br />
Your Phone Service Your Phone Service<br />
Personalize the No Answer Greeting<br />
The No Answer Greeting cannot be turned off. A standard system<br />
greeting with your name will automatically be played unless you create<br />
a personalized No Answer Greeting.<br />
1. Lift the phone and listen for dial tone.<br />
2. Dial *86 to access your voicemail from home.<br />
3. Press 3 for No Answer.<br />
4. Press 1 to record a new greeting.<br />
5. When prompted, record your greeting and press # when done.<br />
6. If you are satisfied with the greeting, press * to save and the new<br />
greeting will be activated.<br />
Changing a Personalized Busy Greeting<br />
1. Lift the phone and listen for dial tone.<br />
2. Dial *86 to access your voicemail from home.<br />
3. Press 2 for Busy Greeting.<br />
4. Press 1 to record a new greeting.<br />
5. When prompted, record your greeting and press # when done.<br />
6. If you are satisfied with the greeting, press * to save and the new<br />
greeting will be activated.<br />
Important: Be sure to record your entire personal greeting and press *<br />
to save and activate your new greeting before hanging up. If you hang<br />
up before you have activated your new greeting, the prior greeting will<br />
remain active.<br />
Listing to Messages<br />
1. Lift the phone and listen for dial tone.<br />
2. Dial *86 to access your voicemail from home.<br />
3. Press 1. You will hear a recording about the number of messages<br />
in the folder and the first message will be played.<br />
Listing to Messages (continued...)<br />
OPTIONS MENU KEY<br />
Save message #<br />
Erase message 7<br />
Repeat the message 2<br />
Play the message envelope 5<br />
Previous message 4<br />
Next message 6<br />
Call back the caller 8<br />
Additional options 9<br />
Previous Menu *<br />
Navigating during Playback<br />
These navigation options are available while the message is playing:<br />
MESSAGE OPTION KEY<br />
Pause Message 2<br />
Skip backward 1<br />
Skip forward 3<br />
Jump to beginning 4<br />
Jump to End 6<br />
Important:<br />
• Each message includes the date and time the message<br />
was left.<br />
• New messages are played first, then Skipped messages,<br />
then Saved messages.<br />
• When you have listened to all your messages, you will be<br />
returned to the <strong>Guide</strong> Menu.<br />
Deleting Saved Messages<br />
To delete saved messages and free up storage space:<br />
1. Lift the phone and listen for dial tone.<br />
2. Dial *86 to access your voicemail from home.<br />
3. Press 1 to hear any new messages.<br />
4. Press 7 to delete each message as it plays.<br />
Changing your Passcode<br />
You can change your Passcode as many times as you want – just make<br />
sure to keep track of the new Passcode.<br />
To change your Passcode:<br />
1. Lift the phone and listen for dial tone.<br />
2. Dial *86 to access your voicemail from home.<br />
3. Press *.<br />
4. Press 8 to reach the Change Passcode Settings menu.<br />
5. Listen to the instructions for creating a new Passcode.<br />
6. Enter your new 4 -10 digit Passcode then press #.<br />
7. Re-enter the new Passcode then press #.<br />
8. Listen to the confirmation announcement and hang up.<br />
Important: Should you forget your Passcode, don’t hesitate to contact<br />
<strong>Grande</strong> <strong>Customer</strong> Service.<br />
Note: You can use the Online Phone Manager to change your Passcode.<br />
Understanding Your Equipment<br />
You will receive a phone modem with your <strong>Grande</strong> Phone Service. This<br />
single device connects our network to your phones and home computer<br />
and is compatible with almost all existing cordless and non-cordless<br />
phones. The phone modem comes with battery backup so if your power<br />
goes down, your <strong>Grande</strong> Phone Service will still be available for up to 8<br />
hours of standby time and up to 4 hours of talk time.<br />
Front View of Phone Modem<br />
If the modem is operating correctly the light sequence for Phone<br />
Modem will be:<br />
Power (solid)<br />
Us (solid)<br />
Online (solid)<br />
Link (Blinking)<br />
Telephone (solid to what line is active on the modem)<br />
Here is a guide to each light on a standard phone modem:<br />
1. Battery<br />
2. Telephone 2<br />
3. Telephone 1<br />
4. Link<br />
5. Online<br />
6. US (Upstream)<br />
7. DS (Downstream)<br />
8. Power<br />
NOTE: Your modem may look different than the modem shown above.<br />
You can find more information about you modem<br />
www.mygrande.com/userguides.<br />
If your system is connected and working properly these lights will be<br />
steady green. Many lights will blink if the device is in use. The<br />
Telephone 2 light will be dark if you only have one telephone line.<br />
Important: If your modem is reset or if there is a problem, your lights<br />
will flash orange.<br />
Back View of Phone Modem<br />
7<br />
1. Power Cord<br />
2. Cable<br />
3. Reset<br />
4. USB<br />
5. Ethernet<br />
6. Telephone 2<br />
7. Telephone 1<br />
6<br />
5<br />
4<br />
3<br />
1 2 3 4 5 6 7 8<br />
2<br />
1<br />
45
46<br />
Your Phone Service Your Phone Service<br />
Troubleshooting Tips<br />
Problem: No dial tone.<br />
Try This: Check the lights on your phone modem (the device<br />
connecting your cable to your phone adapter).<br />
• Power Light – should be solid. If not, verify that the device is<br />
plugged directly into a working power outlet.<br />
• DS (Receive) Light – should be solid. If not, verify that the coax<br />
cable and power cord are plugged directly into the device. Unplug<br />
the power cord from the device and leave it disconnected for 60<br />
seconds. Reconnect the power cord. If the receive light still does<br />
not light up solid, please contact your <strong>Grande</strong> <strong>Customer</strong> Support<br />
Center.<br />
• US (Send) Light – should be solid. If not, verify that the coax cable<br />
andpower cord are plugged directly into the device. Unplug the<br />
power cord from the device and leave it disconnected for 60<br />
seconds. Reconnect the power cord. If the send light still does not<br />
light up solid, please contact your <strong>Grande</strong> <strong>Customer</strong> Support Center.<br />
• Online Light – should be solid.<br />
• Link (PC) Light – should be blinking. If not, verify that the Ethernet<br />
cable is plugged in to both the cable modem and the phone<br />
adapter. Unplug the power cord from the phone adapter and leave<br />
it disconnected for 60 seconds. Reconnect the power cord. If you<br />
still do not have dial tone, please contact your <strong>Grande</strong> <strong>Customer</strong><br />
Care Center.<br />
• Telephone 1 Light – should be steady green when a device is<br />
connected. They will blink if the device is in use.<br />
• Telephone 2 Light – should be steady green when a device is<br />
connected. They will blink if the device is in use. Will be dark if you<br />
only have one telephone line.<br />
• Battery Light - should be steady green. It will blink if there is a<br />
problem with the battery. Your connection should not be affected<br />
by the status of the battery light as long as you have power to the<br />
phone modem. If the battery light is off, make sure the Modem is<br />
plugged in and the battery is securely connected. If the light off or<br />
flashing, please contact your <strong>Grande</strong> <strong>Customer</strong> Support Center.<br />
Make sure that all phones are on the hook and that cordless phone<br />
batteries are charged. Plug the phone directly into the phone adapter to<br />
determine if the issue may be related to wiring inside your home. Try to<br />
plug a working corded phone into different jacks to find out if the issue<br />
is isolated to one phone or jack.<br />
Problem: Cannot Receive Calls.<br />
Try This: Check all phones to be sure that the ringers have not been<br />
turned off and to see which phones are affected. You should also make<br />
sure that you do not have Call Forwarding or Do Not Disturb features<br />
activated. Verify the phone modem is connected to the phone or<br />
installation phone jack.<br />
If all phones are affected, please contact your <strong>Grande</strong> <strong>Customer</strong><br />
Support Center.<br />
Problem: Calls Disconnecting or Can’t Hear the Other Side of the<br />
Conversation.<br />
Try This: Check all phones to see if only specific phones are affected by<br />
this problem. If using a cordless phone, test with a non-cordless phone<br />
if possible. If only certain phones are susceptible, check connections or<br />
replace the phone itself.<br />
Verify the type of call the other party is making. If they are using a cell<br />
phone, your conversation could be affected by reception difficulties. If<br />
the call is a local or long distance call from a standard phone line and<br />
you are still experiencing problems, please contact your <strong>Grande</strong><br />
<strong>Customer</strong> Support Center.<br />
Problem: I Am Getting Short Rings on My Phone and No One is There<br />
When I Answer.<br />
Try This: If your phone is giving only one short ring, you may have Call<br />
Forwarding activated on your line. Please refer to call forwarding status<br />
in the phone section to verify call forwarding status.<br />
Problem: One of My Phone Jacks is Not Working.<br />
Try This: Try plugging another phone into the jack to verify that the<br />
problem is not the phone itself. Check every phone and make sure they<br />
are securely plugged in. If you continue to experience problems with the<br />
jack, call the <strong>Grande</strong> <strong>Customer</strong> Support Center.<br />
Problem: My Personal Answering Machine is Not Working.<br />
Try this: Verify that <strong>Grande</strong> Voicemail is disabled. You can disable<br />
Voicemail through our Online Phone Manager located at<br />
http://phonemanager.mygrande.net or by contacting <strong>Grande</strong> <strong>Customer</strong><br />
Service.<br />
FAQ’s<br />
Where can I view detailed call information?<br />
Call history itemization is available through our Online Phone Manager<br />
tool located at https://phonemanager.mygrande.net.<br />
Can I restrict international calling?<br />
Yes. Contact <strong>Grande</strong> <strong>Communications</strong> if you would like to put a block on<br />
all international calls.<br />
Can I use my own answering machine?<br />
Yes, however you will need to disable <strong>Grande</strong> voicemail. You can disable<br />
Voicemail through our Online Phone Manager located at<br />
http://phonemanager.mygrande.net or by contacting <strong>Grande</strong> <strong>Customer</strong><br />
Service.<br />
Note: voicemail is enabled by default if voicemail feature is activated.<br />
Will fax machines work with <strong>Grande</strong> <strong>Communications</strong> Phone<br />
service?<br />
Yes, Phone service is compatible with most fax equipment brands;<br />
however the baud rate may need to be set on low and error correction<br />
may need to be disabled.<br />
Can I use my existing telephone and caller ID equipment?<br />
The majority of cordless and non-cordless phones, caller ID units,<br />
answering machines, fax machines and alarms will work with <strong>Grande</strong><br />
<strong>Communications</strong> Phone service. We suggest you test your equipment<br />
once your <strong>Grande</strong> <strong>Communications</strong> Phone service is installed.<br />
Can I watch TV and surf the Internet while I’m on the phone?<br />
Yes, you can use all three services at the same time, on the same wall<br />
outlet.<br />
If my TV service stops working will I still be able to make phone<br />
calls?<br />
In most cases an interruption in TV service should not affect your<br />
phone. However, outages can cause an interruption in your Phone<br />
service. All <strong>Grande</strong> Phone services include our Outage Protection<br />
service. In case of an outage, this service will redirect incoming calls to<br />
another phone number so you never miss an important call. Remember<br />
to activate this service in order for it to work.<br />
What is E911? Does <strong>Grande</strong> <strong>Communications</strong> Offer E911 service?<br />
E911 (Enhanced 911) has the benefit of automatically transmitting your<br />
telephone number and location to the 911 Operator. E911 automatically<br />
comes with your <strong>Grande</strong> <strong>Communications</strong> Phone Service at no charge.<br />
Important: If for any reason you need to move the phone modem or<br />
take it to another residence, please contact the <strong>Grande</strong> <strong>Customer</strong><br />
Support Center so your E911 service is maintained.<br />
Do I need to buy a special type of phone or other equipment?<br />
No, your current home phone will work with <strong>Grande</strong> Phone service.<br />
Will my fax machine work with <strong>Grande</strong> Phone service?<br />
<strong>Grande</strong> Phone service is compatible with most fax equipment brands.<br />
If you have Basic, Essential or Optimum Phone service, make sure that<br />
your fax speed is set to the lowest level.<br />
Will my current answering machine work with <strong>Grande</strong> Phone service?<br />
Yes, your answering machine will work with our Phone service. If you<br />
currently have <strong>Grande</strong> Voicemail service set up, you will need to disable<br />
<strong>Grande</strong> Voicemail. <strong>Customer</strong>s with access to the Online Phone Manager<br />
can disable voicemail through the online manager. If you do not have<br />
access to online phone manager please Contact <strong>Customer</strong> Service to<br />
disconnect voicemail service.<br />
Can I select my own phone number?<br />
<strong>Grande</strong> doesn’t provide vanity numbers, however we do offer a selection<br />
of available numbers from which you may choose.<br />
Can I keep my current phone number?<br />
Yes, with <strong>Grande</strong> you can port your landline number over from most<br />
other providers within the same service.<br />
Note: The phone number must be active with the current provider for<br />
porting.<br />
I am trying to set up my home voice mail for the first time. What is<br />
the default passcode?<br />
The default passcode is 9999. After you enter the default passcode,<br />
press # and then listen to the instructions for creating a new,<br />
personalized passcode.<br />
47
48<br />
How to Read your Monthly Bill How to Read your Monthly Bill<br />
How to Read Your Monthly Bill<br />
Your Monthly Bill from <strong>Grande</strong> <strong>Communications</strong> is Easy to Read<br />
• A quick summary of charges on the front page gives you accurate<br />
fees at a glance.<br />
• Detailed charges on following pages allows you to see all your<br />
current transactions.<br />
• Special announcement, customer service information and payment<br />
instructions are in special sections that are easy to find and<br />
understand.<br />
• Larger format is clear, simple and color/highlighted sections helps<br />
differentiate various charges.<br />
Go Green!<br />
Sign Up For Paperless Billing<br />
You can set up paperless billing by <strong>visit</strong>ing billing.mygrande.com<br />
Understanding your Monthly Bill<br />
1 Account PIN<br />
You will be prompted by <strong>Customer</strong> Service to provide this<br />
4-digit security PIN when inquiring about your account.<br />
2 Contact Us<br />
Flexible options to help you reach us.<br />
3 Summary<br />
Total charges, payments, credits and balance due.<br />
4 Messaging Center<br />
Important account information or news from <strong>Grande</strong>.<br />
5 Payment Coupon<br />
Simply tear it off and return with your check/money order.<br />
6 Payment Details<br />
Transaction information during this billing period.<br />
7 Detailed Charges<br />
Detailed charges for each service that you have with <strong>Grande</strong>.<br />
8 Taxes and Fees<br />
Consolidated detail of taxes and fees applied to your<br />
account, in one simplified section.<br />
4<br />
1<br />
2<br />
5<br />
This is a sample bill for demonstration only. Specific services subject to availability. Please contact <strong>Grande</strong> for details.<br />
3<br />
6<br />
7<br />
8<br />
49
GRANDE RETAIL CENTERS<br />
AUSTIN: 1923 East 7th Street, Suite 100 | Austin, Texas 78702<br />
CORPUS CHRISTI: 6441 Saratoga Blvd. | Corpus Christi, Texas 78414<br />
DALLAS: 500 Tittle Drive, Suite 400 | Lewisville, Texas 75056<br />
MIDLAND: 3001 Cuthbert | Midland, Texas 79701<br />
ODESSA: 2401 East IH20 | Odessa, Texas 79766<br />
IMPORTANT CUSTOMER INFORMATION<br />
SAN ANTONIO: 6555 San Pedro Ave. | San Antonio, Texas 78216<br />
SAN MARCOS: 401 Carlson Circle | San Marcos, Texas 78666<br />
WACO: 7200 Imperial Drive | Waco, Texas 76712<br />
WEBSITE: www.mygrande.com<br />
PHONE: 866-247-2633<br />
TiVo Service Number: (can be found on the back panel of your TiVo Premiere Box from <strong>Grande</strong>)<br />
<strong>Customer</strong> Email Address:<br />
<strong>Customer</strong> Username:<br />
<strong>Customer</strong> Password:<br />
Home Networking Password:<br />
Account Phone Number:<br />
Voicemail Password: (default set to 9999)<br />
Account PIN: