Customer Guide - visit site - Grande Communications
Customer Guide - visit site - Grande Communications
Customer Guide - visit site - Grande Communications

You also want an ePaper? Increase the reach of your titles
YUMPU automatically turns print PDFs into web optimized ePapers that Google loves.
44<br />
Your Phone Service Your Phone Service<br />
Personalize the No Answer Greeting<br />
The No Answer Greeting cannot be turned off. A standard system<br />
greeting with your name will automatically be played unless you create<br />
a personalized No Answer Greeting.<br />
1. Lift the phone and listen for dial tone.<br />
2. Dial *86 to access your voicemail from home.<br />
3. Press 3 for No Answer.<br />
4. Press 1 to record a new greeting.<br />
5. When prompted, record your greeting and press # when done.<br />
6. If you are satisfied with the greeting, press * to save and the new<br />
greeting will be activated.<br />
Changing a Personalized Busy Greeting<br />
1. Lift the phone and listen for dial tone.<br />
2. Dial *86 to access your voicemail from home.<br />
3. Press 2 for Busy Greeting.<br />
4. Press 1 to record a new greeting.<br />
5. When prompted, record your greeting and press # when done.<br />
6. If you are satisfied with the greeting, press * to save and the new<br />
greeting will be activated.<br />
Important: Be sure to record your entire personal greeting and press *<br />
to save and activate your new greeting before hanging up. If you hang<br />
up before you have activated your new greeting, the prior greeting will<br />
remain active.<br />
Listing to Messages<br />
1. Lift the phone and listen for dial tone.<br />
2. Dial *86 to access your voicemail from home.<br />
3. Press 1. You will hear a recording about the number of messages<br />
in the folder and the first message will be played.<br />
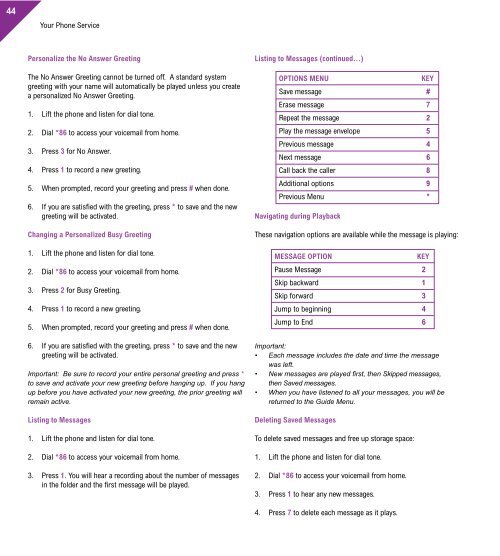
Listing to Messages (continued...)<br />
OPTIONS MENU KEY<br />
Save message #<br />
Erase message 7<br />
Repeat the message 2<br />
Play the message envelope 5<br />
Previous message 4<br />
Next message 6<br />
Call back the caller 8<br />
Additional options 9<br />
Previous Menu *<br />
Navigating during Playback<br />
These navigation options are available while the message is playing:<br />
MESSAGE OPTION KEY<br />
Pause Message 2<br />
Skip backward 1<br />
Skip forward 3<br />
Jump to beginning 4<br />
Jump to End 6<br />
Important:<br />
• Each message includes the date and time the message<br />
was left.<br />
• New messages are played first, then Skipped messages,<br />
then Saved messages.<br />
• When you have listened to all your messages, you will be<br />
returned to the <strong>Guide</strong> Menu.<br />
Deleting Saved Messages<br />
To delete saved messages and free up storage space:<br />
1. Lift the phone and listen for dial tone.<br />
2. Dial *86 to access your voicemail from home.<br />
3. Press 1 to hear any new messages.<br />
4. Press 7 to delete each message as it plays.<br />
Changing your Passcode<br />
You can change your Passcode as many times as you want – just make<br />
sure to keep track of the new Passcode.<br />
To change your Passcode:<br />
1. Lift the phone and listen for dial tone.<br />
2. Dial *86 to access your voicemail from home.<br />
3. Press *.<br />
4. Press 8 to reach the Change Passcode Settings menu.<br />
5. Listen to the instructions for creating a new Passcode.<br />
6. Enter your new 4 -10 digit Passcode then press #.<br />
7. Re-enter the new Passcode then press #.<br />
8. Listen to the confirmation announcement and hang up.<br />
Important: Should you forget your Passcode, don’t hesitate to contact<br />
<strong>Grande</strong> <strong>Customer</strong> Service.<br />
Note: You can use the Online Phone Manager to change your Passcode.<br />
Understanding Your Equipment<br />
You will receive a phone modem with your <strong>Grande</strong> Phone Service. This<br />
single device connects our network to your phones and home computer<br />
and is compatible with almost all existing cordless and non-cordless<br />
phones. The phone modem comes with battery backup so if your power<br />
goes down, your <strong>Grande</strong> Phone Service will still be available for up to 8<br />
hours of standby time and up to 4 hours of talk time.<br />
Front View of Phone Modem<br />
If the modem is operating correctly the light sequence for Phone<br />
Modem will be:<br />
Power (solid)<br />
Us (solid)<br />
Online (solid)<br />
Link (Blinking)<br />
Telephone (solid to what line is active on the modem)<br />
Here is a guide to each light on a standard phone modem:<br />
1. Battery<br />
2. Telephone 2<br />
3. Telephone 1<br />
4. Link<br />
5. Online<br />
6. US (Upstream)<br />
7. DS (Downstream)<br />
8. Power<br />
NOTE: Your modem may look different than the modem shown above.<br />
You can find more information about you modem<br />
www.mygrande.com/userguides.<br />
If your system is connected and working properly these lights will be<br />
steady green. Many lights will blink if the device is in use. The<br />
Telephone 2 light will be dark if you only have one telephone line.<br />
Important: If your modem is reset or if there is a problem, your lights<br />
will flash orange.<br />
Back View of Phone Modem<br />
7<br />
1. Power Cord<br />
2. Cable<br />
3. Reset<br />
4. USB<br />
5. Ethernet<br />
6. Telephone 2<br />
7. Telephone 1<br />
6<br />
5<br />
4<br />
3<br />
1 2 3 4 5 6 7 8<br />
2<br />
1<br />
45