Addendum to PAL User Manual Installation and ... - PAL System
Addendum to PAL User Manual Installation and ... - PAL System
Addendum to PAL User Manual Installation and ... - PAL System

You also want an ePaper? Increase the reach of your titles
YUMPU automatically turns print PDFs into web optimized ePapers that Google loves.
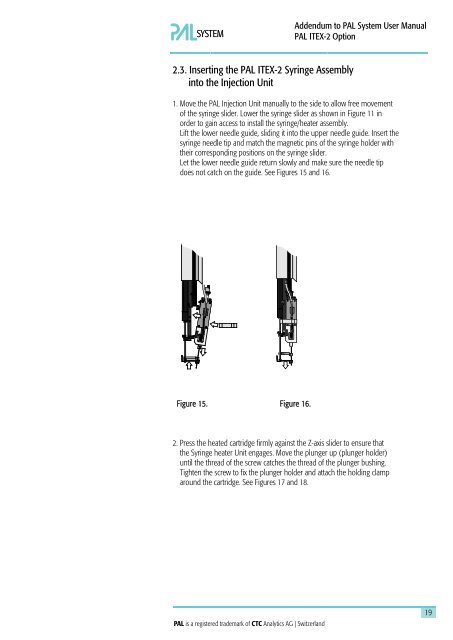
2.3. Inserting the <strong>PAL</strong> ITEX-2 Syringe Assembly<br />
in<strong>to</strong> the Injection Unit<br />
<strong>Addendum</strong> <strong>to</strong> <strong>PAL</strong> <strong>System</strong> <strong>User</strong> <strong>Manual</strong><br />
<strong>PAL</strong> ITEX-2 Option<br />
1. Move the <strong>PAL</strong> Injection Unit manually <strong>to</strong> the side <strong>to</strong> allow free movement<br />
of the syringe slider. Lower the syringe slider as shown in Figure 11 in<br />
order <strong>to</strong> gain access <strong>to</strong> install the syringe/heater assembly.<br />
Lift the lower needle guide, sliding it in<strong>to</strong> the upper needle guide. Insert the<br />
syringe needle tip <strong>and</strong> match the magnetic pins of the syringe holder with<br />
their corresponding positions on the syringe slider.<br />
Let the lower needle guide return slowly <strong>and</strong> make sure the needle tip<br />
does not catch on the guide. See Figures 15 <strong>and</strong> 16.<br />
Figure 15. Figure 16.<br />
2. Press the heated cartridge firmly against the Z-axis slider <strong>to</strong> ensure that<br />
the Syringe heater Unit engages. Move the plunger up (plunger holder)<br />
until the thread of the screw catches the thread of the plunger bushing.<br />
Tighten the screw <strong>to</strong> fix the plunger holder <strong>and</strong> attach the holding clamp<br />
around the cartridge. See Figures 17 <strong>and</strong> 18.<br />
19