Installation Manual Nauticast V1.0.3
Installation Manual Nauticast V1.0.3
Installation Manual Nauticast V1.0.3

You also want an ePaper? Increase the reach of your titles
YUMPU automatically turns print PDFs into web optimized ePapers that Google loves.
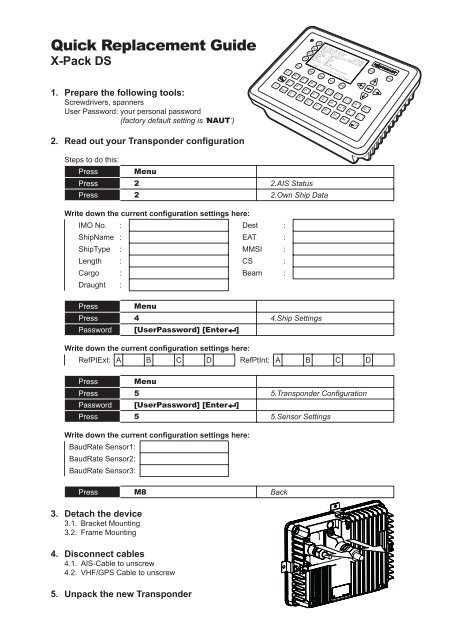
Quick Replacement Guide<br />
X-Pack DS<br />
1. Prepare the following tools:<br />
Screwdrivers, spanners<br />
User Password: your personal password<br />
(factory default setting is ‘NAUT’)<br />
2. Read out your Transponder configuration<br />
Steps to do this:<br />
Press Menu<br />
Press 2 2.AIS Status<br />
Press 2 2.Own Ship Data<br />
Write down the current configuration settings here:<br />
IMO No. : Dest :<br />
ShipName : EAT :<br />
ShipType : MMSI :<br />
Length : CS :<br />
Cargo : Beam :<br />
Draught :<br />
Press Menu<br />
Press 4 4.Ship Settings<br />
Password [UserPassword] [Enter ]<br />
Write down the current configuration settings here:<br />
RefPtExt: A B C D RefPtInt: A B C D<br />
Press Menu<br />
Press 5 5.Transponder Configuration<br />
Password [UserPassword] [Enter ]<br />
Press 5 5.Sensor Settings<br />
Write down the current configuration settings here:<br />
BaudRate Sensor1:<br />
BaudRate Sensor2:<br />
BaudRate Sensor3:<br />
Press M8 Back<br />
3. Detach the device<br />
3.1. Bracket Mounting<br />
3.2. Frame Mounting<br />
4. Disconnect cables<br />
4.1. AIS-Cable to unscrew<br />
4.2. VHF/GPS Cable to unscrew<br />
5. Unpack the new Transponder