- Page 1 and 2:
Before attempting to connect or ope
- Page 3 and 4:
Contents Important Notice for V8.5.
- Page 5 and 6:
Important Notice for V8.5 GPU Decod
- Page 7 and 8:
Frame rate limit in a single hard d
- Page 9 and 10:
Chapter 1 Video Capture Cards This
- Page 11 and 12:
Connecting One GV-4008 Card • Con
- Page 13 and 14:
Connecting Hardware Watchdog 1 Vide
- Page 15 and 16:
Troubleshooting Power Supply Issues
- Page 17 and 18:
1 Video Capture Cards 8. To access
- Page 19 and 20:
1.2 GV-4008A 1 Video Capture Cards
- Page 21 and 22:
Connecting Two GV-4008A Cards 1 Vid
- Page 23 and 24:
Installing Drivers 1 Video Capture
- Page 25 and 26:
1.3 GV-3008 1 Video Capture Cards T
- Page 27 and 28:
Connecting Two GV-3008 Cards 1 Vide
- Page 29 and 30:
Connecting Hardware Watchdog 1 Vide
- Page 31 and 32:
Specifications Interface PCI-E x1 G
- Page 33 and 34:
Packing List (D-Type) 1. GV-Combo A
- Page 35 and 36:
Connecting One GV-Combo A Card (DVI
- Page 37 and 38:
Connecting Two GV-Combo A Cards 1 V
- Page 39 and 40:
Installing Drivers 1 Video Capture
- Page 41 and 42:
Interface Type PCI-E x1 Input Type
- Page 43 and 44:
Connecting One GV-1008 Card 1 Video
- Page 45 and 46:
Figure 1-20 1 Video Capture Cards A
- Page 47 and 48:
Installing Drivers 1 Video Capture
- Page 49 and 50:
1.6 GV-900A 1 Video Capture Cards O
- Page 51 and 52:
Connecting Two GV-900A Cards 1 Vide
- Page 53 and 54:
Installing Drivers 1 Video Capture
- Page 55 and 56:
1.7 GV-650A, GV-800A 1 Video Captur
- Page 57 and 58:
1 Video Capture Cards For the BNC-t
- Page 59 and 60:
Connecting Hardware Watchdog 1 Vide
- Page 61 and 62:
Specifications Interface PCI, PCI-E
- Page 63 and 64:
1.8 GV-600A 1 Video Capture Cards T
- Page 65 and 66:
1 Video Capture Cards For the BNC-T
- Page 67 and 68:
Connecting Hardware Watchdog 1 Vide
- Page 69 and 70:
Specifications Interface PCI Input
- Page 71 and 72:
Packing List 1. GV-600B, GV-650B or
- Page 73 and 74:
Connecting Hardware Watchdog 1 Vide
- Page 75 and 76:
Specifications Interface PCI, PCI-E
- Page 77 and 78:
1.10 Installing Two Cards 1 Video C
- Page 79 and 80:
1.11 Installing Drivers 1 Video Cap
- Page 81 and 82:
1 Video Capture Cards GV-4008 GV-40
- Page 83 and 84:
1 Video Capture Cards 1.13 Comparis
- Page 85 and 86:
1 Video Capture Cards GV-1008 GV-11
- Page 87 and 88:
1 Video Capture Cards GV-600B x 2 G
- Page 89 and 90: Chapter 2 Hardware Accessories This
- Page 91 and 92: Connections 2 Hardware Accessories
- Page 93 and 94: Installing Drivers 2 Hardware Acces
- Page 95 and 96: Connections 2 Hardware Accessories
- Page 97 and 98: 2.3 GV-NET Card V3.1 2 Hardware Acc
- Page 99 and 100: 2 Hardware Accessories 3. You can c
- Page 101 and 102: Overview Relay Out 1 Relay Out 2 Re
- Page 103 and 104: Connections with Two Video Capture
- Page 105 and 106: Connections In I/O Box Mode 2 Hardw
- Page 107 and 108: Switching Modes 2 Hardware Accessor
- Page 109 and 110: Specifications OS Supported Input O
- Page 111 and 112: Connections Following provides two
- Page 113 and 114: Specifications OS Supported Serial
- Page 115 and 116: Extending Transmission over the Dis
- Page 117 and 118: 2.7 GV-I/O 12-In Card V3 2 Hardware
- Page 119 and 120: Note: 2 Hardware Accessories 1. Use
- Page 121 and 122: Connections 2 Hardware Accessories
- Page 123 and 124: 2.9 GV-I/O Box (16 Ports) 2 Hardwar
- Page 125 and 126: Connections to PC There are three w
- Page 127 and 128: Extending Transmission over the Dis
- Page 129 and 130: Specifications Input Output Input 1
- Page 131 and 132: Overview DIP Switch Figure 2-37 2 H
- Page 133 and 134: Assigning Addresses to GV-I/O Box 8
- Page 135 and 136: 2 Hardware Accessories 3. Multiple
- Page 137 and 138: 2.11 GV-I/O Box (4 Ports) 2 Hardwar
- Page 139: Connections to PC There are two way
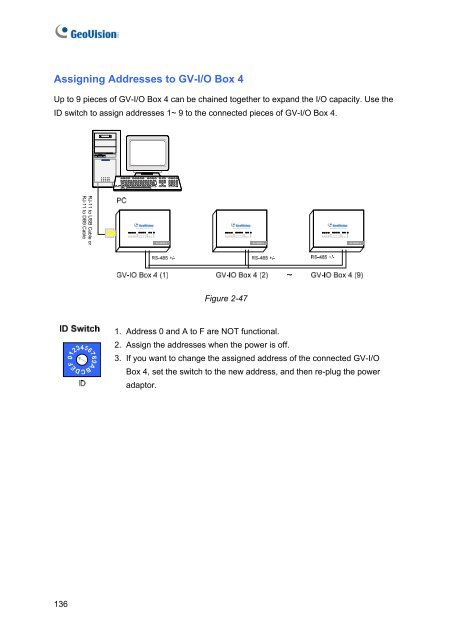
- Page 143 and 144: 2 Hardware Accessories 2.12 Accessi
- Page 145 and 146: 2.12.2 DHCP Connection 2 Hardware A
- Page 147 and 148: 2.12.2.2 Configuring GV-I/O Box on
- Page 149 and 150: 2.12.4 Input Setting In the left me
- Page 151 and 152: 2.12.6 In/Out Monitor In the left m
- Page 153 and 154: 2.12.8 Changing Login ID and Passwo
- Page 155 and 156: Chapter 3 Software Installation Thi
- Page 157 and 158: 3.2 Installing the System 3 Softwar
- Page 159 and 160: 3.3 Program List The Surveillance S
- Page 161 and 162: Chapter 4 Screen Overview This chap
- Page 163 and 164: The controls in the main screen: No
- Page 165 and 166: The controls in the ViewLog window:
- Page 167 and 168: 4.3 SingleView Viewer 16 15 14 13 1
- Page 169 and 170: The controls in the MultiView Viewe
- Page 171 and 172: The controls in the Center V2 windo
- Page 173 and 174: Troubleshooting
- Page 175 and 176: Troubleshooting A message “Can’


