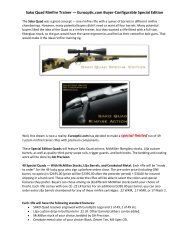
Gebrauchsanleitung Instruction manual • Mode d ... - EuroOptic.com
Gebrauchsanleitung Instruction manual • Mode d ... - EuroOptic.com
Gebrauchsanleitung Instruction manual • Mode d ... - EuroOptic.com

Create successful ePaper yourself
Turn your PDF publications into a flip-book with our unique Google optimized e-Paper software.
7. Exchanging Barrels<br />
There are 5 caliber groups (refer to table<br />
on p. 32). When changing from one calibre<br />
group to the other during a barrel exchange,<br />
the bolt head has to be changed<br />
as well, so that it corresponds to the caliber<br />
group of the interchangeable barrel actually<br />
mounted. Please refer to the table on page<br />
32 for proper allocation of suitable interchangeable<br />
barrels. Furthermore, bolt heads<br />
and barrels are imprinted with a symbol for<br />
the respective caliber group. These markings<br />
have to agree after assembly is <strong>com</strong>pleted.<br />
Within one caliber group, barrels may be<br />
interchanged at random, without having to<br />
exchange the bolt head.<br />
Caliber groups:<br />
Mini stamp MI<br />
Standard stamp ST<br />
Medium stamp ME<br />
Magnum stamp MA<br />
10,3x60 R stamp CH<br />
Make sure that the magazine insert of the<br />
corresponding caliber is installed, when<br />
performing a barrel exchange. The caliber<br />
denominations are marked on the side of<br />
the magazine insert. (see Para. 7.2)<br />
NOTE:<br />
With the barrel of the caliber 10,3x60R, a<br />
single shot insert is supplied. A magazine is<br />
not available.<br />
7.1. Exchanging the barrel<br />
<strong>•</strong> Unload rifle.<br />
<strong>•</strong> Pull bolt assembly all the way back and<br />
remove it.<br />
<strong>•</strong> Loosen both barrel fastening nuts<br />
<strong>com</strong>pletely,using Allen key (SW5). The<br />
nutsremain in their guide rails and cannotget<br />
lost.<br />
<strong>•</strong> Lift barrel out of receiver.<br />
<strong>•</strong> Put exchange barrel into its channel inside<br />
receiver.<br />
<strong>•</strong> Fasten the two barrel fastening nuts<br />
fingertight with the Allen key.<br />
R8 with spare magazine:<br />
<strong>•</strong> Insert the magazine insert corresponding<br />
to the caliber of the barrel from<br />
above into the spare magazine. (refert<br />
to Para. 7.2.)<br />
R8 without spare magazine:<br />
<strong>•</strong> Remove magazine insert (possibly, the<br />
scope has to be removed for this, refer<br />
to Para.12.2 and/or 13.2).<br />
<strong>•</strong> Insert the magazine insert corresponding<br />
to the caliber of the exchange barrel<br />
from above into the magazine well.<br />
<strong>•</strong> Check, whether the caliber group marked<br />
on the bolt head („MI“, „ST“, „ME“,<br />
„MA“, „CH“ refer to Para. 7and Fig. 7.1.)<br />
corresponds with the caliber group of the<br />
exchange barrel.<br />
<strong>•</strong> If the bolt head in the receiver has to be<br />
exchanged: refer to Para. 8.<br />
NOTE:<br />
Always ensure that the barrel channel is<br />
clean! Excessive oil or gun grease between<br />
barrel and receiver has a negative effect on<br />
the precision of the gun.<br />
27<br />
english