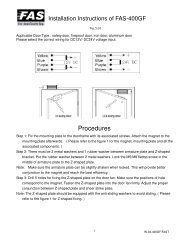
ISTWLR01.4865 Rev00 WALKY:Layout 1 - Fast Access Security Corp.
ISTWLR01.4865 Rev00 WALKY:Layout 1 - Fast Access Security Corp.
ISTWLR01.4865 Rev00 WALKY:Layout 1 - Fast Access Security Corp.

You also want an ePaper? Increase the reach of your titles
YUMPU automatically turns print PDFs into web optimized ePapers that Google loves.
Contents<br />
ENGLISH<br />
1 - WARNINGS AND GENERAL PRECAUTIONS . . . . . . . . . . . . . . . . . . . . 1<br />
1.1 - Safety warnings . . . . . . . . . . . . . . . . . . . . . . . . . . . . . . . . . . . . . . . . . . 1<br />
1.2 - Warnings for installation . . . . . . . . . . . . . . . . . . . . . . . . . . . . . . . . . . . . 1<br />
1.3 - Warnings for use . . . . . . . . . . . . . . . . . . . . . . . . . . . . . . . . . . . . . . . . . . 1<br />
2 - PRODUCT DESCRIPTION AND INTENDED USE . . . . . . . . . . . . . . . . . 1<br />
3 - INSTALLATION . . . . . . . . . . . . . . . . . . . . . . . . . . . . . . . . . . . . . . . . . . . . 2<br />
3.1 - Pre-installation checks . . . . . . . . . . . . . . . . . . . . . . . . . . . . . . . . . . . . . 2<br />
3.2 - Usage limitation . . . . . . . . . . . . . . . . . . . . . . . . . . . . . . . . . . . . . . . . . . 2<br />
3.3 - Preparatory work prior to installation . . . . . . . . . . . . . . . . . . . . . . . . . . . 3<br />
3.4 - Installation of the gearmotor mod. WL1024C - WL1024 . . . . . . . . . . . . 3<br />
3.4.1 - Establishing the length of the gearmotor arm . . . . . . . . . . . . . . 3<br />
3.4.2 - Installation of a gearmotor with a STANDARD LENGTH ARM . . 3<br />
3.4.3 - Installation of a gearmotor with a SHORTENED ARM . . . . . . . . 4<br />
3.5 - Installation of the multi-purpose lamp mod. WLT on the gearmotor<br />
model WL1024C . . . . . . . . . . . . . . . . . . . . . . . . . . . . . . . . . . . . . . . . . . . . . . 5<br />
3.6 - How to remove the control unit . . . . . . . . . . . . . . . . . . . . . . . . . . . . . . . 5<br />
3.7 - Adjusting the alignment of the gate leaves when closed . . . . . . . . . . . . 5<br />
3.8 - Securing and releasing the gearmotor manually . . . . . . . . . . . . . . . . . . 5<br />
4 - ELECTRICAL CONNECTIONS . . . . . . . . . . . . . . . . . . . . . . . . . . . . . . . 5<br />
4.1 - Description of the electrical connections . . . . . . . . . . . . . . . . . . . . . . . . 5<br />
4.2 - Connecting the power cable . . . . . . . . . . . . . . . . . . . . . . . . . . . . . . . . . 6<br />
4.3 - Connecting the gearmotor without a control unit mod. WL1024 . . . . . . 5<br />
4.4 - Connecting other devices . . . . . . . . . . . . . . . . . . . . . . . . . . . . . . . . . . . 5<br />
4.5 - Addressing the connected devices . . . . . . . . . . . . . . . . . . . . . . . . . . . . 6<br />
4.6 - Initialisation and connection check . . . . . . . . . . . . . . . . . . . . . . . . . . . . 6<br />
4.7 - Recognition of the connected devices . . . . . . . . . . . . . . . . . . . . . . . . . 6<br />
4.8 - Recognition of the positions of the mechanical stops . . . . . . . . . . . . . . 6<br />
4.9 - Gate leaves motion check . . . . . . . . . . . . . . . . . . . . . . . . . . . . . . . . . . 6<br />
5 - TESTING AND COMMISSIONING . . . . . . . . . . . . . . . . . . . . . . . . . . . . . 6<br />
5.1 - Testing . . . . . . . . . . . . . . . . . . . . . . . . . . . . . . . . . . . . . . . . . . . . . . . . . 7<br />
5.2 - Commissioning . . . . . . . . . . . . . . . . . . . . . . . . . . . . . . . . . . . . . . . . . . . 7<br />
6 - PROGRAMMING THE CONTROL UNIT . . . . . . . . . . . . . . . . . . . . . . . . 7<br />
6.1 - Level one programming (ON-OFF) . . . . . . . . . . . . . . . . . . . . . . . . . . . . 7<br />
6.2 - Level two programming (adjustable parameters) . . . . . . . . . . . . . . . . . . 8<br />
6.3 - Memory deletion . . . . . . . . . . . . . . . . . . . . . . . . . . . . . . . . . . . . . . . . . . 8<br />
6.4 - Special functions . . . . . . . . . . . . . . . . . . . . . . . . . . . . . . . . . . . . . . . . . 8<br />
7 - WHAT TO DO IF... (troubleshooting guide) . . . . . . . . . . . . . . . . . . . . . . 9<br />
8 - FURTHER INFORMATION . . . . . . . . . . . . . . . . . . . . . . . . . . . . . . . . . . 10<br />
8.1 - Connection of the OXI radio receiver . . . . . . . . . . . . . . . . . . . . . . . . . . 10<br />
8.2 - Connection and installation of the back-up battery mod. PS424 . . . . . 10<br />
8.3 - Connection of the Oview programmer . . . . . . . . . . . . . . . . . . . . . . . . 10<br />
8.4 - Connection of the Solemyo solar power system . . . . . . . . . . . . . . . . . 10<br />
9 - PRODUCT MAINTENANCE . . . . . . . . . . . . . . . . . . . . . . . . . . . . . . . . . 10<br />
DISPOSING OF THE PRODUCT . . . . . . . . . . . . . . . . . . . . . . . . . . . . . . . . 11<br />
PRODUCT TECHNICAL SPECIFICATIONS . . . . . . . . . . . . . . . . . . . . . . . 11<br />
Product life span . . . . . . . . . . . . . . . . . . . . . . . . . . . . . . . . . . . . . . . . . . . . 12<br />
EC DECLARATION OF CONFORMITY . . . . . . . . . . . . . . . . . . . . . . . . . . . 12<br />
APPENDIX . . . . . . . . . . . . . . . . . . . . . . . . . . . . . . . . . . . . . . . . . . . . . . . . . . I<br />
Instructions and warnings for the user . . . . . . . . . . . . . . . . . . . . . . . . . . . . . III<br />
Images . . . . . . . . . . . . . . . . . . . . . . . . . . . . . . . . . . . . . . . . . . . . . . . . . . . . . X<br />
1<br />
WARNINGS AND GENERAL PRECAUTIONS<br />
1.1 - Safety warnings<br />
IMPORTANT! – This manual contains important instructions and warnings<br />
regarding safety. Incorrect installation may cause serious injury. Before<br />
commencing work, all sections of the manual must be read carefully. If in any<br />
doubt, suspend installation and call the Nice Support Service for clarification.<br />
IMPORTANT! – This manual contains important instructions. Keep it for<br />
future maintenance work and disposal of the product.<br />
IMPORTANT! – Under the latest European legislation, automatic door<br />
and gate installations must be compliant with the standards specified in<br />
Directive 2006/42/EC (formerly 98/37/EC) (the Machinery Directive) and<br />
the standards EN 12445, EN 12453, EN 12635 and EN 13241-1 in particular,<br />
which enable conformity of the automated functionality to be de -<br />
clared. In the light of the above, all work involving installation, connection,<br />
testing and maintenance of the product must be carried out<br />
exclusively by qualified and competent technicians!<br />
1.2 - Warnings for installation<br />
Before commencing the installation, check if the product is suitable for the<br />
desired type of use (see “Usage limitation” paragraph 3.2 and the "Product<br />
technical specifications”). If it is not suitable, DO NOT continue with the installation.<br />
All installation and maintenance work must be carried out with the au -<br />
tomation system disconnected from the electricity supply. If the power<br />
disconnection device cannot be seen from where the automation system is<br />
positioned, then before starting work a notice must be attached to the disconnection<br />
device bearing the words “CAUTION! MAINTENANCE IN PRO -<br />
GRESS”.<br />
The Control unit must be connected to an electricity supply line equipped<br />
with protective earthing.<br />
Handle the product with care during installation, taking care to avoid crushing,<br />
denting or dropping it, or contact with liquids of any kind. Keep the product<br />
away from sources of heat and naked flames. Failure to observe the<br />
above can damage the product, and increase the risk of danger or malfunction.<br />
Should this occur, suspend installation work immediately and contact<br />
the Nice Support Service.<br />
Do not modify any part of the product. Prohibited modifications can only lead<br />
to malfunctions. The manufacturer declines all responsibility for damage re -<br />
sulting from unauthorized changes made to the product.<br />
If the gate or door being automated has a pedestrian gate, then the system<br />
must include a control device that will inhibit the operation of the motor when<br />
the pedestrian gate is open.<br />
The products packaging material must be disposed of in full compliance with<br />
local regulations.<br />
1.3 - Warnings for use<br />
The product is not intended for use by persons, including children, with limited<br />
physical, sensory or mental capacities, or who lack experience or knowledge,<br />
unless supervised or trained in the use of the product by a person<br />
responsible for their safety.<br />
Any children near the automation system must be kept under supervision to<br />
ensure that they do not play with it.<br />
Do not allow children to play with the fixed control devices. Keep remote control<br />
devices out of the reach of children.<br />
2<br />
PRODUCT DESCRIPTION AND<br />
INTENDED USE<br />
The devices comprising this product are designed to automate a gate or door<br />
with one or two leaves. IMPORTANT! – Any other use apart from that<br />
described herein, including in different environmental conditions from<br />
those described in this manual is to be considered improper use and is<br />
not permitted!<br />
The principal component of the automation system comprises one or two electric<br />
gearmotors (according to the number of leaves to be automated), each<br />
equipped with a direct current motor and epicyclic reduction gear. One of the<br />
gearmotors (mod. WL1024C) has a control unit that controls its operation. The<br />
Control unit consists of a board with a radio receiver for receiving the commands<br />
sent by the transmitter.<br />
The control unit is designed for connection to several devices belonging to the<br />
Opera system, the Bluebus system and the Solemyo solar powered system.<br />
If it is mains powered, it can house a back-up battery (mod. PS424, optional<br />
accessory) which in the event of a power cut (electricity black-out) guarantees<br />
that the automated device will perform certain manoeuvres in the hours that follow.<br />
In the event of a power cut, the gate leaves can be moved by releasing the<br />
gearmotor with the dedicated key; to perform the manoeuvre manually please<br />
see chapter 3.8.<br />
English – 1<br />
EN