Eco Piccolo V2 6049001.indd - Ikarus
Eco Piccolo V2 6049001.indd - Ikarus
Eco Piccolo V2 6049001.indd - Ikarus

Create successful ePaper yourself
Turn your PDF publications into a flip-book with our unique Google optimized e-Paper software.
Chassis assembly<br />
16<br />
<br />
<br />
<br />
<br />
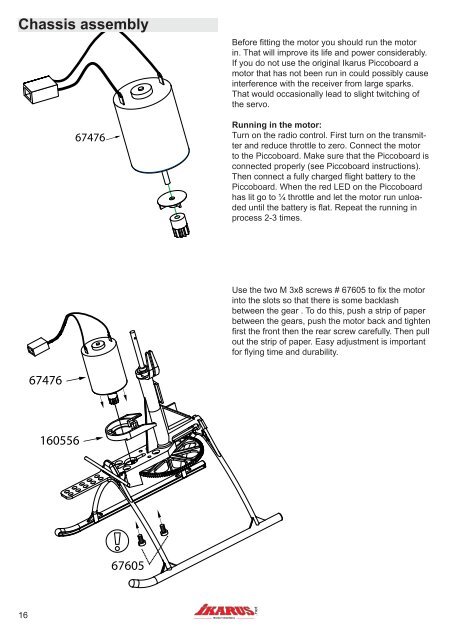
Before fitting the motor you should run the motor<br />
in. That will improve its life and power considerably.<br />
If you do not use the original <strong>Ikarus</strong> Piccoboard a<br />
motor that has not been run in could possibly cause<br />
interference with the receiver from large sparks.<br />
That would occasionally lead to slight twitching of<br />
the servo.<br />
Running in the motor:<br />
Turn on the radio control. First turn on the transmitter<br />
and reduce throttle to zero. Connect the motor<br />
to the Piccoboard. Make sure that the Piccoboard is<br />
connected properly (see Piccoboard instructions).<br />
Then connect a fully charged flight battery to the<br />
Piccoboard. When the red LED on the Piccoboard<br />
has lit go to ¼ throttle and let the motor run unloaded<br />
until the battery is flat. Repeat the running in<br />
process 2-3 times.<br />
Use the two M 3x8 screws # 67605 to fix the motor<br />
into the slots so that there is some backlash<br />
between the gear . To do this, push a strip of paper<br />
between the gears, push the motor back and tighten<br />
first the front then the rear screw carefully. Then pull<br />
out the strip of paper. Easy adjustment is important<br />
for flying time and durability.