Eco Piccolo V2 6049001.indd - Ikarus
Eco Piccolo V2 6049001.indd - Ikarus
Eco Piccolo V2 6049001.indd - Ikarus

Create successful ePaper yourself
Turn your PDF publications into a flip-book with our unique Google optimized e-Paper software.
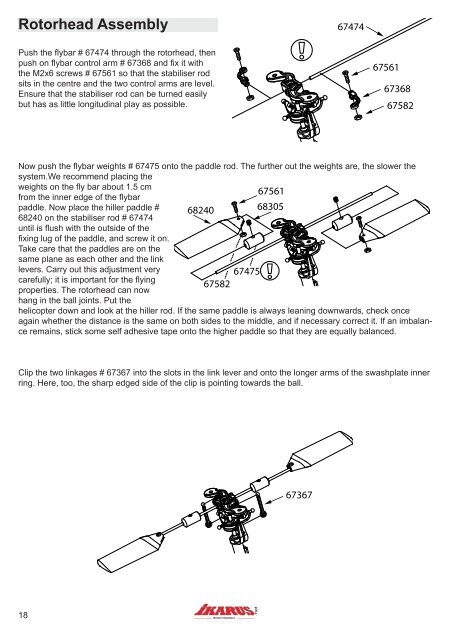
Rotorhead Assembly<br />
Push the flybar # 67474 through the rotorhead, then<br />
push on flybar control arm # 67368 and fix it with<br />
the M2x6 screws # 67561 so that the stabiliser rod<br />
sits in the centre and the two control arms are level.<br />
Ensure that the stabiliser rod can be turned easily<br />
but has as little longitudinal play as possible.<br />
18<br />
<br />
<br />
<br />
<br />
<br />
<br />
<br />
<br />
<br />
<br />
Now push the flybar weights # 67475 onto the paddle rod. The further out the weights are, the slower the<br />
system.We recommend placing the<br />
weights on the fly bar about 1.5 cm<br />
from the inner edge of the flybar<br />
paddle. Now place the hiller paddle #<br />
68240 on the stabiliser rod # 67474<br />
until is flush with the outside of the<br />
fixing lug of the paddle, and screw it on.<br />
Take care that the paddles are on the<br />
same plane as each other and the link<br />
levers. Carry out this adjustment very<br />
carefully; it is important for the flying<br />
properties. The rotorhead can now<br />
hang in the ball joints. Put the<br />
helicopter down and look at the hiller rod. If the same paddle is always leaning downwards, check once<br />
again whether the distance is the same on both sides to the middle, and if necessary correct it. If an imbalance<br />
remains, stick some self adhesive tape onto the higher paddle so that they are equally balanced.<br />
Clip the two linkages # 67367 into the slots in the link lever and onto the longer arms of the swashplate inner<br />
ring. Here, too, the sharp edged side of the clip is pointing towards the ball.