Eco Piccolo V2 6049001.indd - Ikarus
Eco Piccolo V2 6049001.indd - Ikarus
Eco Piccolo V2 6049001.indd - Ikarus

You also want an ePaper? Increase the reach of your titles
YUMPU automatically turns print PDFs into web optimized ePapers that Google loves.
RC installation<br />
<br />
20<br />
<br />
<br />
<br />
<br />
67387<br />
<br />
67365<br />
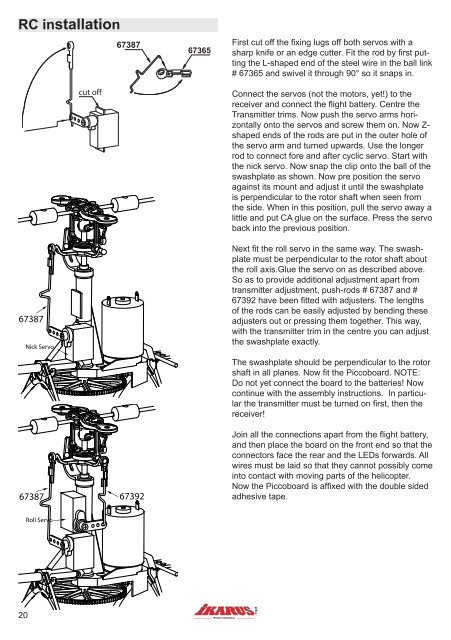
First cut off the fixing lugs off both servos with a<br />
sharp knife or an edge cutter. Fit the rod by first putting<br />
the L-shaped end of the steel wire in the ball link<br />
# 67365 and swivel it through 90° so it snaps in.<br />
Connect the servos (not the motors, yet!) to the<br />
receiver and connect the flight battery. Centre the<br />
Transmitter trims. Now push the servo arms horizontally<br />
onto the servos and screw them on. Now Zshaped<br />
ends of the rods are put in the outer hole of<br />
the servo arm and turned upwards. Use the longer<br />
rod to connect fore and after cyclic servo. Start with<br />
the nick servo. Now snap the clip onto the ball of the<br />
swashplate as shown. Now pre position the servo<br />
against its mount and adjust it until the swashplate<br />
is perpendicular to the rotor shaft when seen from<br />
the side. When in this position, pull the servo away a<br />
little and put CA glue on the surface. Press the servo<br />
back into the previous position.<br />
Next fit the roll servo in the same way. The swashplate<br />
must be perpendicular to the rotor shaft about<br />
the roll axis.Glue the servo on as described above.<br />
So as to provide additional adjustment apart from<br />
transmitter adjustment, push-rods # 67387 and #<br />
67392 have been fitted with adjusters. The lengths<br />
of the rods can be easily adjusted by bending these<br />
adjusters out or pressing them together. This way,<br />
with the transmitter trim in the centre you can adjust<br />
the swashplate exactly.<br />
The swashplate should be perpendicular to the rotor<br />
shaft in all planes. Now fit the Piccoboard. NOTE:<br />
Do not yet connect the board to the batteries! Now<br />
continue with the assembly instructions. In particular<br />
the transmitter must be turned on first, then the<br />
receiver!<br />
Join all the connections apart from the flight battery,<br />
and then place the board on the front end so that the<br />
connectors face the rear and the LEDs forwards. All<br />
wires must be laid so that they cannot possibly come<br />
into contact with moving parts of the helicopter.<br />
Now the Piccoboard is affixed with the double sided<br />
adhesive tape.