Eco Piccolo V2 6049001.indd - Ikarus
Eco Piccolo V2 6049001.indd - Ikarus
Eco Piccolo V2 6049001.indd - Ikarus

Create successful ePaper yourself
Turn your PDF publications into a flip-book with our unique Google optimized e-Paper software.
pitch<br />
Discs<br />
<br />
<br />
<br />
<br />
<br />
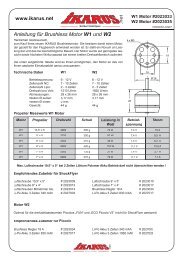
Battery type Recommended for:<br />
1 8 cell NiMh Hovering<br />
2 2 cell Lithiumpolymer Indoor / round flight<br />
3 3 cell Lithiumpolymer Outdoor / round flight<br />
Final assembly<br />
Now lay the receiver aerial by leading it to one of the<br />
skids and affix it so that about 10 cm of the aerial<br />
are hanging freely. Now the flight battery is fixed<br />
under the front end with a rubber band. Hang the ring<br />
sideways on the crossbar. The centre of gravity is adjusted<br />
by sliding the battery forwards and backwards.<br />
To do this, hold the helicopter by the hiller rod, put it<br />
at right-angles to the fuselage and observe the skids.<br />
These should be exactly parallel to the floor (table).<br />
Move the battery until you achieve this. Now the<br />
canopy is fitted. Push the canopy from the front onto<br />
the model and push it onto the canopy clips until the<br />
canopy clicks in.<br />
Next attach the main rotorblades # 67375. These are<br />
screwed into the rotorhead from below with the self<br />
tapping screws # 67473. By fitting the pitch angle<br />
discs you can match the helicopter‘s engine speed<br />
to your battery or your flying style. See the table<br />
opposite .<br />
The wavy line on the rotor blade must be uppermost.<br />
Attach the Blades so they do not fall under their own<br />
weight. If the screws are too tight the helicopter may<br />
start to vibrate, if they are too loose it is difficult to<br />
increase the rotor speed.<br />
Next turn on the transmitter, put all the trims in the<br />
centre position and pull the throttle stick and the<br />
throttle trim right down. Only then is the flight<br />
battery is connected to the Piccoboard. Do not move<br />
the Helicopter until the red LED on the Piccoboard<br />
lights up, about 5-7 seconds. The electronics are now<br />
active.<br />
Keep the throttle at the lowest position and carry<br />
out a rudder direction check. Push the cyclic Stick<br />
forward and check the swashplate tilts forward. Push<br />
the cyclic left and check the swashplate tilts left. Now<br />
increase the throttle slowly. The main rotor starts<br />
moving and shortly after the tail rotor follows.<br />
Well done, now your <strong>Piccolo</strong> <strong>V2</strong> is ready for its<br />
maiden flight.<br />
21