- Page 1 and 2:
CLIMAZON 2 GEBRAUCHSANWEISUNG OPERA
- Page 3 and 4:
Willkommen Fachpersonal • Das Ger
- Page 5 and 6:
Inhaltsverzeichnis 1 Geräte- und F
- Page 7 and 8:
1 Geräte- und Funktionsbeschreibun
- Page 9 and 10:
2 Ihre Sicherheit ist uns wichtig W
- Page 11 and 12:
2 Ihre Sicherheit ist uns wichtig 2
- Page 13 and 14:
2 Ihre Sicherheit ist uns wichtig G
- Page 15 and 16:
2 Ihre Sicherheit ist uns wichtig
- Page 17 and 18:
3 Inbetriebnahme 3.1 Auspacken / Ve
- Page 19 and 20:
4 Gerät vorbereiten Abbildung 2 4.
- Page 21 and 22: 5 Übersicht Behandlungen, Präpara
- Page 23 and 24: 6 Behandlung durchführen Abbildung
- Page 25 and 26: 6 Behandlung durchführen Abbildung
- Page 27 and 28: 6 Behandlung durchführen Abbildung
- Page 29 and 30: 6 Behandlung durchführen Abbildung
- Page 31 and 32: 6 Behandlung durchführen Abbildung
- Page 33 and 34: 7 Geräte- und Behandlungsvoreinste
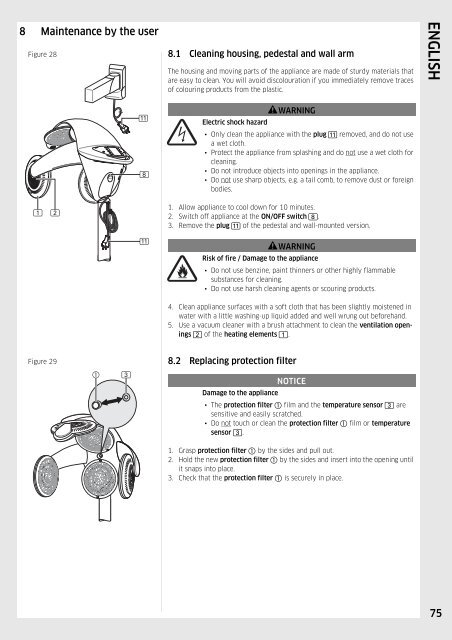
- Page 35 and 36: 8 Wartung durch den Anwender Abbild
- Page 37 and 38: 10 Service und Wartung durch den Ku
- Page 39 and 40: 14 Gewährleistung Sehr geehrte Kun
- Page 41 and 42: Welcome Qualified staff • The app
- Page 43 and 44: Table of contents 1 Description of
- Page 45 and 46: 1 Description of appliance and func
- Page 47 and 48: 2 Your safety is important to us IM
- Page 49 and 50: 2 Your safety is important to us 2.
- Page 51 and 52: 2 Your safety is important to us KE
- Page 53 and 54: 2 Your safety is important to us
- Page 55 and 56: 3 Putting the appliance into operat
- Page 57 and 58: 4 Preparing appliance Figure 2 4.2
- Page 59 and 60: 5 Overview of treatments, products
- Page 61 and 62: 6 Performing treatment Figure 7 6.2
- Page 63 and 64: 6 Performing treatment Figure 11 6.
- Page 65 and 66: 6 Performing treatment Figure 14 6.
- Page 67 and 68: 6 Performing treatment Figure 17 6.
- Page 69 and 70: 6 Performing treatment Figure 21 6.
- Page 71: 7 Changing appliance and treatment
- Page 75 and 76: 10 Servicing and maintenance by Cus
- Page 77 and 78: 14 Guarantee Dear Customer, Thank y
- Page 79 and 80: Bienvenue Personnel qualifié • L
- Page 81 and 82: Table des matières 1 Description d
- Page 83 and 84: 1 Description de l'appareil et de s
- Page 85 and 86: 2 Votre sécurité avant tout CONSI
- Page 87 and 88: 2 Votre sécurité avant tout 2.2 C
- Page 89 and 90: 2 Votre sécurité avant tout METTR
- Page 91 and 92: 2 Votre sécurité avant tout • L
- Page 93 and 94: 3 Mise en service 3.1 Déballage /
- Page 95 and 96: 4 Préparation de l'appareil Figure
- Page 97 and 98: 5 Vue d'ensemble des traitements, d
- Page 99 and 100: 6 Traitement Figure 7 6.2.3 Pour le
- Page 101 and 102: 6 Traitement Figure 11 6.6 Directiv
- Page 103 and 104: 6 Traitement Figure 14 6.8 - Choix
- Page 105 and 106: 6 Traitement Figure 17 6.9.4 Mise e
- Page 107 and 108: 6 Traitement Figure 21 6.10 Fin du
- Page 109 and 110: 7 Modification des préréglages de
- Page 111 and 112: 8 Maintenance incombant à l'utilis
- Page 113 and 114: 10 Service technique et maintenance
- Page 115 and 116: 14 Garantie Chère cliente, cher cl
- Page 117 and 118: Bienvenida Personal especializado
- Page 119 and 120: Índice 1 Descripción del aparato
- Page 121 and 122: 1 Descripción del aparato y su fun
- Page 123 and 124:
2 Su seguridad es lo importante IND
- Page 125 and 126:
2 Su seguridad es lo importante 2.2
- Page 127 and 128:
2 Su seguridad es lo importante MAN
- Page 129 and 130:
2 Su seguridad es lo importante •
- Page 131 and 132:
3 Puesta en funcionamiento 3.1 Dese
- Page 133 and 134:
4 Preparar el aparato Ilustración
- Page 135 and 136:
5 Esquema de tratamientos, producto
- Page 137 and 138:
6 Realización del tratamiento Ilus
- Page 139 and 140:
6 Realización del tratamiento Ilus
- Page 141 and 142:
6 Realización del tratamiento Ilus
- Page 143 and 144:
6 Realización del tratamiento Ilus
- Page 145 and 146:
6 Realización del tratamiento Ilus
- Page 147 and 148:
7 Modificar los preajustes del apar
- Page 149 and 150:
8 Mantenimiento del aparato a cargo
- Page 151 and 152:
10 Servicio y mantenimiento por par
- Page 153 and 154:
14 Garantía Estimado/a cliente: Le
- Page 155 and 156:
Benvenuti Personale qualificato •
- Page 157 and 158:
Indice 1 Descrizione dell'apparecch
- Page 159 and 160:
1 Descrizione dell'apparecchio e de
- Page 161 and 162:
2 Importanza della sicurezza person
- Page 163 and 164:
2 Importanza della sicurezza person
- Page 165 and 166:
2 Importanza della sicurezza person
- Page 167 and 168:
2 Importanza della sicurezza person
- Page 169 and 170:
3 Messa in funzione 3.1 Apertura/sm
- Page 171 and 172:
4 Preparazione dell'apparecchio Fig
- Page 173 and 174:
5 Elenco generale di trattamenti, p
- Page 175 and 176:
6 Esecuzione del trattamento Figura
- Page 177 and 178:
6 Esecuzione del trattamento Figura
- Page 179 and 180:
6 Esecuzione del trattamento Figura
- Page 181 and 182:
6 Esecuzione del trattamento Figura
- Page 183 and 184:
6 Esecuzione del trattamento Figura
- Page 185 and 186:
7 Modifica delle preimpostazioni de
- Page 187 and 188:
8 Manutenzione da parte dell'utiliz
- Page 189 and 190:
10 Assistenza e manutenzione da par
- Page 191 and 192:
14 Garanzia Gentilissima cliente, e
- Page 193 and 194:
Välkommen Fackpersonal • Apparat
- Page 195 and 196:
Innehållsförteckning 1 Apparat- o
- Page 197 and 198:
1 Apparat- och funktionsbeskrivning
- Page 199 and 200:
2 Din säkerhet är viktig för oss
- Page 201 and 202:
2 Din säkerhet är viktig för oss
- Page 203 and 204:
2 Din säkerhet är viktig för oss
- Page 205 and 206:
2 Din säkerhet är viktig för oss
- Page 207 and 208:
3 Idrifttagning 3.1 Uppackning/Avfa
- Page 209 and 210:
4 Förbereda apparaten Bild 2 4.2 I
- Page 211 and 212:
5 Översikt behandlingar, preparat
- Page 213 and 214:
6 Genomföra behandling Bild 7 6.2.
- Page 215 and 216:
6 Genomföra behandling Bild 11 6.6
- Page 217 and 218:
6 Genomföra behandling Bild 14 6.8
- Page 219 and 220:
6 Genomföra behandling Bild 17 6.9
- Page 221 and 222:
6 Genomföra behandling Bild 21 6.1
- Page 223 and 224:
7 Apparat- och behandlingsförinst
- Page 225 and 226:
8 Användarens underhåll Bild 28 8
- Page 227 and 228:
10 Service och underhåll som utfö
- Page 229 and 230:
14 Garanti Bäste kund, Tack för a
- Page 231 and 232:
Welkom Geschoold personeel • Het
- Page 233 and 234:
Inhoudsopgave 1 Apparaat- en functi
- Page 235 and 236:
1 Apparaat- en functiebeschrijving
- Page 237 and 238:
2 Uw veiligheid is belangrijk voor
- Page 239 and 240:
2 Uw veiligheid is belangrijk voor
- Page 241 and 242:
2 Uw veiligheid is belangrijk voor
- Page 243 and 244:
2 Uw veiligheid is belangrijk voor
- Page 245 and 246:
3 Inbedrijfstelling 3.1 Uitpakken/v
- Page 247 and 248:
4 Apparaat voorbereiden Afbeelding
- Page 249 and 250:
5 Overzicht behandelingen, preparat
- Page 251 and 252:
6 Behandeling uitvoeren Afbeelding
- Page 253 and 254:
6 Behandeling uitvoeren Afbeelding
- Page 255 and 256:
6 Behandeling uitvoeren Afbeelding
- Page 257 and 258:
6 Behandeling uitvoeren Afbeelding
- Page 259 and 260:
6 Behandeling uitvoeren Afbeelding
- Page 261 and 262:
7 Voorinstellingen van apparaat en
- Page 263 and 264:
8 Onderhoud door de gebruiker Afbee
- Page 265 and 266:
10 Service en onderhoud door de kla
- Page 267 and 268:
14 Garantie Geachte klant, Bedankt
- Page 269 and 270:
Добро пожаловать! С
- Page 271 and 272:
Содержание 1 Описан
- Page 273 and 274:
1 Описание прибора
- Page 275 and 276:
2 Ваша безопасность
- Page 277 and 278:
2 Ваша безопасность
- Page 279 and 280:
2 Ваша безопасность
- Page 281 and 282:
2 Ваша безопасность
- Page 283 and 284:
2 Ваша безопасность
- Page 285 and 286:
4 Подготовить прибо
- Page 287 and 288:
5 Обзор видов обраб
- Page 289 and 290:
6 Проведение обрабо
- Page 291 and 292:
6 Проведение обрабо
- Page 293 and 294:
6 Проведение обрабо
- Page 295 and 296:
6 Проведение обрабо
- Page 297 and 298:
6 Проведение обрабо
- Page 299 and 300:
7 Изменение преднас
- Page 301 and 302:
7 Изменение преднас
- Page 303 and 304:
9 Неисправности и в
- Page 305 and 306:
12 Утилизация отслу