

Sony TA-VE800G - TA-VE800G Consignes d’utilisation
Sony TA-VE800G - TA-VE800G Consignes d’utilisation
Sony TA-VE800G - TA-VE800G Consignes d’utilisation

You also want an ePaper? Increase the reach of your titles
YUMPU automatically turns print PDFs into web optimized ePapers that Google loves.
Advanced Operations<br />
Adding names to CDs in non-<strong>Sony</strong> CD<br />
changers or <strong>Sony</strong> CD changers without<br />
CTRL A1 jacks<br />
If your CD changer is not a <strong>Sony</strong> Product or does not<br />
have a CTRL A1 jack, you will have to add names<br />
manually as follows;<br />
1 Click the LIST CD button in the INDEX SETTING<br />
screen.<br />
INDEX SETTING<br />
Operating a CD Changer<br />
Grouping CDs<br />
You use the on-screen display to assign your CDs to<br />
one or more groups.<br />
1 Click FUNCTION in the main menu.<br />
The FUNCTION SELECT menu appears.<br />
2 Click INDEX.<br />
The INDEX SETTING screen appears.<br />
3 Click the LIST CD button.<br />
LIST<br />
CD<br />
4 Click SELECT, then click the disc you want to<br />
assign to a new group.<br />
RETURN<br />
2 • To name a disc<br />
Click TITLE. Display the number of the disc to<br />
be named by clicking the > or . icon on the<br />
right side of screen, then click the disc to be<br />
named.<br />
• To name a group<br />
Click GROUP, then click the group to be<br />
named.<br />
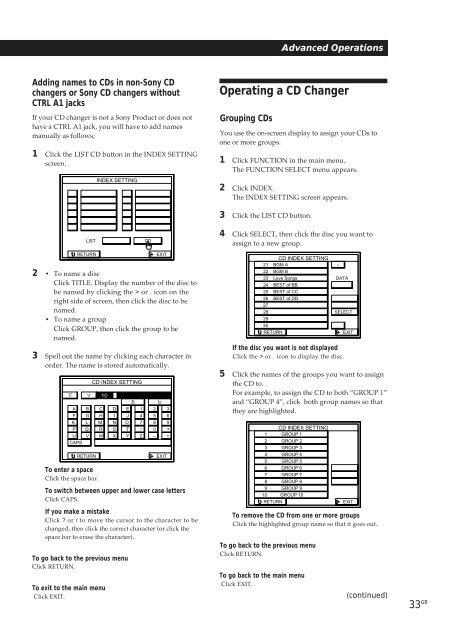
3 Spell out the name by clicking each character in<br />
order. The name is stored automatically.<br />
V<br />
A B<br />
F G<br />
K L<br />
P Q<br />
U V<br />
CAPS<br />
To enter a space<br />
Click the space bar.<br />
To switch between upper and lower case letters<br />
Click CAPS.<br />
If you make a mistake<br />
Click ? or / to move the cursor to the character to be<br />
changed, then click the correct character (or click the<br />
space bar to erase the character).<br />
To go back to the previous menu<br />
Click RETURN.<br />
To exit to the main menu<br />
Click EXIT.<br />
v<br />
RETURN<br />
CD INDEX SETTING<br />
10<br />
C<br />
H<br />
M<br />
R<br />
W<br />
D<br />
I<br />
N<br />
S<br />
X<br />
B<br />
E<br />
J<br />
O<br />
T<br />
Y<br />
1<br />
4<br />
7<br />
/<br />
Z<br />
EXIT<br />
b<br />
2<br />
5<br />
8<br />
0<br />
–<br />
EXIT<br />
3<br />
6<br />
9<br />
*<br />
+<br />
CD INDEX SETTING<br />
21 BGM A<br />
><br />
22<br />
23<br />
24<br />
25<br />
26<br />
27<br />
BGM B<br />
Love Songs<br />
BEST of BB<br />
BEST of CC<br />
BEST of DD<br />
DA<strong>TA</strong><br />
28<br />
29<br />
30<br />
SELECT<br />
.<br />
RETURN<br />
EXIT<br />
If the disc you want is not displayed<br />
Click the > or . icon to display the disc.<br />
5 Click the names of the groups you want to assign<br />
the CD to.<br />
For example, to assign the CD to both “GROUP 1”<br />
and “GROUP 4”, click both group names so that<br />
they are highlighted.<br />
1<br />
2<br />
3<br />
4<br />
5<br />
6<br />
7<br />
8<br />
9<br />
10<br />
RETURN<br />
CD INDEX SETTING<br />
GROUP 1<br />
GROUP 2<br />
GROUP 3<br />
GROUP 4<br />
GROUP 5<br />
GROUP 6<br />
GROUP 7<br />
GROUP 8<br />
GROUP 9<br />
GROUP 10<br />
To remove the CD from one or more groups<br />
Click the highlighted group name so that it goes out.<br />
To go back to the previous menu<br />
Click RETURN.<br />
To go back to the main menu<br />
Click EXIT.<br />
EXIT<br />
(continued)<br />
33 GB


