- Page 1 and 2: Aggregati Manuale d’uso e manuten
- Page 3 and 4: Informazioni sulla pubblicazione/ P
- Page 5 and 6: MC S.r.l. © - 01ih00a.fm271107 Ita
- Page 7 and 8: Italiano I
- Page 9 and 10: Indice Introduzione Descrizione 1 P
- Page 11 and 12: Interventi 6 Manutenzione Indice 6.
- Page 13 and 14: Introduzione Scopo e limiti del man
- Page 15 and 16: Descrizione I
- Page 17 and 18: 1 Parti principali 1.1 Destinazione
- Page 19 and 20: 1.3 Interfaccia aggregato-utensile
- Page 21 and 22: 1.3.4 Attacco lama e pinza Attacco
- Page 23 and 24: 1.5 Convenzioni Si definisce il ver
- Page 25 and 26: 2 Preparazione 2.1 Installazione de
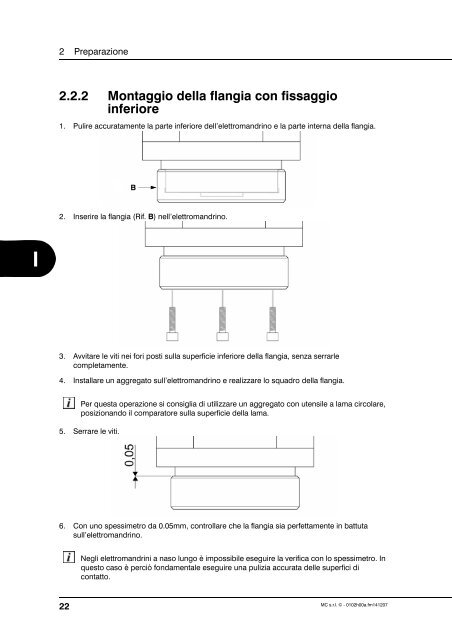
- Page 27: 2.2 Montaggio della flangia sull’
- Page 31 and 32: MC S.r.l. © - 0103h00a.fm141207 3
- Page 33 and 34: 3.3 Utensili per taglio 3.3.1 Flang
- Page 35 and 36: MC S.r.l. © - 0103h00a.fm141207 3
- Page 37 and 38: MC S.r.l. © - 0104h00a.fm141207 4
- Page 39 and 40: 4.3 Utensili per taglio 4.3.1 Flang
- Page 41 and 42: 4.3.3 Fissaggio a 6 viti Torx D 1.
- Page 43 and 44: 5 Regolazioni MC S.r.l. © - 0105h0
- Page 45 and 46: MC S.r.l. © - 0105h00a.fm141207 5
- Page 47 and 48: Interventi I
- Page 49 and 50: 6 Manutenzione 6 Manutenzione Duran
- Page 51 and 52: 6.3 Lubrificazione a grasso 6.3.1 P
- Page 53 and 54: 6.4.1 Verifica livello olio Attende
- Page 55 and 56: Posizionarsi su una vaschetta di ra
- Page 57 and 58: 6.5 Pulizia A 6 Manutenzione Pulire
- Page 59 and 60: Appendici I
- Page 61 and 62: A Informazioni sulla sicurezza A.1
- Page 63 and 64: MC S.r.l. © - 01ah00a.fm141207 A I
- Page 65 and 66: A.6 Segnaletica obblighi 6 Assicura
- Page 67 and 68: Indice analitico A aggregato docume
- Page 69 and 70: English GB
- Page 71 and 72: Table of contents Introduction Desc
- Page 73 and 74: Table of contents 6.5 Cleaning ....
- Page 75 and 76: Introduction Field of application a
- Page 77 and 78: Description GB
- Page 79 and 80:
1 Main parts 1.1 Designed use MC S.
- Page 81 and 82:
1.3 Aggregate-tool interface 1.3.1
- Page 83 and 84:
1.3.4 Blade mounting and collet Bla
- Page 85 and 86:
1.5 Conventions MC S.r.l. © - 0101
- Page 87 and 88:
2 Preparation 2.1 Fitting the aggre
- Page 89 and 90:
MC S.r.l. © - 0102h00gb.fm110208 2
- Page 91 and 92:
Uses GB
- Page 93 and 94:
3 Tool characteristics 3.1 Boring t
- Page 95 and 96:
3.3 Circular blade tools 3.3.1 Flan
- Page 97 and 98:
3.4 Safety in the choice of tools M
- Page 99 and 100:
4 Fitting tools MC S.r.l. © - 0104
- Page 101 and 102:
4.3 Cutting tools 4.3.1 Flange and
- Page 103 and 104:
4.3.3 6 torx screw mounting D 1. Un
- Page 105 and 106:
5 Adjustments MC S.r.l. © - 0105h0
- Page 107 and 108:
5.2 Transverse orientation (variati
- Page 109 and 110:
Operations GB
- Page 111 and 112:
6 Maintenance 6 Maintenance Do not
- Page 113 and 114:
6.3 Greasing 6.3.1 Greasing procedu
- Page 115 and 116:
6.4.1 Oil level check Wait for the
- Page 117 and 118:
6 Maintenance Place the aggregate o
- Page 119 and 120:
6.5 Cleaning 6 Maintenance Clean su
- Page 121 and 122:
Appendices GB
- Page 123 and 124:
A Safety informations A.1 Safety re
- Page 125 and 126:
MC S.r.l. © - 01ah00gb.fm110208 A
- Page 127 and 128:
A.6 Warning signs 6 Make 4 Turn 5 W
- Page 129 and 130:
Analytical index A adjustment possi
- Page 131 and 132:
Français F
- Page 133 and 134:
Table des matières Introduction De
- Page 135 and 136:
Interventions 6 Entretien Table des
- Page 137 and 138:
Introduction But et limites de la n
- Page 139 and 140:
Description F
- Page 141 and 142:
1 Parties principales 1.1 Destinati
- Page 143 and 144:
1.3 Interface agrégat-outil 1.3.1
- Page 145 and 146:
1.3.4 Prise lame et pince Prise lam
- Page 147 and 148:
1.5 Conventions On définit le sens
- Page 149 and 150:
2 Préparation 2.1 Installation de
- Page 151 and 152:
MC S.r.l. © - 0102h00f.fm141207 2
- Page 153 and 154:
Utilisation F
- Page 155 and 156:
MC S.r.l. © - 0103h00f.fm141207 3
- Page 157 and 158:
3.3 Outils pour coupe 3.3.1 Flasque
- Page 159 and 160:
3.4 Sécurité sur le choix de l’
- Page 161 and 162:
4 Montage des outils MC S.r.l. © -
- Page 163 and 164:
4.3 Outils pour coupe 4.3.1 Flasque
- Page 165 and 166:
4.3.3 Fixation à 6 vis Torx D 1. D
- Page 167 and 168:
5 Réglages Toutes les opérations
- Page 169 and 170:
5.2 Orientation transversale (varia
- Page 171 and 172:
Interventions F
- Page 173 and 174:
6 Entretien 6 Entretien Pendant la
- Page 175 and 176:
6.3 Lubrification à la graisse 6.3
- Page 177 and 178:
6.4.1 Vérification du niveau d’h
- Page 179 and 180:
6 Entretien Placer un bac de récup
- Page 181 and 182:
6.5 Nettoyage Nettoyer les surfaces
- Page 183 and 184:
Appendices F
- Page 185 and 186:
MC S.r.l. © - 01ah00f.fm141207 A I
- Page 187 and 188:
MC S.r.l. © - 01ah00f.fm141207 A I
- Page 189 and 190:
A.6 Signaux d’obligation 6 Veille
- Page 191 and 192:
Index analytique A agrégat montage
- Page 193 and 194:
Deutsch D
- Page 195 and 196:
Inhaltsverzeichnis Vorwort Beschrei
- Page 197 and 198:
Eingriffe 6 Wartung Anhang Inhaltsv
- Page 199 and 200:
Vorwort Zweck und Einschränkungen
- Page 201 and 202:
Beschreibung D
- Page 203 and 204:
1 Hauptteile 1.1 Zweckbestimmung MC
- Page 205 and 206:
1.3 Schnittstelle Aggregat-Werkzeug
- Page 207 and 208:
1.3.4 Sägeblatt- und Zangenfutter
- Page 209 and 210:
1.5 Konventionen MC S.r.l. © - 010
- Page 211 and 212:
2 Vorbereitung 2.1 Installation des
- Page 213 and 214:
2.2 Montage des Flanschs an der Ele
- Page 215 and 216:
Anwendung D
- Page 217 and 218:
MC S.r.l. © - 0103h00de.fm141207 3
- Page 219 and 220:
3.3 Schneidwerkzeuge 3.3.1 Flansch
- Page 221 and 222:
MC S.r.l. © - 0103h00de.fm141207 3
- Page 223 and 224:
MC S.r.l. © - 0104h00de.fm141207 4
- Page 225 and 226:
4.3 Schneidwerkzeuge 4.3.1 Flansch
- Page 227 and 228:
4.3.3 Befestigung mit 6 Schrauben T
- Page 229 and 230:
5 Einstellungen MC S.r.l. © - 0105
- Page 231 and 232:
MC S.r.l. © - 0105h00de.fm141207 5
- Page 233 and 234:
Eingriffe D
- Page 235 and 236:
6 Wartung 6 Wartung Während des Um
- Page 237 and 238:
6.3 Fettschmierung 6.3.1 Schmierpro
- Page 239 and 240:
6.4.1 Ölstandkontrolle Das Aggrega
- Page 241 and 242:
6 Wartung Ein Sammelbecken für das
- Page 243 and 244:
6.5 Reinigung A 6 Wartung Die angeg
- Page 245 and 246:
Anhang D
- Page 247 and 248:
A Informationen zur Sicherheit A.1
- Page 249 and 250:
� Eine Schutzbrille mit seitliche
- Page 251 and 252:
A.6 Pflichtenhinweise 6 Sicherstell
- Page 253 and 254:
Analytischer Index A Allgemeine Ver
- Page 255 and 256:
Español E
- Page 257 and 258:
Índice de los contenidos Premisa D
- Page 259 and 260:
Índice de los contenidos 6.5 Limpi
- Page 261 and 262:
Premisa Objeto y límites del manua
- Page 263 and 264:
Descripción E
- Page 265 and 266:
MC S.r.l. © - 0101h00e.fm141207 1
- Page 267 and 268:
1.3 Interfaz agregado-herramienta 1
- Page 269 and 270:
1.3.4 Conexión hoja y pinza MC S.r
- Page 271 and 272:
1.5 Convenciones MC S.r.l. © - 010
- Page 273 and 274:
2 Preparación 2.1 Instalación del
- Page 275 and 276:
MC S.r.l. © - 0102h00e.fm141207 2
- Page 277 and 278:
Uso E
- Page 279 and 280:
MC S.r.l. © - 0103h00e.fm141207 3
- Page 281 and 282:
3.3 Herramientas para corte 3.3.1 B
- Page 283 and 284:
MC S.r.l. © - 0103h00e.fm141207 3
- Page 285 and 286:
MC S.r.l. © - 0104h00e.fm141207 4
- Page 287 and 288:
4.3 Herramientas para corte 4.3.1 B
- Page 289 and 290:
4.3.3 Fijación de 6 tornillos Torx
- Page 291 and 292:
5 Regulaciones MC S.r.l. © - 0105h
- Page 293 and 294:
MC S.r.l. © - 0105h00e.fm141207 5
- Page 295 and 296:
Intervenciones E
- Page 297 and 298:
6 Mantenimiento 6 Mantenimiento Dur
- Page 299 and 300:
6.3 Lubricación con grasa 6.3.1 Pr
- Page 301 and 302:
6.4.1 Verificación del nivel de ac
- Page 303 and 304:
6 Mantenimiento Posicionarse en una
- Page 305 and 306:
6.5 Limpieza A 6 Mantenimiento Limp
- Page 307 and 308:
Apéndices E
- Page 309 and 310:
A Información sobre la seguridad A
- Page 311 and 312:
MC S.r.l. © - 01ah00e.fm141207 A I
- Page 313 and 314:
MC S.r.l. © - 01ah00e.fm141207 A I
- Page 315 and 316:
Índice analítico A aceite lubrica