OM, Partner, P718 T, P722 T, 964831101, 964831301, 2007-06 ...
OM, Partner, P718 T, P722 T, 964831101, 964831301, 2007-06 ...
OM, Partner, P718 T, P722 T, 964831101, 964831301, 2007-06 ...

Create successful ePaper yourself
Turn your PDF publications into a flip-book with our unique Google optimized e-Paper software.
Below are descriptions of typical cutting<br />
procedure to be adopted for specific<br />
situations. However, these should be<br />
assessed each time to calculate whether the<br />
method is most suitable or not, In order to use<br />
a method with the least possible risk.<br />
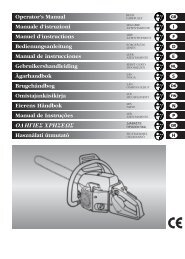
Trunk on the ground. (Risk of touching the<br />
ground with the chain once the bar has<br />
passed trough the trunk). (fig.5)<br />
Cut from top to bottom through the whole<br />
trunk. Towards the end of the cut, proceed<br />
very carefully to prevent the chain from hitting<br />
the ground. If it is possible, cut 2/3 of the<br />
trunk, roll it over, and cut the remaining third<br />
from top to bottom to limit the risk of the chain<br />
touching the ground.<br />
Trunk supported at one end only (Risk of<br />
trunk breaking during cutting action). (fig.6)<br />
Begin the cut from underneath for about 1/3 of<br />
the diameter, and then finish the cutting action<br />
from the top to meet the undercut.<br />
Trunk supported at both ends. (Risk of<br />
pinching the chain). (fig.7)<br />
Begin the cut from above for about 1/3 of the<br />
diameter, and then continue from underneath<br />
to meet the overcut.<br />
Tree felling.<br />
ATTENTION!: Never attempt to fell a tree if<br />
you do not have the necessary experience,<br />
and in any case never fell trees that have<br />
trunks with a diameter larger than the length<br />
of the bar! This operation is reserved for<br />
expert machine users with adequate<br />
equipment.<br />
When felling a tree, the aim is to have the tree<br />
fall in the most convenient position for the<br />
following limbing and bucking operations.<br />
(Avoid trees falling on top of other trees:<br />
Felling trees that are entangled with other<br />
trees is a very dangerous operation).<br />
First of all decide which is the best direction<br />
for the tree to fall by evaluating the following:<br />
objects or other plants around the tree, the<br />
inclination, the curve, wind direction, and<br />
greatest branch concentration. Take into<br />
account dead or broken branches that may<br />
break off during felling creating a further<br />
danger risk.<br />
ATTENTION! During tree felling operations in<br />
critical conditions, always remove ear<br />
protection immediately after cutting operations<br />
to be able to listen for unusual noises and any<br />
warning signals.<br />
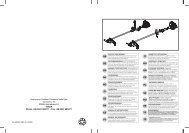
Preliminary cutting operations and<br />
identifying the retreat path.<br />
Eliminate any branches that interfere with the<br />
job (fig.8), starting from top to bottom, and<br />
then, always keeping the trunk between the<br />
user and the machine eliminate the more<br />
difficult branches afterwards, piece by piece.<br />
Eliminate all plants that interfere with work<br />
operations and control the area for possible<br />
obstacles (rocks, roots, ditches,etc.) when<br />
planning the retreat path (to follow during tree<br />
fall); Refer to the illustration (fig.9) for the<br />
directions to be maintained (A. predicted tree<br />
fall direction. B. Retreat path. C. Danger<br />
zone).<br />
FELLING CUTS (fig.10)<br />
In order to ensure that the user has complete<br />
control over the tree fall, the cutting<br />
instructions are as follows:<br />
The cut that controls the fall direction of the<br />
tree is to be executed first: First of all cut the<br />
UPPER PART of the directional notch on the<br />
side the tree must fall. Remain on the right<br />
hand side of the tree and cut using the chain<br />
pull method; then cut the LOWER PART that<br />
must meet the end of the upper part. The<br />
depth of the directional notch must be 1/ 4 of the<br />
trunk diameter, with an angle of at least 45°<br />
between upper and lower cut. The meeting<br />
point between the two sides of the notch is<br />
called “directional cut line” This line must be<br />
perfectly horizontal at right angles (90°) to the<br />
felling direction.<br />
The felling cut that provokes the tree fall, is<br />
performed at 3 to 5cm above the lower part of<br />
the directional felling cut line, finishing at a<br />
distance of 1/10 of the trunk from the notch.<br />
Remain on the left hand side of the tree and<br />
cut using the chain pulling method and the<br />
spiked bumper. Check that the tree does not<br />
move in a direction other than that predicted<br />
for the fall. As soon as possible insert a felling<br />
lever or wedge into the cut. The uncut part of<br />
the trunk is called the “hinge”, as it is intended<br />
to guide the tree as it falls; in cases where the<br />
cuts are not sufficient, not straight, or have<br />
been cut through completely, the tree fall<br />
cannot be controlled (extremely dangerous!).<br />
For this reason the various cuts must be<br />
performed with great precision.<br />
When cutting operations are completed the<br />
tree will begin to fall. Where necessary help<br />
tree fall using wedges or felling levers.<br />
ENGLISH - 9<br />
Limbing<br />
Once the tree has been felled, the trunk must<br />
be limbed: in other words, the branches are<br />
removed from the trunk. Do not<br />
underestimate this operation because the<br />
large majority of kickback accidents occur<br />
during this stage. For this reason pay close<br />
attention to the position of the bar nose during<br />
cutting operations and always work on the left<br />
hand side of the trunk.