BR/BD 100/250 R BR/BD 100/250 RI BR 120/250 R BR ... - Kärcher
BR/BD 100/250 R BR/BD 100/250 RI BR 120/250 R BR ... - Kärcher
BR/BD 100/250 R BR/BD 100/250 RI BR 120/250 R BR ... - Kärcher

You also want an ePaper? Increase the reach of your titles
YUMPU automatically turns print PDFs into web optimized ePapers that Google loves.
Metering device (option)<br />
Detergent is added to the fresh water on the<br />
way to the cleaning head with the help of a<br />
dosaging device.<br />
Note<br />
The metering device can be used to add 5%<br />
of detergent at maximum. In case of a higher<br />
dose the detergent must be poured into<br />
the fresh water tank.<br />
Place the canister with the detergent in<br />
the trough behind the seat.<br />
Unscrew the canister lid.<br />
Insert the suction hose of the dosing<br />
equipment into the canister.<br />
Note<br />
– The appliance is equipped with a fresh<br />
water level display. If the fresh water<br />
tank is empty, then the function of adding<br />
detergent gets deactivated. The<br />
cleaning head continues to work without<br />
the addition of any liquid.<br />
– Detergent addition is also stopped when<br />
the detergent can is empty. Indicator<br />
lamp: "detergent tank empty" glows red.<br />
Only fresh water is supplied to the<br />
cleaning head.<br />
Sweeping (only <strong>BR</strong>/<strong>BD</strong>...<strong>RI</strong>)<br />
The sweeper picks up loose dirt before<br />
cleaning the floor.<br />
Warning<br />
Risk of damage to the sweeper.<br />
– Do not sweep in packing tapes, wires or<br />
similar objects.<br />
– Only drive over steps with maximum 2<br />
cm height with the <strong>BR</strong>/<strong>BD</strong>...<strong>RI</strong> models.<br />
– The dust filter can get blocked or germs<br />
can form in it. Use the sweeper only to<br />
sweep dry surfaces.<br />
Note<br />
Suction turbine, side brushes and filter<br />
cleaner continue to run for a while after<br />
switching off.<br />
Switch on "sweeping" button.<br />
The sweeper is activated. The indicator<br />
lamp "sweeping" is on during the operations.<br />
Bulk waste flap<br />
The bulk waste flap can be raised to sweep<br />
in larger objects (up to max. 6 cm height).<br />
Danger<br />
Risk of injury on account of electric shock.<br />
Raise the bulk waste flap only when there is<br />
no person standing close by.<br />
Press the pedal for raising the bulk<br />
waste flap.<br />
Note<br />
The vacuuming and sweeping performance<br />
is lower when the bulk waste flap is raised.<br />
Hence, raise the bulk waste flap only when<br />
needed.<br />
Stopping sweeping<br />
Set "sweeping" button to "0".<br />
The sweeper is deactivated. Once you<br />
have stopped sweeping, the dust filter is<br />
cleaned for approx. 15 seconds. The indicator<br />
lamp "dust filter shaking" glows.<br />
1<br />
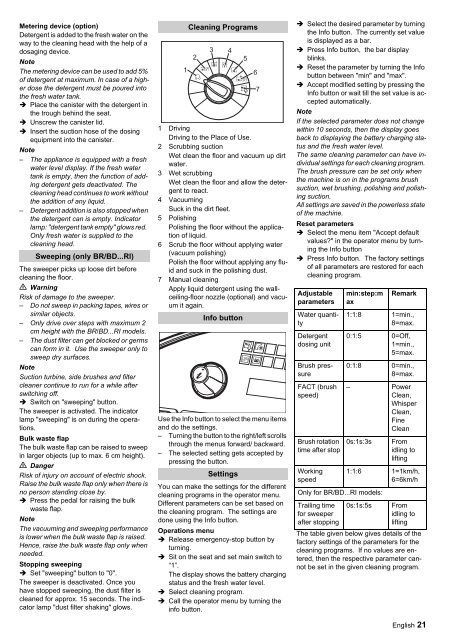
Cleaning Programs<br />
2<br />
3 4<br />
1 Driving<br />
Driving to the Place of Use.<br />
2 Scrubbing suction<br />
Wet clean the floor and vacuum up dirt<br />
water.<br />
3 Wet scrubbing<br />
Wet clean the floor and allow the detergent<br />
to react.<br />
4 Vacuuming<br />
Suck in the dirt fleet.<br />
5 Polishing<br />
Polishing the floor without the application<br />
of liquid.<br />
6 Scrub the floor without applying water<br />
(vacuum polishing)<br />
Polish the floor without applying any fluid<br />
and suck in the polishing dust.<br />
7 Manual cleaning<br />
Apply liquid detergent using the wallceiling-floor<br />
nozzle (optional) and vacuum<br />
it again.<br />
Info button<br />
Use the Info button to select the menu items<br />
and do the settings.<br />
– Turning the button to the right/left scrolls<br />
through the menus forward/ backward.<br />
– The selected setting gets accepted by<br />
pressing the button.<br />
Settings<br />
You can make the settings for the different<br />
cleaning programs in the operator menu.<br />
Different parameters can be set based on<br />
the cleaning program. The settings are<br />
done using the Info button.<br />
Operations menu<br />
Release emergency-stop button by<br />
turning.<br />
Sit on the seat and set main switch to<br />
“1”.<br />
The display shows the battery charging<br />
status and the fresh water level.<br />
Select cleaning program.<br />
Call the operator menu by turning the<br />
info button.<br />
5<br />
6<br />
7<br />
Select the desired parameter by turning<br />
the Info button. The currently set value<br />
is displayed as a bar.<br />
Press Info button, the bar display<br />
blinks.<br />
Reset the parameter by turning the Info<br />
button between "min" and "max".<br />
Accept modified setting by pressing the<br />
Info button or wait till the set value is accepted<br />
automatically.<br />
Note<br />
If the selected parameter does not change<br />
within 10 seconds, then the display goes<br />
back to displaying the battery charging status<br />
and the fresh water level.<br />
The same cleaning parameter can have individual<br />
settings for each cleaning program.<br />
The brush pressure can be set only when<br />
the machine is on in the programs brush<br />
suction, wet brushing, polishing and polishing<br />
suction.<br />
All settings are saved in the powerless state<br />
of the machine.<br />
Reset parameters<br />
Select the menu item "Accept default<br />
values?" in the operator menu by turning<br />
the Info button<br />
Press Info button. The factory settings<br />
of all parameters are restored for each<br />
cleaning program.<br />
Adjustable<br />
parameters<br />
Water quantity<br />
Detergent<br />
dosing unit<br />
Brush pressure<br />
FACT (brush<br />
speed)<br />
Brush rotation<br />
time after stop<br />
Working<br />
speed<br />
min:step:m<br />
ax<br />
Remark<br />
1:1:8 1=min.,<br />
8=max.<br />
0:1:5 0=Off,<br />
1=min.,<br />
5=max.<br />
0:1:8 0=min.,<br />
8=max.<br />
– Power<br />
Clean,<br />
Whisper<br />
Clean,<br />
Fine<br />
Clean<br />
0s:1s:3s<br />
Only for <strong>BR</strong>/<strong>BD</strong>...<strong>RI</strong> models:<br />
Trailing time<br />
for sweeper<br />
after stopping<br />
From<br />
idling to<br />
lifting<br />
1:1:6 1=1km/h,<br />
6=6km/h<br />
0s:1s:5s<br />
From<br />
idling to<br />
lifting<br />
The table given below gives details of the<br />
factory settings of the parameters for the<br />
cleaning programs. If no values are entered,<br />
then the respective parameter cannot<br />
be set in the given cleaning program.<br />
English 21