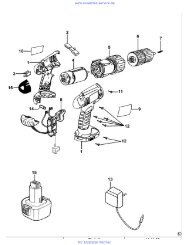
Solo Gartengeraete - Ersatzteilplan
Solo Gartengeraete - Ersatzteilplan
Solo Gartengeraete - Ersatzteilplan

You also want an ePaper? Increase the reach of your titles
YUMPU automatically turns print PDFs into web optimized ePapers that Google loves.
15<br />
7<br />
18<br />
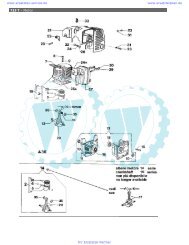
Zaagketting<br />
Zwaard (kettinggeleider)<br />
Handgreep<br />
Handbeschermer<br />
Kap<br />
Choke - smoorklep<br />
Halfgas-Controlestift<br />
Olietank<br />
Startergreep<br />
Brandstoftank<br />
Kortsluitschakelaar<br />
Gashendel<br />
Primer<br />
Ontstekingskaars<br />
Luchtfilter<br />
Schroef - stationair toerental<br />
Regelschroef carburator (H/L)<br />
Trillingsdemper<br />
Koude lucht aanzuigzone<br />
Regelschroef oliepomp<br />
Koppeling<br />
Remband<br />
Kettingrem<br />
Gasblokkeringsknop<br />
Decompressieventiel<br />
www.ersatzteil-service.de www.ersatzteilplan.de<br />
14<br />
20<br />
21<br />
22<br />
23<br />
Catena<br />
Guida<br />
Staffa<br />
Paramano<br />
Capote<br />
Leva di avviamento<br />
Copiglia di controllo<br />
Serbatoio d‘olio<br />
Impugnatura avviamento<br />
Serbatoio carburante<br />
Interruttore<br />
Leva del gas<br />
Primer<br />
Candela<br />
Filtro aria<br />
Vite rallentatore<br />
Vite regolazione carburatore (H/L)<br />
Ammortizzatore di vibrazioni<br />
Zona di aspirazione<br />
Regolazione della pompa olio<br />
Frizione<br />
Nastro freni<br />
Freno catena<br />
Bloccaggio leva<br />
Valvola di decompressione<br />
SOLO-Halbgasautomatik<br />
Starten bei kaltem Motor<br />
1. Den Primer mehrmals drücken, bis<br />
der Kunststoffballon sichtbar und spürbar<br />
mit Kraftstoff befüllt ist (nur gültig<br />
für Primerausrüstung)<br />
2. Choke mit Halbgas-Automatik ziehen.<br />
HINWEIS: Deko-Ventil (25) drücken - auch<br />
bei jedem weiteren Startzug.<br />
Startergriff langsam bis zum ersten Widerstand<br />
heraus- und dann schnell und<br />
kräftig durchziehen. Startvorgang wiederholen,<br />
bis der Motor hörbar und kurzzeitig<br />
anspringt. Dann sofort<br />
3. Chokeknopf wieder eindrücken.<br />
Bei erneutem Start läuft der Motor mit<br />
Halbgas weiter (sichtbar durch den roten<br />
Kontrollstift im Choke-Hebel).<br />
4. Wenn der Motor läuft, kurz den Gashebel<br />
betätigen, damit er im Leerlauf<br />
weiterläuft.<br />
Hinweis:<br />
Beim Gasgeben wird die Sperre der Halbgasautomatik<br />
gelöst, der rote<br />
Kontrollstift verschwindet im Choke-Hebel;<br />
der Motor läuft mit Leerlauf-Drehzahl<br />
weiter. Sollte der Motor trotz weiterer<br />
Startversuche nicht anspringen, ist<br />
der Brennraum bereits überfettet. In diesem<br />
Fall empfiehlt es sich, die Zündkerze<br />
auszuschrauben und abzutrocknen. Stellen<br />
Sie den Kurzschlußschalter auf "Stop"<br />
und den Gashebel auf Vollgasstellung<br />
und ziehen Sie den Startergriff bei ausgeschraubter<br />
Zündkerze zur Belüftung<br />
des Brennraumes mehrmals durch.<br />
5. Starten bei warmem Motor<br />
Motor in Leerlaufstellung starten! Bei<br />
sehr niedrigen Umgebungstemperaturen:<br />
- Choke mit Halbgasautomatik ziehen<br />
- Chokehebel sofort wieder in Ausgangsstellung<br />
zurückschieben (roter<br />
Kontrollstift im Choke-Hebel bleibt sichtbar<br />
- Motor starten und kurze Zeit durchlaufen<br />
lassen<br />
- Gashebel kurz betätigen, damit der<br />
Motor mit Leerlauf-Drehzahl weiterläuft.<br />
Ölpumpeneinstellung<br />
Die Fördermenge der Ölpumpe läßt sich<br />
über eine Regulierungsschraube an der<br />
Unterseite der Motorsäge um ca. 3/4 Umdrehungen<br />
von Plus(+) nach Minus(-) verstellen.<br />
Als Anhaltspunkt wird empfohlen,<br />
für eine Schneidgarnitur 38cm die<br />
Mittelstellung der Regulierung zwischen<br />
(+) und (-) zu wählen. Bei Leerlaufdrehzahl<br />
keine Ölförderung.<br />
Half Throttle Automatic<br />
Cold starting steps<br />
1. Pump primer bulb repeatedly until bulb is<br />
approximately 3/4 full with fuel mix and<br />
somewhat firm.<br />
2. Pull out choke knob with half-throttle<br />
automatic! NOTE: Always press the decompression<br />
valve button (25) before each<br />
attempt to start the saw.<br />
Slowly pull on starter grip until rope<br />
encounters some resistance from starter<br />
pulley. Next, pull through firmly and rapidly<br />
in an upward motion. Guide rope back into<br />
starter rather than letting it snap back.<br />
Caution: Retain secure hold of saw with the<br />
foot and hand position for starting the chain<br />
saw in a safe manner.<br />
Repeat starting procedure until engine<br />
attempts to fire, then immediately<br />
3. Push in choke knob.<br />
Pull until engine starts. The engine will<br />
continue to run at half- throttle (as indicated<br />
by red indicator pin on the choke knob).<br />
4. Once the engine runs, briefly depress &<br />
release the throttle lever to allow engine to<br />
operate at idle speed.<br />
NOTE: Depressing the throttle lever releases<br />
the half-throttle automatic lock and the red<br />
indicator pin on the choke knob disappears<br />
inside. The engine continues to run at idle speed.<br />
Should the engine fail to start after several<br />
repeated starting attempts, the engine has<br />
already been "flooded" (too much fuel<br />
mixture in cylinder). In this case, remove the<br />
spark plug and dry it. Set the ignition switch<br />
to "stop" and the throttle lever to full<br />
throttle. Crank engine by pulling the starter<br />
through several times to vent fuel mix and<br />
vapors from cylinder and crank case. Check<br />
spark plug gap; correct if necessary. Reinstall<br />
spark plug; connect spark plug cap. Set<br />
ignition switch to "I" position (on) and<br />
repeat starting steps.<br />
5. Warm Start Procedure<br />
Start engine in idle position! During low<br />
ambient temperatures:<br />
- Pull out choke with half-throttle automatic.<br />
- Push choke knob back in to end position<br />
("open"), red indicator pin on choke button<br />
remains visible).<br />
- Crank engine and allow to run briefly.<br />
- Depress throttle lever briefly to allow<br />
engine to run at idle speed (indicator pin<br />
disappears).<br />
If you are unsuccessful in starting the engine,<br />
consult the troubleshooting guide in your<br />
SOLO chain saw handbook or contact a<br />
servicing dealer.<br />
Oil pump adjustment<br />
The rate of delivery of the oil pump can be<br />
adjusted by turning the adjustment screw on<br />
the underside of the chain saw about 3/8<br />
turns plus (+) to minus (-). As point of<br />
reference, it is recommended that the<br />
medium setting of the adjustment between<br />
(+) and (-) be selected when using a 38cm/<br />
15" bar and chain accessory. There is no oil<br />
delivery at idle speed.