


Create successful ePaper yourself
Turn your PDF publications into a flip-book with our unique Google optimized e-Paper software.
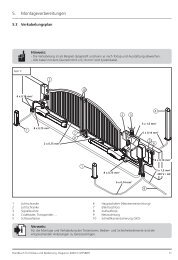
• Pre-tension the first torsion spring with<br />
the aid of the spring tensioning tool<br />
(260).<br />
- Rotate 2 turns in the direction of the<br />
arrow (note markings).<br />
- Tighten the 2 hexagonal head screws<br />
(044) in the right-hand torsion spring.<br />
• Pre-tension the second torsion spring in<br />
the same way.<br />
NOTE: Prevent torsion shaft<br />
from twisting. The ropes should<br />
remain taut.<br />
• Screw coupling screws (043) fingertight<br />
on either side of the coupling.<br />
28<br />
29<br />
31<br />
32n<br />
Tension torsion springs<br />
• Insert spring tensioning tool (260) and<br />
hold firmly in place.<br />
• Slacken 2 hex-head screws (044), tension<br />
torsion springs with tensioner tool<br />
(260) up to the specified number of<br />
turns (N) according to the specification<br />
plate.<br />
• Re-tighten the 2 hex-head screws (2).<br />
• Tension the second torsion spring in the<br />
same way.<br />
• Lightly oil the torsion springs, Figure<br />
30.<br />
NOTE: Spring tension! The<br />
door leaf should run automatically<br />
downwards in the closing<br />
end position (approx. 30 cm<br />
above the floor)!<br />
Align door sections<br />
• Loosen the coupling screws (043) on<br />
one side of the coupling. This will even<br />
up the uneven cable lengths on the left<br />
and right.<br />
• Align the door sections by turning the<br />
torsion shafts (240) parallel to the lintel<br />
architrave.<br />
• Tighten all coupling screws (043), align<br />
torsion shaft flush to them!<br />
Fasten spring-loaded tube<br />
• Attach the tensioning tool (260) with the<br />
cable holder (261) to the outside of the<br />
side architraves (103/107) or place on<br />
the lintel architrave seal.<br />
Finger protection,<br />
cable deflection<br />
CAUTION:<br />
Always mount the safety device.<br />
33<br />
34v-<br />
35v<br />
36v<br />
37v-38v<br />
39v<br />
Adjust tandem drive<br />
mechanism<br />
• Slacken flange nuts (045) on the tandem<br />
drive mechanism.<br />
• Press the door sections by hand gently<br />
against the sealing strip one after the<br />
other and tighten flange nuts (045).<br />
Attach control cable<br />
locking mechanism<br />
• Feed the control cables (501) through<br />
the hinge covers at the top (340) and<br />
the bottom (345) and attach the hinge<br />
covers. Off-centre hinges: feed the control<br />
cables (501) through part (582).<br />
• Loosen screw fastenings (056) and<br />
(057).<br />
• Push the opening handle (505) up. Push<br />
in the control cable sleeves completely<br />
(see detail, Figure 35-3) and screw tight.<br />
• Clamp (057) the strands of the control<br />
cable (501). The control cables (501)<br />
should then be lightly tensioned and<br />
firmly screwed in place. When the<br />
cables are correctly assembled, the<br />
release pins (508) should project<br />
approx 1 mm when the release lever<br />
is applied. Important!<br />
• Tie a knot in the pull-back cable (540)<br />
on the right or left diagonal strut<br />
(424/428) and the retaining bracket<br />
(350).<br />
WARNING: Screw the cables<br />
securely in place. If the control<br />
cables slip you will not be able<br />
to open the door from the outside.<br />
Carry out these steps with<br />
great care.<br />
• Replace the lock cover (503).<br />
• Check the door function without the locking<br />
mechanism.<br />
Fit catch<br />
Use the catch (575) to disable the lock.<br />
• Fit the catch casing (573/577).<br />
Adjust catch gap<br />
WARNING: You must adjust<br />
the catch from the inside. If<br />
incorrectly set the door can<br />
no longer be opened from<br />
outside.Take great care therefore<br />
with both catches when<br />
carrying out this step.<br />
• Open and close the door several times.<br />
• Check the gap again and adjust if<br />
necessary.<br />
• Check the function from the inside and<br />
adjust the catch gap again if necessary.<br />
Mount fastening bracket<br />
for WK2<br />
Only for automatic doors without a lock.<br />
40-41 Fit hinge covers<br />
42<br />
43<br />
43n<br />
44<br />
Fit floor handles<br />
Activate spring failure<br />
safety mechanism<br />
• Remove both locking screws (211) from<br />
spring failure safety mechanism (210).<br />
WARNING: There is no protection<br />
in the case of spring failure<br />
while the screws (211) are still<br />
fastened.<br />
Fit cable drum<br />
covers<br />
CAUTION! The low-lintel door<br />
must not be operated before<br />
fitting the cable drum covers<br />
(282). Covers must be replaced<br />
if damaged. The manufacturer<br />
accepts no liability and the<br />
warranty is invalid if the door<br />
is operated without the cable<br />
drum covers.<br />
Remove foils<br />
Remove the foils from the door leaf after<br />
installation.<br />
NOTE: Foils only available if the<br />
appropriate label is fixed to the<br />
door.<br />
<strong>ES</strong> <strong>100</strong> <strong>ZP</strong><br />
N000710-01-00/05<br />
13 (102)


![Technische Details LEVO_3000 [239 KB]](https://img.yumpu.com/43445897/1/184x260/technische-details-levo-3000-239-kb.jpg?quality=85)