DT-X7 CI - Radix
DT-X7 CI - Radix
DT-X7 CI - Radix

Erfolgreiche ePaper selbst erstellen
Machen Sie aus Ihren PDF Publikationen ein blätterbares Flipbook mit unserer einzigartigen Google optimierten e-Paper Software.
4. Your Receiver and its Functions<br />
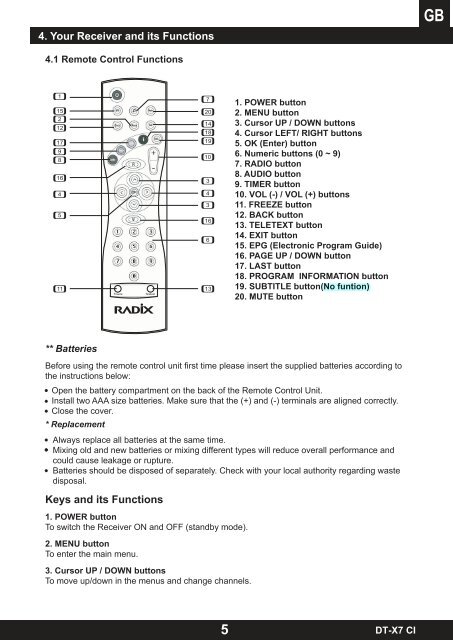
4.1 Remote Control Functions<br />
1<br />
15<br />
2<br />
12<br />
17<br />
9<br />
8<br />
16<br />
4<br />
5<br />
11<br />
** Batteries<br />
Before using the remote control unit first time please insert the supplied batteries according to<br />
the instructions below:<br />
Open the battery compartment on the back of the Remote Control Unit.<br />
Install two AAA size batteries. Make sure that the (+) and (-) terminals are aligned correctly.<br />
Close the cover.<br />
* Replacement<br />
Always replace all batteries at the same time.<br />
Mixing old and new batteries or mixing different types will reduce overall performance and<br />
could cause leakage or rupture.<br />
Batteries should be disposed of separately. Check with your local authority regarding waste<br />
disposal.<br />
Keys and its Functions<br />
14<br />
18<br />
19<br />
1. POWER button<br />
To switch the Receiver ON and OFF (standby mode).<br />
2. MENU button<br />
To enter the main menu.<br />
3. Cursor UP / DOWN buttons<br />
To move up/down in the menus and change channels.<br />
7<br />
20<br />
10<br />
3<br />
4<br />
3<br />
16<br />
6<br />
13<br />
5<br />
1. POWER button<br />
2. MENU button<br />
3. Cursor UP / DOWN buttons<br />
4. Cursor LEFT/ RIGHT buttons<br />
5. OK (Enter) button<br />
6. Numeric buttons (0 ~ 9)<br />
7. RADIO button<br />
8. AUDIO button<br />
9. TIMER button<br />
10. VOL (-) / VOL (+) buttons<br />
11. FREEZE button<br />
12. BACK button<br />
13. TELETEXT button<br />
14. EXIT button<br />
15. EPG (Electronic Program Guide)<br />
16. PAGE UP / DOWN button<br />
17. LAST button<br />
18. PROGRAM INFORMATION button<br />
19. SUBTITLE button(No funtion)<br />
20. MUTE button<br />
<strong>DT</strong>-<strong>X7</strong> <strong>CI</strong>