DT-X7 CI - Radix
DT-X7 CI - Radix
DT-X7 CI - Radix

Sie wollen auch ein ePaper? Erhöhen Sie die Reichweite Ihrer Titel.
YUMPU macht aus Druck-PDFs automatisch weboptimierte ePaper, die Google liebt.
Press the OK button to start searching using the above settings.<br />
Another search method is “Advanced Search”. Use this channel search to search for a particular<br />
channel or channels ones that you couldn’t find using “Manual Search”. Enter the PID of the<br />
channel you want to search.<br />
Set the channel’s Video PID.<br />
Set the channel’s Audio PID.<br />
Set the channel’s PCR PID.<br />
Press the OK button at “Start Search”<br />
The names of the channels will be listed.<br />
Press the EXIT button to return to viewing mode and check that the reception of the selected<br />
channel is good.<br />
Note on Network Search:<br />
In this search mode, the receiver first collects the network information first from the TP you<br />
selected. Then an Manual Search takes place to research all the channels in that network. The<br />
number of searched channels may vary, depending on the TPs present in that network. Select<br />
whether to use the network information of the TP stream specified in "Select Transponder". I.e,<br />
download the TP information of the satellite you want to find from a particular TP and then use<br />
this to Auto Search the channels in the TP group. The number of channels searched may vary<br />
depending on the TP information transmitted. Select Network Search and then use the<br />
buttons to set it.<br />
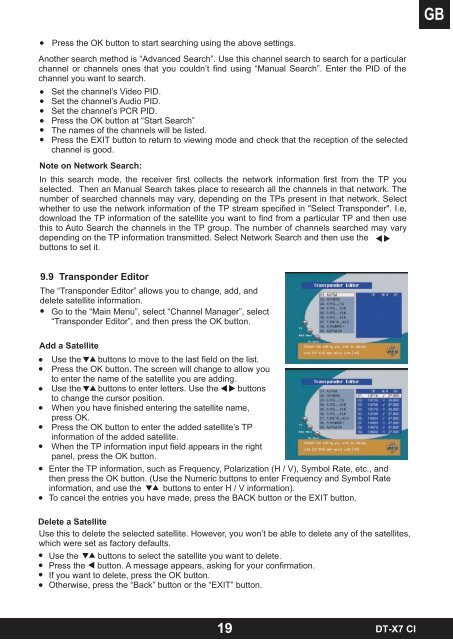
9.9 Transponder Editor<br />
The “Transponder Editor” allows you to change, add, and<br />
delete satellite information.<br />
Go to the “Main Menu”, select “Channel Manager”, select<br />
“Transponder Editor”, and then press the OK button.<br />
Add a Satellite<br />
Use the buttons to move to the last field on the list.<br />
Press the OK button. The screen will change to allow you<br />
to enter the name of the satellite you are adding.<br />
Use the buttons to enter letters. Use the buttons<br />
to change the cursor position.<br />
When you have finished entering the satellite name,<br />
press OK.<br />
Press the OK button to enter the added satellite’s TP<br />
information of the added satellite.<br />
When the TP information input field appears in the right<br />
panel, press the OK button.<br />
Enter the TP information, such as Frequency, Polarization (H / V), Symbol Rate, etc., and<br />
then press the OK button. (Use the Numeric buttons to enter Frequency and Symbol Rate<br />
information, and use the buttons to enter H / V information).<br />
To cancel the entries you have made, press the BACK button or the EXIT button.<br />
Delete a Satellite<br />
Use this to delete the selected satellite. However, you won’t be able to delete any of the satellites,<br />
which were set as factory defaults.<br />
Use the buttons to select the satellite you want to delete.<br />
Press the button. A message appears, asking for your confirmation.<br />
If you want to delete, press the OK button.<br />
Otherwise, press the “Back” button or the “EXIT” button.<br />
19<br />
<strong>DT</strong>-<strong>X7</strong> <strong>CI</strong>