DT-X7 CI - Radix
DT-X7 CI - Radix
DT-X7 CI - Radix

Sie wollen auch ein ePaper? Erhöhen Sie die Reichweite Ihrer Titel.
YUMPU macht aus Druck-PDFs automatisch weboptimierte ePaper, die Google liebt.
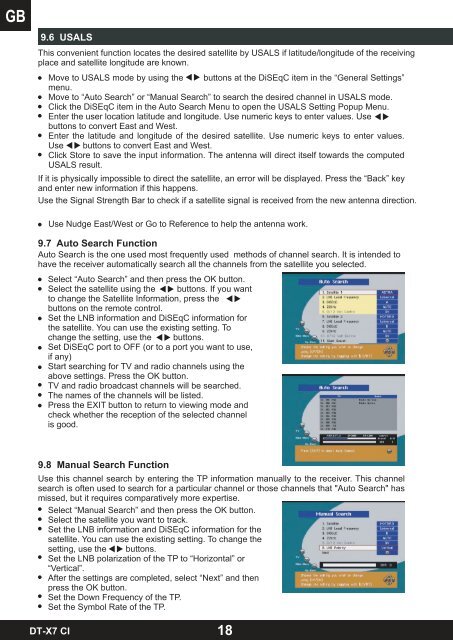
9.6 USALS<br />
This convenient function locates the desired satellite by USALS if latitude/longitude of the receiving<br />
place and satellite longitude are known.<br />
Move to USALS mode by using the buttons at the DiSEqC item in the “General Settings”<br />
menu.<br />
Move to “Auto Search” or “Manual Search” to search the desired channel in USALS mode.<br />
Click the DiSEqC item in the Auto Search Menu to open the USALS Setting Popup Menu.<br />
Enter the user location latitude and longitude. Use numeric keys to enter values. Use<br />
buttons to convert East and West.<br />
Enter the latitude and longitude of the desired satellite. Use numeric keys to enter values.<br />
Use buttons to convert East and West.<br />
Click Store to save the input information. The antenna will direct itself towards the computed<br />
USALS result.<br />
If it is physically impossible to direct the satellite, an error will be displayed. Press the “Back” key<br />
and enter new information if this happens.<br />
Use the Signal Strength Bar to check if a satellite signal is received from the new antenna direction.<br />
Use Nudge East/West or Go to Reference to help the antenna work.<br />
9.7 Auto Search Function<br />
Auto Search is the one used most frequently used methods of channel search. It is intended to<br />
have the receiver automatically search all the channels from the satellite you selected.<br />
Select “Auto Search” and then press the OK button.<br />
Select the satellite using the buttons. If you want<br />
to change the Satellite Information, press the<br />
buttons on the remote control.<br />
Set the LNB information and DiSEqC information for<br />
the satellite. You can use the existing setting. To<br />
change the setting, use the buttons.<br />
Set DiSEqC port to OFF (or to a port you want to use,<br />
if any)<br />
Start searching for TV and radio channels using the<br />
above settings. Press the OK button.<br />
TV and radio broadcast channels will be searched.<br />
The names of the channels will be listed.<br />
Press the EXIT button to return to viewing mode and<br />
check whether the reception of the selected channel<br />
is good.<br />
9.8 Manual Search Function<br />
Use this channel search by entering the TP information manually to the receiver. This channel<br />
search is often used to search for a particular channel or those channels that "Auto Search" has<br />
missed, but it requires comparatively more expertise.<br />
Select “Manual Search” and then press the OK button.<br />
Select the satellite you want to track.<br />
Set the LNB information and DiSEqC information for the<br />
satellite. You can use the existing setting. To change the<br />
setting, use the buttons.<br />
Set the LNB polarization of the TP to “Horizontal” or<br />
“Vertical”.<br />
After the settings are completed, select “Next” and then<br />
press the OK button.<br />
Set the Down Frequency of the TP.<br />
Set the Symbol Rate of the TP.<br />
1<br />
<strong>DT</strong>-<strong>X7</strong> <strong>CI</strong><br />
18