
Create successful ePaper yourself
Turn your PDF publications into a flip-book with our unique Google optimized e-Paper software.
ISO 9001 CERTIFIED www.liteputer.com.tw<br />
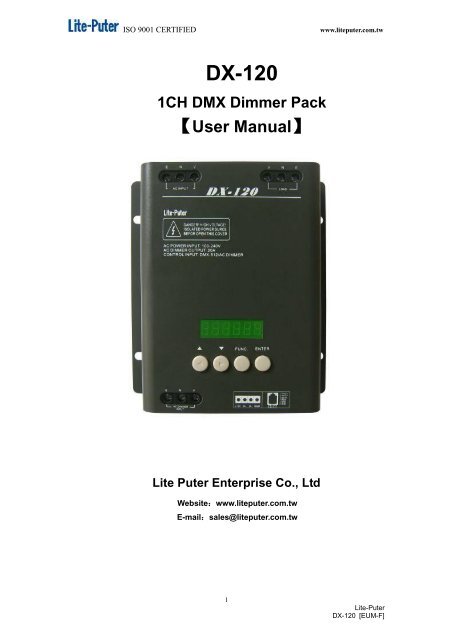
<strong>DX</strong>-<strong>120</strong><br />
1CH DMX Dimmer Pack<br />
【User Manual】<br />
<strong>Lite</strong> <strong>Puter</strong> Enterprise Co., Ltd<br />
Website:www.liteputer.com.tw<br />
E-mail:sales@liteputer.com.tw<br />
1<br />
<strong>Lite</strong>-<strong>Puter</strong><br />
<strong>DX</strong>-<strong>120</strong> [EUM-F]
ISO 9001 CERTIFIED www.liteputer.com.tw<br />
Index<br />
1 Introduction ................................................................................................... 3<br />
1-1 Feature ................................................................................................ 3<br />
1-2 Specification ........................................................................................ 3<br />
1-3 Dimension ........................................................................................... 3<br />
1-4 Operation Panel Introduction ............................................................... 4<br />
1-5 System Diagram .................................................................................. 5<br />
2 Operation ...................................................................................................... 6<br />
2-1 Standard DMX Signal .......................................................................... 6<br />
2-2 DMX Address Setting/Check ............................................................... 6<br />
2-3 ID NO. Setting ..................................................................................... 6<br />
2-4 Scene Setting ...................................................................................... 7<br />
2-5 Fade Time Setting ............................................................................... 8<br />
2-6 Zone and Start Channel ....................................................................... 9<br />
2-7 Channel Dimming/Switch Setting ...................................................... 10<br />
2-8 Receiving DMX signal ON/OFF ......................................................... 11<br />
2-9 Software Version Display ................................................................... 11<br />
2-10 Overload Protection ......................................................................... 12<br />
2-11 Memory Initialization ........................................................................ 12<br />
Limited Warranty ............................................................................................ 13<br />
2<br />
<strong>Lite</strong>-<strong>Puter</strong><br />
<strong>DX</strong>-<strong>120</strong> [EUM-F]
1 Introduction<br />
1-1 Feature<br />
ISO 9001 CERTIFIED www.liteputer.com.tw<br />
� Standard DMX-512 signal and AC dimmer signal.<br />
� Can be used as 1 channel dimmer pack. 1 output channel, max. 20A.<br />
� Build-in current detection and overload protection.<br />
� Can be connected to ECP series control panel.<br />
� Suitable to control the load over 40W (include).<br />
1-2 Specification<br />
� Power input: 100-240V AC<br />
� Output: Max. 20A for 1 channel<br />
� Protocol: DMX-512/RS485, AC dimmer signal<br />
� DMX signal connector: 4 PIN green terminal (5.0mm)<br />
6P6C phone jack (RJ11)<br />
� AC dimmer signal connector: 3 PIN terminal (10.0mm)<br />
� Dimension: 166(W)*185(H)*58(D)mm<br />
� Weight: 1.52 Kg<br />
� Fuse: PCB No.: OG15010A F1, F2 (Resettable fuse 0.1A, 60V)<br />
1-3 Dimension<br />
F3, F4 (Tube fuse 1A, 250V)<br />
3<br />
<strong>Lite</strong>-<strong>Puter</strong><br />
<strong>DX</strong>-<strong>120</strong> [EUM-F]
ISO 9001 CERTIFIED www.liteputer.com.tw<br />
1-4 Operation Panel Introduction<br />
Front Panel<br />
Rear Panel<br />
2 3 4 5<br />
6 7<br />
Back Panel 9 10<br />
8<br />
1<br />
1 LCD Screen 6 Load terminal<br />
2 ▲ Up button 7 Power input<br />
3 ▼ Down button 8 AC dimmer Terminal<br />
4 Function key 9,10<br />
5 Enter key<br />
4<br />
DMX signal input<br />
<strong>Lite</strong>-<strong>Puter</strong><br />
<strong>DX</strong>-<strong>120</strong> [EUM-F]
1-5 System Diagram<br />
Diagram 1:<br />
Diagram 2:<br />
ISO 9001 CERTIFIED www.liteputer.com.tw<br />
5<br />
<strong>Lite</strong>-<strong>Puter</strong><br />
<strong>DX</strong>-<strong>120</strong> [EUM-F]
2 Operation<br />
ISO 9001 CERTIFIED www.liteputer.com.tw<br />
2-1 Standard DMX Signal<br />
d. – 0 0 1<br />
2-2 DMX Address Setting/Check<br />
6<br />
When DMX-512 signal inputs, this dot<br />
will blink.<br />
The standard DMX console can output 512 channels, but <strong>DX</strong>-<strong>120</strong> must select 1<br />
channel from 512 channels to output.<br />
STEP-1 LED displays as below,<br />
0 0 – 0. 0 A<br />
Dimming value<br />
Press【ENTER】to check the current DMX address.<br />
STEP-2 Press【ENTER】and【▲】or【▼】 to modify the DMX address,<br />
For example, change the DMX address from 001 to 020.<br />
d – 0 0 1 d – 0 2 0<br />
2-3 ID NO. Setting<br />
Each E<strong>DX</strong> series device must have a ID NO.(default value is 001), when the device<br />
work alone, it doesn’t need a ID NO, when several devices work together, each one<br />
must have different ID NO.<br />
STEP-1 LED displays as below,<br />
0 0 – 0. 0 A<br />
Output<br />
current<br />
STEP-2 Press【FUNC】6 times and LED will display,<br />
I d – 0 0 1<br />
<strong>Lite</strong>-<strong>Puter</strong><br />
<strong>DX</strong>-<strong>120</strong> [EUM-F]
ISO 9001 CERTIFIED www.liteputer.com.tw<br />
STEP-3 Then press【ENTER】and LED will display,<br />
I d – 0 0 1<br />
STEP-4 Press【▲】or【▼】to adjust ID NO.(It can range from 001 to 255)<br />
STEP-5 Press【ENTER】to save.<br />
2-4 Scene Setting<br />
<strong>DX</strong>-<strong>120</strong> can set 6 scenes: SC1,SC2… SC6<br />
STEP-1 LED displays as below,<br />
0 0 – 0. 0 A<br />
STEP-2 Press【FUNC】and LED will display,<br />
- - S C - -<br />
STEP-3 Press【ENTER】to enter scene setting and LED will display,<br />
S C 1 – 2 0<br />
Scene No.<br />
STEP-4 Press【ENTER】again, the “20” will blink and LED will display,<br />
S C 1 – 2 0<br />
STEP-5 Press【▲】or【▼】to adjust the dimming value.<br />
For example: If modify the dimming value to 50%, LED will display,<br />
S C 1 – 5 0<br />
STEP-6 Press【ENTER】to save the setting to scene 1( The device will output the<br />
setting immediately.) and LED will display,<br />
S C 1 – 5 0<br />
Current Dimming value<br />
Blink<br />
Blink<br />
7<br />
Blink<br />
<strong>Lite</strong>-<strong>Puter</strong><br />
<strong>DX</strong>-<strong>120</strong> [EUM-F]
ISO 9001 CERTIFIED www.liteputer.com.tw<br />
STEP-7 Press【▲】or【▼】to choose the other scenes.<br />
For example: edit scene 6<br />
Press【▲】until LED displays:<br />
S C 6 – 0 0<br />
STEP-8 Repeat STEP-4 ~ STEP-6 to save dimming value to scene 6.<br />
After scene setting, users can use ECP series control panels to recall the scenes.<br />
2-5 Fade Time Setting<br />
<strong>DX</strong>-<strong>120</strong> can set the SC1~SC6 each scene’s FADE time.<br />
STEP-1 LED displays as below,<br />
0 0 – 0. 0 A<br />
STEP-2 Press【FUNC】twice and LED will display,<br />
- F A d E -<br />
STEP-3 Press【ENTER】 to enter Fade time setting and LED will display,<br />
F d 1 – 0. 4<br />
Scene No.<br />
STEP-4 Press【ENTER】 again to set SC 1’s fade time, now “0.4” will blink and<br />
LED will display,<br />
F d 1 – 0. 4<br />
STEP-5 Press【▲】or【▼】to modify fade time.<br />
For example: modify fade time to 5 seconds and LED will display,<br />
F d 1 – 0 5<br />
Fade time:<br />
0.4 seconds.<br />
Blink<br />
Blink<br />
STEP-6 Press【ENTER】to save the SC1’s FADE time and LED will display,<br />
8<br />
<strong>Lite</strong>-<strong>Puter</strong><br />
<strong>DX</strong>-<strong>120</strong> [EUM-F]
ISO 9001 CERTIFIED www.liteputer.com.tw<br />
STEP-7 Press 【▲】or【▼】to select SC 1 to SC 6 and OFF scene.<br />
For example, set OFF scene’s fade time.<br />
Press 【▲】or【▼】until LED displays as below,<br />
STEP-8 Repeat STEP-4 ~ STEP-6 to finish OFF scene’s fade time setting.<br />
FADE time comparison<br />
0. 1 0.2 0.3 0.4------------0.8 0.9<br />
It means:0.1 second 0.2 second 0.3 second 0.4 second ---0.8 second 0.9 second<br />
0 1 02 03 04--------------58 59<br />
It means:1 second 2 seconds3 seconds 4 seconds ------ 58 seconds 59 seconds<br />
0 1. 02. 03. 04.--------------58. 59.<br />
It means:1 minute 2 minutes 3 minutes 4 minutes ------ 98 minutes 99 minutes<br />
Notice:the maximal value is 99 minutes.<br />
2-6 Zone and Start Channel<br />
Notice<br />
F d 1 – 0 5<br />
F d 0 – 0 .1<br />
1.<strong>DX</strong>-<strong>120</strong> can set 99 zones. (01~99 zones).<br />
2.When Zone set as 00, control panel set as any zone can recall the scenes.<br />
STEP-1 LED displays as below,<br />
0 0 – 0. 0 A<br />
STEP-2 Press【FUNC】three times and LED will display,<br />
0 0 - 0 0 1<br />
Zone No.<br />
STEP-3 Press【ENTER】to enter zone setting and LED will display,<br />
0 0 - 0 0 1<br />
Blink<br />
9<br />
Start channel address<br />
<strong>Lite</strong>-<strong>Puter</strong><br />
<strong>DX</strong>-<strong>120</strong> [EUM-F]
ISO 9001 CERTIFIED www.liteputer.com.tw<br />
STEP-4 Press【▲】or【▼】to modify the zone no..<br />
For example, Modify zone no.to 02 and LED will display,<br />
STEP-5 Press【ENTER】to save the setting and LED will display,<br />
STEP-6 Press【▲】and【▼】 to modify the start channel address.<br />
For example, modify the start channel address to 100 and LED will display,<br />
STEP-7 Press【ENTER】to save the setting and LED will display,<br />
The start channel can choose from channel 001 to 255.<br />
2-7 Channel Dimming/Switch Setting<br />
STEP-1 LED displays as below,<br />
STEP-2 Press【FUNC】4 times and LED will display,<br />
STEP-3 Then【ENTER】and LED will display,<br />
STEP-4 Press【▲】or【▼】to set the channel as a dimming (d) or switching (s)<br />
channel.<br />
0 2 - 0 0 1<br />
0 2 - 0 0 1<br />
0 2 – 1 0 0<br />
0 2 – 1 0 0<br />
0 0 – 0. 0 A<br />
A L = d<br />
Blink<br />
Blink<br />
A L = d Blink<br />
10<br />
Default setting: set as dimming channel,<br />
D stands for dimming.<br />
<strong>Lite</strong>-<strong>Puter</strong><br />
<strong>DX</strong>-<strong>120</strong> [EUM-F]
ISO 9001 CERTIFIED www.liteputer.com.tw<br />
STEP-5 Press【ENTER】to save.<br />
2-8 Receiving DMX signal ON/OFF<br />
STEP-1 LED displays as below,<br />
STEP-2 Press【FUNC】5 times and LED will display,<br />
STEP-3 Then【ENTER】and LED will display,<br />
or<br />
11<br />
(Dimming)<br />
(Switching)<br />
STEP-4 Press【▲】or【▼】to select receiving DMX signal (OF) or not receiving DMX<br />
signal (ON).<br />
A L = d<br />
A L = S<br />
0 0 – 0. 0 A<br />
d – P A S S<br />
d – O F<br />
d – O n<br />
STEP-5 Press【ENTER】to save.<br />
2-9 Software Version Display<br />
STEP-1 LED displays as below,<br />
0 0 – 0. 0 A<br />
STEP-2 Press【FUNC】7 times and LED will display,<br />
Display current software version<br />
U – 1.5<br />
Blink<br />
Blink<br />
<strong>Lite</strong>-<strong>Puter</strong><br />
<strong>DX</strong>-<strong>120</strong> [EUM-F]
ISO 9001 CERTIFIED www.liteputer.com.tw<br />
2-10 Overload Protection<br />
If the total current is between 22A-35A, the device will limit output to 20A.<br />
The LED will display as below,<br />
F L – 2 0 A<br />
FL stands for the dimming value and it can be any value. Because of the different fixture,<br />
in some condition when the dimming value is 50%, the total current will be 15A but when<br />
the dimming value is 20% , the total current can be 25A.<br />
If the total current is over 35A, the device will switch off automatically.<br />
For example, when the total current is 37A, the LED will display as below.<br />
O. F. F. 3 7 A<br />
2-11 Memory Initialization<br />
Press【FUNC】and【ENTER】at the same time to initialize the device after turning off<br />
the device. Then turn the device on and LED will display,<br />
I n I t - -<br />
12<br />
Current load value<br />
<strong>Lite</strong>-<strong>Puter</strong><br />
<strong>DX</strong>-<strong>120</strong> [EUM-F]
ISO 9001 CERTIFIED www.liteputer.com.tw<br />
Limited Warranty<br />
1. <strong>Lite</strong>-<strong>Puter</strong> is only responsible for the product itself.<br />
2. <strong>Lite</strong>-<strong>Puter</strong> guarantees to keep <strong>Lite</strong>-<strong>Puter</strong>’s from manufacturing defects<br />
within a year since the distributing date.<br />
3. <strong>Lite</strong>-<strong>Puter</strong> does not offer on-site service. If the defects appears<br />
In <strong>Lite</strong>-<strong>Puter</strong>’s product, please deliver the product to local distributors or to<br />
Taipei headquarters.<br />
4. The warranty does not cover:<br />
a. Any fault caused by false usage, imprudence (collision, inadequate<br />
installation or adjustment, insufficient ventilation, or improper repairs)<br />
b. Force majeure factors (flooding, earthquake, thunder,volcanic eruption,<br />
tsunami or other factors beyond <strong>Lite</strong>-<strong>Puter</strong> control).<br />
c. The cost of installing, reinstalling, adjusting, repairing, or reprogramming<br />
the product.<br />
d. Other products or devices which are offered by <strong>Lite</strong>-<strong>Puter</strong> or not by<br />
<strong>Lite</strong>-<strong>Puter</strong>.<br />
5. <strong>Lite</strong>-<strong>Puter</strong> does not warrant the product will operate without interruption or<br />
being free of error.<br />
Revision Record<br />
Version Record<br />
A First version<br />
B Change silk print on the front panel and add<br />
load usage explanation<br />
C Typing error<br />
D Add 2-1,2-3,2-7,2-8,2-9 function<br />
E Add 2-11 function<br />
F Change 1-2<br />
Issued on: May, 2011<br />
13<br />
<strong>Lite</strong>-<strong>Puter</strong><br />
<strong>DX</strong>-<strong>120</strong> [EUM-F]
World Headquarter:<br />
<strong>Lite</strong> <strong>Puter</strong> Enterprise Co., Ltd.<br />
ISO 9001 CERTIFIED www.liteputer.com.tw<br />
Address: 11F, No. 189, Gangqian Rd., Neihu Dist., Taipei City, Taiwan<br />
Zip Code: 11494<br />
Tel: +886-2-27998099<br />
Fax: +886-2-27993828<br />
Website: www.liteputer.com.tw<br />
E-mail: sales@liteputer.com.tw<br />
Shanghai Factory:<br />
<strong>Lite</strong>-<strong>Puter</strong> Technology (Shanghai) Co., Ltd.<br />
Address: Building B5, No. 298, Lane 3509, Hongmei S. Road, Shanghai, China<br />
Zip Code: 201108<br />
Tel: +86-21-54408210<br />
Fax: +86-21-64978079<br />
Shanghai Sales Center:<br />
Address: Room 701, Building Gem, No. 487, Tianlin Road, Shanghai, China<br />
Zip Code: 201103<br />
Tel: +86-21-33674316/33674850<br />
Fax: +86-21-33674013<br />
Website: www.liteputer.com.cn<br />
E-mail: sales_china@liteputer.com.tw<br />
14<br />
<strong>Lite</strong>-<strong>Puter</strong><br />
<strong>DX</strong>-<strong>120</strong> [EUM-F]
![DX-404 4 CH DMX Dimmer Pack [User Manual] Lite Puter ...](https://img.yumpu.com/10320220/1/184x260/dx-404-4-ch-dmx-dimmer-pack-user-manual-lite-puter-.jpg?quality=85)
![DX-401A/DX-402A 4 CH DMX Dimmer Pack [User Manual] - Lite-Puter](https://img.yumpu.com/10320041/1/184x260/dx-401a-dx-402a-4-ch-dmx-dimmer-pack-user-manual-lite-puter.jpg?quality=85)