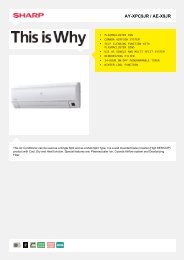
LC-46/52HD1E Operation-Manual GB - Sharp
LC-46/52HD1E Operation-Manual GB - Sharp
LC-46/52HD1E Operation-Manual GB - Sharp

Create successful ePaper yourself
Turn your PDF publications into a flip-book with our unique Google optimized e-Paper software.
10<br />
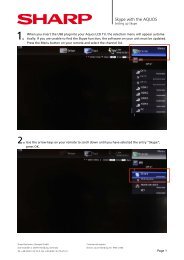
Initial installation<br />
Initial installation wizard<br />
When the TV powers on for the first time after<br />
purchase, the initial auto installation wizard appears.<br />
Follow the menus and make the necessary settings<br />
one after another.<br />
Initial installation -> Language<br />
Proceed<br />
NOTE<br />
• You can repeat this installation process by conducting the<br />
“Repeat initial installation” command. Press INFO, the<br />
option is located in the third line from the top.<br />
Buttons to be used:<br />
a/b/c/d:<br />
Move the cursor and select the settings.<br />
OK:<br />
Press to confirm and proceed to the next step.<br />
YELLOW:<br />
In some screens you can select or deselect<br />
items with YELLOW. When an item is selected,<br />
it is marked with ✔.<br />
Initial installation -> Connect antenna cable(s)<br />
Antenna cable(s) for:<br />
to antenna socket(s):<br />
Antenna/cable (analogue)<br />
DVB-T<br />
DVB-C<br />
DVB-S (cable 1)<br />
DVB-S (cable 2)<br />
BACK:<br />
Press to go back one step.<br />
END:<br />
If this icon is visible, you can exit the wizard.<br />
Table of setting options in initial installation<br />
wizard<br />
There are numerous settings in the initial installation<br />
wizard. When in doubt, refer to the table below so you<br />
don’t get overwhelmed.<br />
Items Explanation<br />
Language Select the language.<br />
Connect<br />
antenna<br />
cable(s)<br />
Antenna DVB-T<br />
Antenna/cable (analogue): analogue stations<br />
via cable/antenna<br />
DVB-T: digital, terrestrial stations<br />
DVB-C: digital stations via cable<br />
DVB-S (cable 1): digital stations via satellite<br />
DVB-S (cable 2): digital stations via satellite<br />
If you are using an active antenna, then select<br />
yes (5V) for the antenna power supply.<br />
Antenna<br />
DVB-C<br />
Antenna<br />
DVB-S<br />
Items Explanation<br />
High band<br />
LNB<br />
frequencies<br />
Low Band/High<br />
Band<br />
Symbol rates<br />
Favoured signal<br />
source<br />
Start search<br />
Connecting<br />
additional<br />
devices<br />
Room antenna<br />
Active antenna<br />
Unidirectional<br />
antenna<br />
The conventional settings will be derived from<br />
the selection of set location. Only change this<br />
if you know other symbol rates and modulation<br />
types or if you have to specify the network ID for<br />
your cable network (information available from<br />
your cable network provider). If you want to run<br />
the station search independently of the channel<br />
grid, select frequency search for the search<br />
method.<br />
Select which satellite(s) you receive from a list.<br />
For more than one satellite, select the type of<br />
your changeover switch or communal satellite<br />
system additionally. Ask your dealer in this<br />
regard.<br />
Specify here whether the high band of the<br />
selected satellite is to be searched in addition to<br />
the low band.<br />
Normally, you do not need to change the values<br />
for high and low band, unless the LNC (LNB) of<br />
your satellite system uses a different oscillator<br />
frequency (important for the frequency display).<br />
After you have made these settings, you should<br />
receive the picture and sound of the selected<br />
satellites (only with Astra1 and HOTBIRD).<br />
The symbol rates are specified by the satellite<br />
provider and do not normally need to be<br />
changed.<br />
Select the signal source from a list, the station<br />
of which is to be at the top of your station list<br />
(starting with station slot 1).<br />
• If you want to use the AV Link function with an<br />
externally connected recorder, the analogue<br />
stations have to be between station slot 1 and<br />
99.<br />
Start the automatic station search with OK. First<br />
TV stations, then radio stations are searched<br />
for. The stations found in the automatic search<br />
are divided into the appropriate station blocks<br />
depending on the previously selected antenna<br />
cables (signal sources). Subsequently the<br />
stations can only be re-sorted within these<br />
blocks. At the beginning of the station list<br />
you will find the block with the stations of the<br />
preferred signal source.<br />
Any mixed sorting of stations from different<br />
signal sources is only possible with the<br />
favourites list.<br />
In conclusion the connection wizard will start;<br />
with their help you can register and set your<br />
video devices or decoders, and connect them to<br />
the TV set. DVD players and DVD recorders are<br />
already registered at the factory.<br />
You can start the connection wizard manually<br />
later and add new devices. Further information<br />
is available on page 15 (Connection wizard) and<br />
page 22 (Speaker/amplifier connection).<br />
With good reception conditions a room antenna<br />
can be used for DVB-T (socket ANT2).<br />
Under less favorable reception conditions, it is<br />
advisable to use an active antenna which has to<br />
be set accordingly in the initial installation or in<br />
the “TV Menu > Connections > Antenna DVB ><br />
Antenna DVB-T”. (See “Antenna DVB-T” on this<br />
page).<br />
If the location is outside of the normal<br />
transmission range then a directional antenna<br />
can be used to improve reception quality.