LC-46/52HD1E Operation-Manual GB - Sharp
LC-46/52HD1E Operation-Manual GB - Sharp
LC-46/52HD1E Operation-Manual GB - Sharp

You also want an ePaper? Increase the reach of your titles
YUMPU automatically turns print PDFs into web optimized ePapers that Google loves.
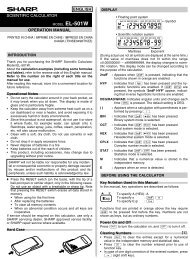
24<br />
Other features<br />
Using PhotoViewer<br />
This TV is equipped with PhotoViewer, allowing you to<br />
view pictures in the standard JPEG format via a USB<br />
stick or a memory card in a card reader. In addition you<br />
can arrange the pictures into a Slideshow.<br />
E Connecting<br />
Insert a card reader (with a USB cable) or a USB stick<br />
into the USB terminal on the TV (see page 6). Should<br />
you find it difficult to connect a USB cable due to the<br />
TV installation pattern (e.g., wall-mounting), use a USB<br />
extension cable (commercially available.)<br />
NOTE<br />
• Depending on the model of a card reader or USB stick, the<br />
TV may not be able to recognise the contained data.<br />
• Use only alphanumeric characters for naming a Photo<br />
Viewer file.<br />
• Do not disconnect a USB stick from the TV while<br />
transferring pictures, using Slide Show, or when a menu<br />
screen is switching to another.<br />
• Do not connect and disconnect a USB stick from the TV<br />
repeatedly.<br />
Starting PhotoViewer<br />
PhotoViewer starts automatically when a memory card<br />
or USB device with the appropriate data is connected.<br />
The first page of the Photo Overview will be shown.<br />
NOTE<br />
• You cannot display image data in progressive JPEG format.<br />
A memory card or USB device should contain data in the<br />
standard JPEG format.<br />
If a memory device is already inserted and if it is<br />
not detected automatically start PhotoViwer as<br />
follows:<br />
1<br />
2<br />
3<br />
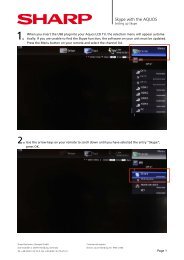
Press MENU and the TV menu screen displays.<br />
Press c/d to select “Extended functions”, and<br />
then press b to move down.<br />
Press a/b to select “PhotoViewer”, and then<br />
press OK.<br />
• If several memory cards are present in the card<br />
reader, a selection menu opens. Press c/d to select<br />
the desired memory card, and confirm with OK.<br />
• When a memory device is inserted, PhotoViewer<br />
may not start automatically. Please start PhotoViewer<br />
using steps 1-3 above.<br />
Exiting PhotoViewer<br />
Press END on the remote control to exit the<br />
PhotoViewer screen or remove the memory card<br />
or USB device.<br />
Watching photos<br />
EXAMPLE<br />
1<br />
2<br />
USB 1:\picture_024.jpg\<br />
View picture<br />
Mark picture<br />
Slide show<br />
scroll (1/3)<br />
38 pictures<br />
Press a/b/c/d to select the picture, press<br />
Pr/s if there are more pages.<br />
Press OK to display the picture in full frame.<br />
✔ Press J or Pr to move to the next image.<br />
✔ Press G or Ps to move to the previous image.<br />
✔ Press END to turn the photo information on/off.<br />
• If “Photo info” is set to “on”, extended information<br />
appears. (Page 25)<br />
✔ Press YELLOW to zoom in on the picture. Zooming<br />
in m2, m4, m8 and original size are possible. In the<br />
zoom mode you can move the picture around with<br />
a/b/c/d. To exit the zoom mode press OK or<br />
H.<br />
✔ Press c/d to rotate the image 90 degrees right/<br />
left. (You have to pause the Slideshow to rotate<br />
pictures.)<br />
✔ Press OK or H to return to the Photo overview<br />
screen.<br />
Opening picture folder<br />
If there is a picture folder within the memory<br />
device, press a/b/c/d to select the folder in<br />
the Photo Overview screen, and then press OK<br />
to open the folder.<br />
USB 1:\HD1PhotoViewer\<br />
Open folder Slide show<br />
scroll (1/3)<br />
• The pictures in the folder are displayed.<br />
38 pictures