

Horizon Memory Craft 12000 - Janome
Horizon Memory Craft 12000 - Janome
Horizon Memory Craft 12000 - Janome

You also want an ePaper? Increase the reach of your titles
YUMPU automatically turns print PDFs into web optimized ePapers that Google loves.
q<br />
w<br />
r<br />
t<br />
e<br />
79<br />
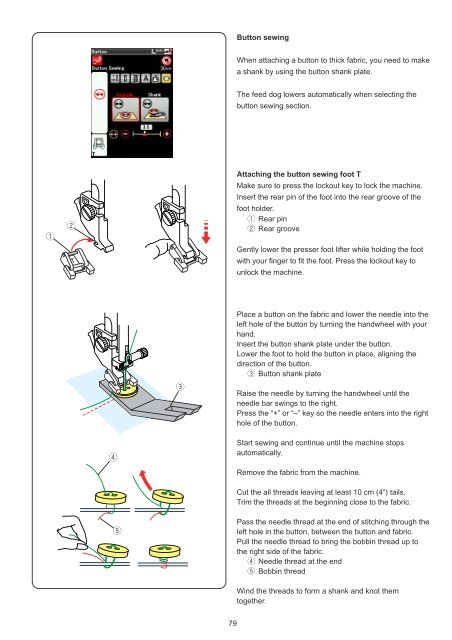
Button sewing<br />
When attaching a button to thick fabric, you need to make<br />
a shank by using the button shank plate.<br />
The feed dog lowers automatically when selecting the<br />
button sewing section.<br />
Attaching the button sewing foot T<br />
Make sure to press the lockout key to lock the machine.<br />
Insert the rear pin of the foot into the rear groove of the<br />
foot holder.<br />
q Rear pin<br />
w Rear groove<br />
Gently lower the presser foot lifter while holding the foot<br />
with your finger to fit the foot. Press the lockout key to<br />
unlock the machine.<br />
Place a button on the fabric and lower the needle into the<br />
left hole of the button by turning the handwheel with your<br />
hand.<br />
Insert the button shank plate under the button.<br />
Lower the foot to hold the button in place, aligning the<br />
direction of the button.<br />
e Button shank plate<br />
Raise the needle by turning the handwheel until the<br />
needle bar swings to the right.<br />
Press the “+” or “–” key so the needle enters into the right<br />
hole of the button.<br />
Start sewing and continue until the machine stops<br />
automatically.<br />
Remove the fabric from the machine.<br />
Cut the all threads leaving at least 10 cm (4”) tails.<br />
Trim the threads at the beginning close to the fabric.<br />
Pass the needle thread at the end of stitching through the<br />
left hole in the button, between the button and fabric.<br />
Pull the needle thread to bring the bobbin thread up to<br />
the right side of the fabric.<br />
r Needle thread at the end<br />
t Bobbin thread<br />
Wind the threads to form a shank and knot them<br />
together.


