¥ Endeavor (380) Manual - Lopi
¥ Endeavor (380) Manual - Lopi
¥ Endeavor (380) Manual - Lopi

You also want an ePaper? Increase the reach of your titles
YUMPU automatically turns print PDFs into web optimized ePapers that Google loves.
OPERATING YOUR APPLIANCE (CONTINUED) PAGE 21<br />
A WORD ABOUT WOOD<br />
This appliance is designed to burn natural cord wood with high efficiencies and low emissions. With<br />
properly dried wood, you will fully realize the heating and clean-burning potential of our hightechnology<br />
appliance. With poor wood, this high-technology appliance will become much less efficient<br />
and produce more emissions. Read on to find out more about the type of fuel you should use.<br />
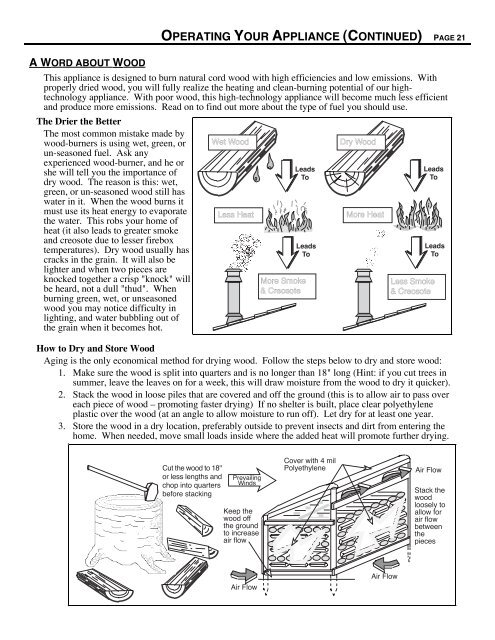
The Drier the Better<br />
The most common mistake made by<br />
wood-burners is using wet, green, or<br />
un-seasoned fuel. Ask any<br />
experienced wood-burner, and he or<br />
she will tell you the importance of<br />
dry wood. The reason is this: wet,<br />
green, or un-seasoned wood still has<br />
water in it. When the wood burns it<br />
must use its heat energy to evaporate<br />
the water. This robs your home of<br />
heat (it also leads to greater smoke<br />
and creosote due to lesser firebox<br />
temperatures). Dry wood usually has<br />
cracks in the grain. It will also be<br />
lighter and when two pieces are<br />
knocked together a crisp "knock" will<br />
be heard, not a dull "thud". When<br />
burning green, wet, or unseasoned<br />
wood you may notice difficulty in<br />
lighting, and water bubbling out of<br />
the grain when it becomes hot.<br />
Wet Wood<br />
Less Heat<br />
Leads<br />
To<br />
More Smoke<br />
& Creosote<br />
Leads<br />
To<br />
Dry Wood<br />
More Heat<br />
Leads<br />
To<br />
Leads<br />
To<br />
Less Smoke<br />
& Creosote<br />
How to Dry and Store Wood<br />
Aging is the only economical method for drying wood. Follow the steps below to dry and store wood:<br />
1. Make sure the wood is split into quarters and is no longer than 18" long (Hint: if you cut trees in<br />
summer, leave the leaves on for a week, this will draw moisture from the wood to dry it quicker).<br />
2. Stack the wood in loose piles that are covered and off the ground (this is to allow air to pass over<br />
each piece of wood Ð promoting faster drying) If no shelter is built, place clear polyethylene<br />
plastic over the wood (at an angle to allow moisture to run off). Let dry for at least one year.<br />
3. Store the wood in a dry location, preferably outside to prevent insects and dirt from entering the<br />
home. When needed, move small loads inside where the added heat will promote further drying.<br />
Cut the wood to 18"<br />
or less lengths and<br />
chop into quarters<br />
before stacking<br />
Prevailing<br />
Winds<br />
Keep the<br />
wood off<br />
the ground<br />
to increase<br />
air flow<br />
Air Flow<br />
Cover with 4 mil<br />
Polyethylene Air Flow<br />
Air Flow<br />
Stack the<br />
wood<br />
loosely to<br />
allow for<br />
air flow<br />
between<br />
the<br />
pieces