¥ Endeavor (380) Manual - Lopi
¥ Endeavor (380) Manual - Lopi
¥ Endeavor (380) Manual - Lopi

Create successful ePaper yourself
Turn your PDF publications into a flip-book with our unique Google optimized e-Paper software.
OPTIONAL EQUIPMENT PAGE 33<br />
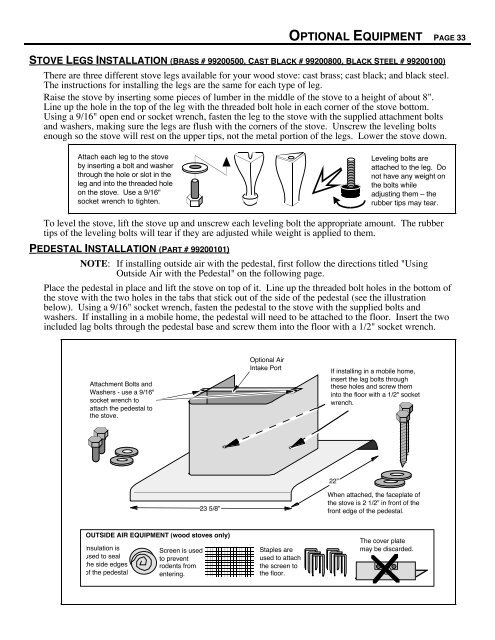
STOVE LEGS INSTALLATION (BRASS # 99200500, CAST BLACK # 99200800, BLACK STEEL # 99200100)<br />
There are three different stove legs available for your wood stove: cast brass; cast black; and black steel.<br />
The instructions for installing the legs are the same for each type of leg.<br />
Raise the stove by inserting some pieces of lumber in the middle of the stove to a height of about 8".<br />
Line up the hole in the top of the leg with the threaded bolt hole in each corner of the stove bottom.<br />
Using a 9/16" open end or socket wrench, fasten the leg to the stove with the supplied attachment bolts<br />
and washers, making sure the legs are flush with the corners of the stove. Unscrew the leveling bolts<br />
enough so the stove will rest on the upper tips, not the metal portion of the legs. Lower the stove down.<br />
Attach each leg to the stove<br />
by inserting a bolt and washer<br />
through the hole or slot in the<br />
leg and into the threaded hole<br />
on the stove. Use a 9/16"<br />
socket wrench to tighten.<br />
Leveling bolts are<br />
attached to the leg. Do<br />
not have any weight on<br />
the bolts while<br />
adjusting them Ð the<br />
rubber tips may tear.<br />
To level the stove, lift the stove up and unscrew each leveling bolt the appropriate amount. The rubber<br />
tips of the leveling bolts will tear if they are adjusted while weight is applied to them.<br />
PEDESTAL INSTALLATION (PART # 99200101)<br />
NOTE: If installing outside air with the pedestal, first follow the directions titled "Using<br />
Outside Air with the Pedestal" on the following page.<br />
Place the pedestal in place and lift the stove on top of it. Line up the threaded bolt holes in the bottom of<br />
the stove with the two holes in the tabs that stick out of the side of the pedestal (see the illustration<br />
below). Using a 9/16" socket wrench, fasten the pedestal to the stove with the supplied bolts and<br />
washers. If installing in a mobile home, the pedestal will need to be attached to the floor. Insert the two<br />
included lag bolts through the pedestal base and screw them into the floor with a 1/2" socket wrench.<br />
Attachment Bolts and<br />
Washers - use a 9/16"<br />
socket wrench to<br />
attach the pedestal to<br />
the stove.<br />
23 5/8Ó<br />
OUTSIDE AIR EQUIPMENT (wood stoves only)<br />
Insulation is<br />
used to seal<br />
the side edges<br />
of the pedestal<br />
.<br />
Screen is used<br />
to prevent<br />
rodents from<br />
entering.<br />
Optional Air<br />
Intake Port<br />
Staples are<br />
used to attach<br />
the screen to<br />
the floor.<br />
If installing in a mobile home,<br />
insert the lag bolts through<br />
these holes and screw them<br />
into the floor with a 1/2" socket<br />
wrench.<br />
22Ó<br />
When attached, the faceplate of<br />
the stove is 2 1/2Ó in front of the<br />
front edge of the pedestal.<br />
The cover plate<br />
may be discarded.