2913 Quilt it With Ruffles Sue Hausmann and ... - Husqvarna Viking
2913 Quilt it With Ruffles Sue Hausmann and ... - Husqvarna Viking
2913 Quilt it With Ruffles Sue Hausmann and ... - Husqvarna Viking

Create successful ePaper yourself
Turn your PDF publications into a flip-book with our unique Google optimized e-Paper software.
Cut:<br />
For a baby size quilt:<br />
Cut two pieces 8” x width of fabric from each of fi ve<br />
different prints.<br />
Cut fi ve pieces of Warm <strong>and</strong> Natural Batting 8” x 44”<br />
Nine 2” x width of fabric strips for ruffl e<br />
Make The Ruffl es:<br />
1. Thread w<strong>it</strong>h sewing thread top <strong>and</strong> bobbin.<br />
2. St<strong>it</strong>ch the 2” x width of fabric pieces right sides<br />
together, end to end to create one long strip.<br />
3. Fold in half lengthwise, wrong sides together<br />
<strong>and</strong> press.<br />
4. Snap on your Edge St<strong>it</strong>ching Foot. Select right<br />
needle pos<strong>it</strong>ion straight st<strong>it</strong>ch. St<strong>it</strong>ch the raw<br />
edges together aligning the edges w<strong>it</strong>h the fl ange<br />
on the foot. This will keep the raw edges from<br />
shifting as they go through the ruffl er.<br />
5. Attach your ruffl er.<br />
6. Adjust your ruffl er so that 10” ruffl es down to<br />
5”. We used the 6 setting.<br />
7. Ruffl e the long strip.<br />
Make the <strong>Quilt</strong>:<br />
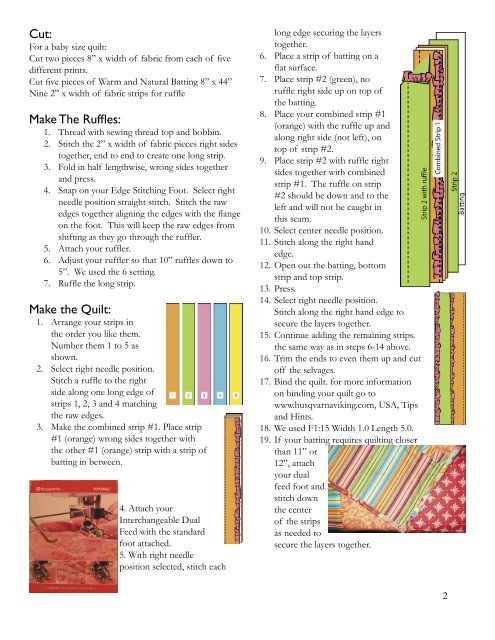
1. Arrange your strips in<br />
the order you like them.<br />
Number them 1 to 5 as<br />
shown.<br />
2. Select right needle pos<strong>it</strong>ion.<br />
St<strong>it</strong>ch a ruffl e to the right<br />
side along one long edge of<br />
strips 1, 2, 3 <strong>and</strong> 4 matching<br />
the raw edges.<br />
3. Make the combined strip #1. Place strip<br />
#1 (orange) wrong sides together w<strong>it</strong>h<br />
the other #1 (orange) strip w<strong>it</strong>h a strip of<br />
batting in between.<br />
4. Attach your<br />
Interchangeable Dual<br />
Feed w<strong>it</strong>h the st<strong>and</strong>ard<br />
foot attached.<br />
5. W<strong>it</strong>h right needle<br />
pos<strong>it</strong>ion selected, st<strong>it</strong>ch each<br />
long edge securing the layers<br />
together.<br />
6. Place a strip of batting on a<br />
fl at surface.<br />
7. Place strip #2 (green), no<br />
ruffl e right side up on top of<br />
the batting.<br />
8. Place your combined strip #1<br />
(orange) w<strong>it</strong>h the ruffl e up <strong>and</strong><br />
along right side (not left), on<br />
top of strip #2.<br />
9. Place strip #2 w<strong>it</strong>h ruffl e right<br />
sides together w<strong>it</strong>h combined<br />
strip #1. The ruffl e on strip<br />
#2 should be down <strong>and</strong> to the<br />
left <strong>and</strong> will not be caught in<br />
this seam.<br />
10. Select center needle pos<strong>it</strong>ion.<br />
11. St<strong>it</strong>ch along the right h<strong>and</strong><br />
edge.<br />
12. Open out the batting, bottom<br />
strip <strong>and</strong> top strip.<br />
13. Press.<br />
14. Select right needle pos<strong>it</strong>ion.<br />
St<strong>it</strong>ch along the right h<strong>and</strong> edge to<br />
secure the layers together.<br />
15. Continue adding the remaining strips.<br />
the same way as in steps 6-14 above.<br />
16. Trim the ends to even them up <strong>and</strong> cut<br />
off the selvages.<br />
17. Bind the quilt. for more information<br />
on binding your quilt go to<br />
www.husqvarnaviking.com, USA, Tips<br />
<strong>and</strong> Hints.<br />
18. We used F1:15 Width 1.0 Length 5.0.<br />
19. If your batting requires quilting closer<br />
than 11” or<br />
12”, attach<br />
your dual<br />
feed foot <strong>and</strong><br />
st<strong>it</strong>ch down<br />
the center<br />
of the strips<br />
as needed to<br />
secure the layers together.<br />
2
![[pdf] husqvarna viking sewing machine stitch comparison chart](https://img.yumpu.com/11869478/1/190x146/pdf-husqvarna-viking-sewing-machine-stitch-comparison-chart.jpg?quality=85)