2413 Terrific Free Motion Trapunto - Husqvarna Viking
2413 Terrific Free Motion Trapunto - Husqvarna Viking
2413 Terrific Free Motion Trapunto - Husqvarna Viking

Create successful ePaper yourself
Turn your PDF publications into a flip-book with our unique Google optimized e-Paper software.
<strong>2413</strong> Terrifi c <strong>Free</strong><br />
<strong>Motion</strong> <strong>Trapunto</strong><br />
with Carol Ingram<br />
Carol Ingram, Designer, author and teacher from<br />
Sulky of America joined Sue with free motion<br />
quilting ideas. She showed a black and white quilt<br />
with 520 half square triangles called Girlfriend<br />
Half Square Triumph. The Inspira Fashion Hat<br />
Embroidery Designs were stitched on the block.<br />
Carol had several girlfriends help her piece the top,<br />
hence the name, Girlfriend Half Square Triumph.<br />
She used an angular stippling to match the art deco<br />
look. She tried both a black and white thread as<br />
well as a red/black combination to decide on what<br />
she liked.<br />
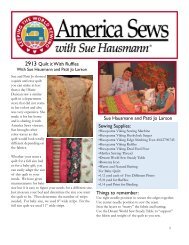
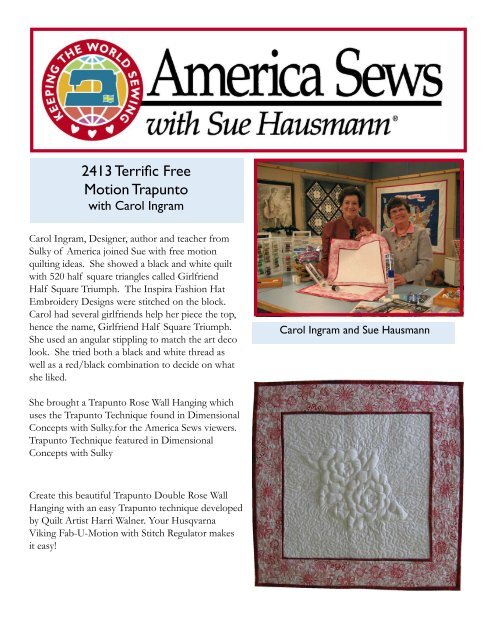
She brought a <strong>Trapunto</strong> Rose Wall Hanging which<br />
uses the <strong>Trapunto</strong> Technique found in Dimensional<br />
Concepts with Sulky.for the America Sews viewers.<br />
<strong>Trapunto</strong> Technique featured in Dimensional<br />
Concepts with Sulky<br />
Create this beautiful <strong>Trapunto</strong> Double Rose Wall<br />
Hanging with an easy <strong>Trapunto</strong> technique developed<br />
by Quilt Artist Harri Walner. Your <strong>Husqvarna</strong><br />
<strong>Viking</strong> Fab-U-<strong>Motion</strong> with Stitch Regulator makes<br />
it easy!<br />
Carol Ingram and Sue Hausmann
Finished size approximately 23” x 23”<br />
Sewing Supplies:<br />
•Pattern for Double Rose Design<br />
•16 1/2” x 16 1/2” square of white or off white<br />
cotton fabric for trapunto center<br />
•14” x 14” piece of high loft polyester batting for<br />
trapunto technique<br />
•16” x 16” piece of Sulky Soft and Sheer Stabilizer<br />
•23” x 23” square of Warm and Natural cotton<br />
batting<br />
•1/4 yd. bright solid color for framing strip<br />
(optional)<br />
•1/4 yd. print for borders<br />
•25” x 25” square of print fabric for backing<br />
•Topstitch Needle size 90<br />
•Wash-A-Way water soluble basting thread #644320<br />
•Clear invisible thread<br />
•Cotton or Rayon thread for free motion sewing<br />
•Sewing thread for construction<br />
•<strong>Husqvarna</strong> <strong>Viking</strong> Clear 1/4” Piecing Foot with<br />
Guide #412927445<br />
•<strong>Husqvarna</strong> <strong>Viking</strong> Left Edge Topstitch Foot<br />
#412 78 42-45<br />
•1/4” wide Steam-A-Seam 2 #140000195<br />
•Quick Easy Mitred Binding Tool #140002480<br />
1/4” seam allowances throughout<br />
1. Tape the two parts of the Double Rose<br />
pattern together.<br />
2. Place white or off white square on a light<br />
box or a window over the Double Rose<br />
pattern and trace the design onto the fabric<br />
with a fabric marking pen.<br />
3. Thread your <strong>Husqvarna</strong> <strong>Viking</strong> with sewing<br />
thread top and bobbin and set for sewing,<br />
straight stitch, stitch length 2.5.<br />
Optional Framing Strip:<br />
1. Carol framed the<br />
center square with<br />
a bright colored<br />
narrow strip to make<br />
it “pop”. Rotary cut<br />
two strips 1” wide<br />
across the 45” width of the fabric. Fold the<br />
strip wrong sides together and press.<br />
2. Snap on your 1/4” Piecing Foot with Guide<br />
and place the edges of the strip with the raw<br />
edge of the white square. Place all raw edges<br />
against the guide on the foot and straight<br />
stitch the narrow strip to all edges of the<br />
trapunto square. It’s easy to start by stitching<br />
the strip to the top edge, then the bottom<br />
edge, then both side edges.<br />
Borders:<br />
1. Rotary cut two strips 3 3/4” wide across<br />
the 45” width of the fabric. Snap on the<br />
¼” Piecing Foot with Guide and place the<br />
strips right sides together with the edges of<br />
the trapunto square. Straight stitch borders<br />
around the trapunto square with raw edges<br />
against the guide in the foot. It’s easy to start<br />
by stitching the borders to the top edge, then<br />
the bottom edge, then both side edges. Now<br />
your wall hanging top is fi nished. Except for<br />
the quilting.<br />
Quilt:<br />
1. Set up your <strong>Husqvarna</strong> <strong>Viking</strong> with the<br />
Fabric Mover with Stitch Regulator.<br />
Consult the instructions and/or the DVD<br />
that came with your <strong>Husqvarna</strong> <strong>Viking</strong><br />
Fabric Mover with Stitch Regulator for more<br />
information about set up. Set stitch length<br />
dial on the Stitch Regulator “brain” in the<br />
center—about 2.5 stitches per inch.<br />
2. Put in a 90 topstitch needle and thread with<br />
Wash-A-Way thread on top and invisible<br />
or bobbin thread in the bobbin. Set your<br />
<strong>Husqvarna</strong> <strong>Viking</strong> machine for free motion<br />
sewing, straight stitch.<br />
3. Place the high loft batting behind the traced<br />
design and put stabilizer underneath.<br />
4. Place the fabric sandwich onto the Fabric<br />
Mover surface. Be sure to lower the presser<br />
foot if it does not lower automatically on<br />
your <strong>Husqvarna</strong> <strong>Viking</strong> model to engage the<br />
top thread tension. Select needle stop down<br />
and place the needle down on the marked<br />
line of the outside of the rose design.<br />
5. Place your foot on the “foot switch” and
hold the switch down. Take 3-4 stitches in<br />
place then begin moving the Fabric Mover<br />
surface guiding the surface so you stitch<br />
all the way around the outside of the rose<br />
design. Do not stitch other lines of the<br />
design yet.<br />
Remember—you do not need to control the<br />
speed of the sewing; your Stitch Regulator<br />
does all the work for you. And you do not<br />
push the fabric as you sew, instead, simply<br />
move the Fabric Mover surface. There will<br />
be no stitching except in place until you<br />
move the Fabric Mover surface. When<br />
you reach the edge of the Fabric Mover<br />
opening, stop with the needle down, lift the<br />
fabric sandwich and move the Fabric Mover<br />
surface to the next area to be stitched.<br />
7. Remove the fabric from the Fabric Mover.<br />
Trim away the stabilizer and trim up to the<br />
stitching to trim away the high loft batting<br />
outside the rose design. Now the center<br />
rose design of your wall hanging will be<br />
very puffy for “easy trapunto”. This original<br />
stitching can be removed when the project is<br />
fi nished by spraying it with water.<br />
Batting and Backing:<br />
1. Re-thread with cotton sewing thread top<br />
and bobbin. Place the cotton batting square<br />
under the wall hanging top and stitch around<br />
the outside with a 3-step zigzag to stitch the<br />
edges together.<br />
2. The backing is cut 1” larger than the batting<br />
and top all the way around so that the edges<br />
can be folded to the front to create the ½”<br />
binding. Place the backing wrong side up and<br />
center the wall hanging top/batting on top<br />
and baste the layers with temporary spray<br />
adhesive or safety pins.<br />
Quilting:<br />
1. Thread with cotton or rayon thread top<br />
and bobbin. Place the wall hanging onto<br />
the Fabric Mover surface. Step on the “foot<br />
switch” and move the Fabric Mover surface.<br />
Begin by stitching free motion around the<br />
outside of the rose design stitching over your<br />
Wash-A-Way thread stitching then stitch<br />
over all the marked lines in the rose design to<br />
create the trapunto detail of the roses.<br />
2. Once the roses are quilted, move to the area<br />
around the roses and stipple stitch open<br />
swirling stitch designs up to the borders. If<br />
you stitched the optional framing stitch, do<br />
not catch this in the stippling. Continue<br />
stippling the borders<br />
Binding:<br />
1. Fold the raw edge of the backing toward<br />
the wall hanging top ½”. The raw edge of<br />
the backing should be against the edge of<br />
the top. For perfect mitred corners use the<br />
Mitred binding tool. Fold the backing over<br />
the edge of the top and pin or fuse in place<br />
with Steam a Seam fusible web strips.<br />
2. Snap on the Left Edge Topstitch foot And<br />
select a blanket stitch or buttonhole stitch<br />
and stitch the binding in place with the right<br />
side up. Enjoy!!<br />
Thanks to the underwriter:<br />
www.sulky.com
<strong>2413</strong> Quick Project<br />
Embroidered Towel Wrap<br />
with Alix Graham-Michel<br />
1. Alix Graham-Michel joined Sue and Carol<br />
with a fun quick project, a terry wrap. The<br />
featured the delightful Loralie Designs.<br />
Alix, of course, chose the “Sewphisticates”<br />
embroidery designs. She also had fabrics<br />
from the “On the Mend” collection for<br />
women recovering from cancer.<br />
2. Start with a towel or yardage that goes<br />
around you plus a 10” overlap. Find a<br />
coordinating fabric for the pocket.<br />
3. Extra fabric will be needed for ruffl e and top<br />
binding.<br />
4. Cut ruffl e strips 2 to 3 times the length of<br />
the wrap bottom edge and one side which is<br />
actually one side and bottom of the towel.<br />
Seam the strips end to end. Thread your<br />
Huskylock Serger with Sulky 30 wt. on both<br />
loopers and sewing thread in the needle. Set<br />
for Rolled Edge according to your Sewing<br />
Advisor ®. Stitch a rolled edge along one<br />
long edge of the ruffl e strips.<br />
5. Snap on your Gathering Foot. Adjust the<br />
stitch length to 6.0. Stitch along the un-<br />
Sue Hausmann, Carol Ingram<br />
and Alix Graham-Michel<br />
Sewing Supplies:<br />
•<strong>Husqvarna</strong> <strong>Viking</strong> Sewing/Embroidery Machine<br />
•<strong>Husqvarna</strong> <strong>Viking</strong> Huskylock Serger<br />
•Loralie Designs “Sewphisticates” Multiformat CD<br />
•Loralie Designs “On the Mend” Multiformat CD<br />
•Sulky 40 wt. Rayon Embroidery Thread<br />
•Loralie “On The Mend” Fabric<br />
•Bobbin Thread<br />
•Sulky Solvy Water Soluble Stabilizer<br />
•<strong>Husqvarna</strong> <strong>Viking</strong> Left Edge Topstitch Foot<br />
#412 78 42-45<br />
•<strong>Husqvarna</strong> <strong>Viking</strong> Clear Stitch In the Ditch Foot<br />
#412 92 74-46<br />
•<strong>Husqvarna</strong> <strong>Viking</strong> Gathering Foot #412 79 71-45<br />
•Purchased Towel<br />
•9” Zipper<br />
•Fasturn Tube Turner #140000001
hemmed edge of the ruffl e strips to gather.<br />
Set aside the ruffl ed strips.<br />
6. Embroider the design of your choice on the<br />
pocket fabric or cut a pocket from Loralie’s<br />
“On the Mend” fabric. Cut the pocket 9” x<br />
11” or desired size.<br />
7. Place a zipper face down along the top of<br />
the pocket and straight stitch the zipper tape<br />
to the pocket edge.<br />
8. On the top of the zipper, create a binding<br />
the length of the pocket and add a ruffl e.<br />
To create the binding, cut a strip 3” wide<br />
and as long as the top edge of the pocket.<br />
Press the strip wrong sides together. place<br />
a ruffl ed strip right sides together with the<br />
binding, matching the raw edtes and serge<br />
the ruffl e to the binding. Then place the<br />
“bound” ruffl e over the zipper edge. Fuse in<br />
place with Steam-A-Seam 2. Snap on your<br />
Clear Stitch in the Ditch foot and stitch the<br />
binding to the top of the zipper stitching in<br />
the ditch between the ruffl e and the binding.<br />
Snap on your Left Edge Topstitch Foot.<br />
Then place the pocket on the towel and<br />
stitch in place.<br />
9. Serge ruffl e along the sides and the bottom.<br />
Top Band and Ties:<br />
10. Cut a strip the width of the towel plus 15”<br />
long and 3” wide. Cut a second strip 15”<br />
long and 3” wide.<br />
11. Fold the long strip right sides together and<br />
stitch 15” along one long end and across the<br />
short end as shown. Fold the short strip<br />
right sides together and stitch one long edge<br />
and one short edge.<br />
15"<br />
12. Using your Fasturn Tube Turner, turn the<br />
short tube, and the stitched end of the long<br />
tube. The stitched portions are the ties.<br />
Press.<br />
13. Press the binding part of the strip wrong<br />
sides together. Place the binding band on<br />
the top of the towel right sides together,<br />
matching the raw edges of the band with the<br />
top edge of the towel wrap. Pin. Serge in<br />
place using your Huskylock Serger. Place the<br />
wrap around your body to determine where<br />
to place the other tie. Serge the raw end of<br />
the tie to fi nish, and stitch the tie in place<br />
with your sewing machine.
![[pdf] husqvarna viking sewing machine stitch comparison chart](https://img.yumpu.com/11869478/1/190x146/pdf-husqvarna-viking-sewing-machine-stitch-comparison-chart.jpg?quality=85)