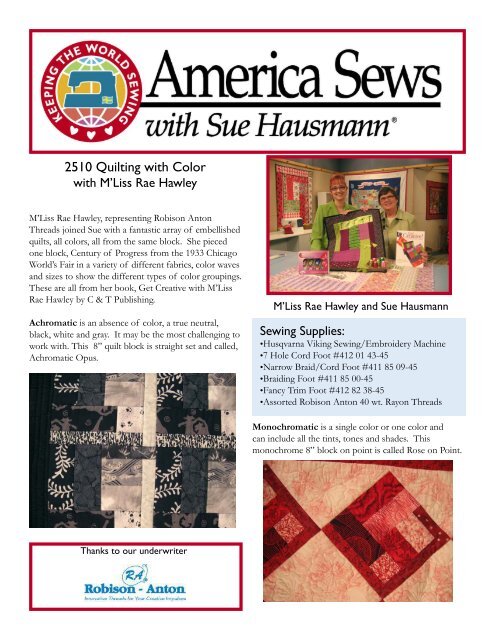
2510 Quilting with Color - Husqvarna Viking
2510 Quilting with Color - Husqvarna Viking
2510 Quilting with Color - Husqvarna Viking

You also want an ePaper? Increase the reach of your titles
YUMPU automatically turns print PDFs into web optimized ePapers that Google loves.
<strong>2510</strong> <strong>Quilting</strong> <strong>with</strong> <strong>Color</strong><br />
<strong>with</strong> M’Liss Rae Hawley<br />
M’Liss Rae Hawley, representing Robison Anton<br />
Threads joined Sue <strong>with</strong> a fantastic array of embellished<br />
quilts, all colors, all from the same block. She pieced<br />
one block, Century of Progress from the 1933 Chicago<br />
World’s Fair in a variety of different fabrics, color waves<br />
and sizes to show the different types of color groupings.<br />
These are all from her book, Get Creative <strong>with</strong> M’Liss<br />
Rae Hawley by C & T Publishing.<br />
Achromatic is an absence of color, a true neutral,<br />
black, white and gray. It may be the most challenging to<br />
work <strong>with</strong>. This 8” quilt block is straight set and called,<br />
Achromatic Opus.<br />
Thanks to our underwriter<br />
M’Liss Rae Hawley and Sue Hausmann<br />
Sewing Supplies:<br />
•<strong>Husqvarna</strong> <strong>Viking</strong> Sewing/Embroidery Machine<br />
•7 Hole Cord Foot #412 01 43-45<br />
•Narrow Braid/Cord Foot #411 85 09-45<br />
•Braiding Foot #411 85 00-45<br />
•Fancy Trim Foot #412 82 38-45<br />
•Assorted Robison Anton 40 wt. Rayon Threads<br />
Monochromatic is a single color or one color and<br />
can include all the tints, tones and shades. This<br />
monochrome 8” block on point is called Rose on Point.
Complementary colors are directly across from each<br />
other on the color wheel. It often is referred to as<br />
“opposites attract”. This wall hanging is one block <strong>with</strong><br />
the block size enlarted <strong>with</strong> a 2 x 3 ratio equaling 16” x<br />
24”. This re-sizing gave the opportunity to embellish. It<br />
is called, Interlude in Chartreuse and Red Violet.<br />
1<br />
6<br />
2<br />
This quilt was made of many solid or tone on<br />
tone fabrics. They were embellished <strong>with</strong> different<br />
techniques.<br />
1. The 7 hole cord foot was threaded <strong>with</strong> cords which<br />
were couched or stitched over <strong>with</strong> a serpentine stitch.<br />
M’Liss likes to leave the cord ends hanigne!<br />
2. The Fancy Trim foot was used to sew sequins and<br />
other types of trims. Pull a piece of the sequin trim<br />
through to the back of the foot before you start to sew.<br />
Thread <strong>with</strong> matching thread or invisible thread and<br />
select a blanket stitch at a wide width.<br />
3. The Narrow Braiding Foot and the braiding foot are<br />
both excellent for couching cords and trims.<br />
4. M’Liss made twin needle tucks <strong>with</strong> two different<br />
colors of thread. Be sure to do your pintucks fi rst, then<br />
cut the piece because the pintucks will take up some<br />
of the fabric. White thread can be used because it is a<br />
4<br />
3<br />
5<br />
neutral.<br />
5. Braid <strong>with</strong> tassels hanging down adorned one piece.<br />
M’Liss made tassels from Robison Anton thread.<br />
6. A grid was stitched <strong>with</strong> pintucks, and then buttons<br />
were stitched through all the layers so they actually<br />
created the quilting.<br />
Triadic is three colors equally spaced on the color<br />
wheel. It can be primary colors yellow, red and blue or<br />
secondary colors orange, violet and green. This quilt<br />
called “Jesters Dance” is an example of a triadic quilt.<br />
Analogous colors are neighbors, side by side on the<br />
color wheel: in this block, yellow, yellow green and<br />
green. It is a 32” block but it has been split into three<br />
parts, 8” x 32”, 16” x 32” and 8” x 32” to create a<br />
triptych wall<br />
hanging..<br />
The<br />
embroidery<br />
on the<br />
border was<br />
stitched on<br />
tulle, then<br />
appliquéd<br />
onto the<br />
quilt.<br />
Ribbons<br />
fl ow from<br />
piece to piece. M’Liss stitched the words<br />
“follow the path, the journey continues” free<br />
hand, into the quilting.
Telling your story through piecing<br />
Each section of the block, was pieced. Many piecing<br />
variations and creative options present themselves in this<br />
hanging created by a group of people working together.<br />
Thus the name, Group Eexpression. The colors are<br />
analogous<br />
Telling your story through fabric<br />
M’Liss made this for her daughter Adrian, called<br />
“Spring for Adrian”. It uses a fabric collection that<br />
has a springtime theme, and is embellished <strong>with</strong><br />
embroideries.<br />
This Coca Cola quilt is an example of using large print<br />
fabrics in a quilt. M’Liss by enlarged the quilt block<br />
size so each piece in the block could showcase the large<br />
fabric print..<br />
For more examples of color and quilting and<br />
instructions for the Century of Progress blocks, be<br />
sure to Get<br />
M’liss’s Book, Get<br />
Creative!
<strong>2510</strong> Quick Project<br />
Sun Catcher<br />
<strong>with</strong> Janie Lantz<br />
Creating the embroidery:<br />
1. Open 4D Embroidery Professional System.<br />
2. QuickLink to 4D Design Creator .<br />
3. In the Wizard, select Create Express<br />
Embroidery.<br />
4. Click Next.<br />
5. Select View Picture, and browse to C:\ 4D<br />
embroidery \ Picture Library \ClipArt \Animals<br />
\ANIaqua. Click OK and choose the fi sh in a<br />
bubble, GO103625. Click Next.<br />
6. No rotation is needed, so click Next.<br />
7. The fi sh is cropped appropriately, so click Next.<br />
8. Choose Fit Design to Hoop. Change Hoop to<br />
My Hoops or <strong>Husqvarna</strong> <strong>Viking</strong> Designer SE,<br />
and choose the150 x 150 DoAll Quilter’s Hoop.<br />
Click OK.<br />
9. Click Next.<br />
10. You don’t need to change in Reduce <strong>Color</strong>s, so<br />
click Next.<br />
11. In Choose Thread <strong>Color</strong>s, check the<br />
Automatically Remove Background <strong>Color</strong><br />
option. Click Next.<br />
12. In the Fabric Advisor, change to Sheer fabric.<br />
This will optimize the design for stitching<br />
on sheer fabric, removing underlay and stray<br />
stitches. Click Next.<br />
13. Review the design in the Preview. Click Finish.<br />
14. In the edit tab, right click to select different areas<br />
Sue Hausmann, M’Liss Rae Hawley and Janie Lantz<br />
Sewing Supplies:<br />
•<strong>Husqvarna</strong> <strong>Viking</strong> Sewing and Embroidry Machine<br />
•Two 10” x10” squares Green or blue cotton fabric<br />
for the sun catcher frame One 10” x10” square Warm<br />
& Natural battingDouble-fold bias tape or bias selffabric<br />
for fi nishing. 12” x 12” square fi rmly woven<br />
sheer such as: Silk Organza tinted <strong>with</strong> Tsukineko<br />
Inks to the color of water & heat set, Voile (cotton<br />
can also be tinted) Or: Sparkle or other organza in a<br />
pale green or blue. Note: If the organza or voile is<br />
too limp, use spray starch or fabric sizing to crisp it<br />
•1/2 Yard of 1/8” wide satin ribbon in coordinating<br />
color<br />
•Embroidery Design created in 4D Embroidery<br />
Design Creator<br />
Or choose an openwork design from<br />
MyEmbroideries.com.<br />
•Robison Anton Rayon Embroidery Threads<br />
•Empty bobbins, one for each color embroidery<br />
thread<br />
•Do-All Quilter’s Hoop #920 115-096 (use Heavy<br />
inner hoop)<br />
•Hoop Ease for the Do-All Quilter’s Hoop #412 74<br />
95 06<br />
•Cut A Round Tool #140 00 16 45<br />
•Rotary cutter <strong>with</strong> 25mm (1”) or smaller blade<br />
•Clear gridded ruler and rotary cutting mat<br />
•Sewing thread to match the frame fabric<br />
•Clear 1/4” Piecing Foot #412 92 74 47<br />
•Adjustable Bias Binder Foot #412 98 50 45
of the fi sh, and adjust different areas of fi ll.<br />
15. Save as Suncatcher.can.<br />
16. Select 3D Create Stitches to make an<br />
embroidery fi le, and save as Suncatcher.vp3.<br />
17. Select 3D Create Stitches again, and use the<br />
Send function to send to your Designer SE, a<br />
fl oppy disk or USB stick for the Designer I, or a<br />
card reader/writer.<br />
Stitching your Sun Catcher:<br />
1. Cut a square of organza about 12” square. If<br />
necessary, stiffen slightly <strong>with</strong> spray starch or<br />
sizing.<br />
2. Place the outer Do-All Quilter’s hoop on a fl at<br />
surface. Lay the organza over the outer hoop,<br />
and then lay Hoop Ease on top. Press the<br />
Heavy inner hoop into place and fl ip the Quick-<br />
Release lever closed.<br />
3. Wind a matching bobbin for each color and trim<br />
carefully between each thread change to make it<br />
reversible. Stitch using Robison Anton Rayon<br />
threads. Turn off the Automatic Jump Stitch<br />
Cut Feature if you have it on your machine.<br />
4. Remove from the embroidery hoop and clip any<br />
stray threads.<br />
5. Using the Cut-A-Round tool, cut the embroidery<br />
into a 6” circle.<br />
6. Using the Cut-A-Round tool, cut 5” circles in<br />
the exact center of each 10” piece of quilting<br />
cotton.<br />
7. Quarter and pin-mark the organza circle and one<br />
cotton square.<br />
8. Lay the organza embroidery right-side up on a<br />
fi rm surface. Lay one fabric frame over it, right<br />
side up. Flip the top edge of the frame down<br />
toward the center of the organza, so the frame<br />
and organza are right-sides together where<br />
they will be seamed. Match the quarter marks,
keeping the<br />
embroidery<br />
design<br />
horizontal<br />
in the fabric<br />
frame, and<br />
stitch using<br />
the Clear<br />
1/4” Piecing Foot. The organza will fi t perfectly<br />
into the opening cut in the cotton square.<br />
9. Place a Warm and Natural square on the right<br />
side of the second piece (back of the frame) of<br />
quilting cotton. Use the 1/4” Clear Piecing Foot<br />
to stitch the fabric to the batting 1/4” from the<br />
edge of the cutout in the frame backing, through<br />
the cotton and Warm & Natural batting. Trim<br />
out the center of the batting, leaving the ¼”<br />
seam allowance. Hint: use a scalloped rotary<br />
cutter or pinking shear to “notch” the seam<br />
allowances, allowing the fabric to turn more<br />
easily.<br />
10. Turn the batting through the circle hole to the<br />
wrong side and press, making sure the batting<br />
rolls slightly to the wrong side so it will be<br />
hidden when you stitch the centers together.<br />
This will create a fi nished portal to be placed<br />
over the back side of the embroidery design.<br />
11. Align the two frame pieces wrong sides together,<br />
making sure to match up the circular opening<br />
in the padded square <strong>with</strong> the stitched edge<br />
of the organza square. Use the B foot and a<br />
decorative stitch to secure the two halves of the<br />
“sandwich” together around the edges of the<br />
circular opening.<br />
12. Press to smooth, and trim to an exact 9” x 9”.<br />
13. Bind, using ½” double fold binding (either<br />
purchased, or make your own to match). Start<br />
by binding the bottom edge, leaving a 6” tail<br />
for seaming at the end. At the corner, stitch<br />
right up to the edge of the fabric frame, using<br />
Fix to lock the stitches. Pull the fabric out the<br />
back of the foot to make slack, and form a miter<br />
at the corner. Pull the bias and quilted fabric<br />
back into place and stitch from the miter to the<br />
next corner. Repeat, overlapping the ends and<br />
stitching into place when you have stitched all<br />
the way around.<br />
14. Cut an 18” length of narrow ribbon. Tie a bow,<br />
shoe-lace style, at each end. Tack in place at<br />
each top corner.<br />
15. Press again, hang in a sunny window, and you’ll<br />
have a sun catcher to brighten your days!<br />
Thanks to the underwriter of ourQuick Project:
![[pdf] husqvarna viking sewing machine stitch comparison chart](https://img.yumpu.com/11869478/1/190x146/pdf-husqvarna-viking-sewing-machine-stitch-comparison-chart.jpg?quality=85)