Instructions for Cutler-Hammer Jockey Pump Controllers
Instructions for Cutler-Hammer Jockey Pump Controllers
Instructions for Cutler-Hammer Jockey Pump Controllers

Create successful ePaper yourself
Turn your PDF publications into a flip-book with our unique Google optimized e-Paper software.
IM05805004K<br />
Effective January 2003<br />
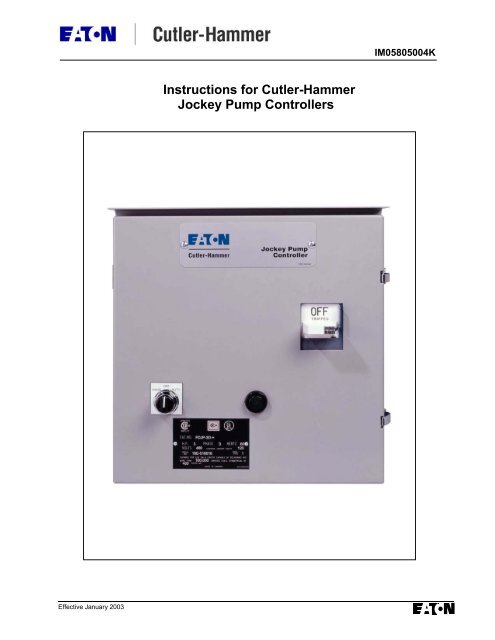
<strong>Instructions</strong> <strong>for</strong> <strong>Cutler</strong>-<strong>Hammer</strong><br />
<strong>Jockey</strong> <strong>Pump</strong> <strong>Controllers</strong><br />
IM05805004K
IM05805004K<br />
Effective January 2003<br />
TABLE OF CONTENTS<br />
1. INSTALLATION AND MOUNTING OF THE CONTROLLER ............................................... 1<br />
2. SYSTEM PRESSURE CONNECTIONS ............................................................................... 1<br />
3. ELECTRICAL CONNECTIONS......................................................................................... 1<br />
3.1 ELECTRICAL CHECKOUT INSTRUCTIONS........................................................................................... 2<br />
3.1.1 Motor Rotation Check............................................................................................................. 2<br />
3.1.2 Pressure Switch Set Point....................................................................................................... 2<br />
3.1.3 Starting and Stopping ............................................................................................................. 2<br />
3.1.4 Overload Relay Trip Setting ................................................................................................... 2<br />
3.1.5 Running Period Timer (Optional)........................................................................................... 2<br />
3.2 PRESSURE SWITCH SETTING INSTRUCTIONS...................................................................................... 3<br />
4. FIGURE 1: TYPICAL SCHEMATIC.................................................................................. 4<br />
5. FIGURE 2: DIMENSIONAL DRAWING ............................................................................ 5<br />
6. FIGURE 3: OVERLOAD RELAY SELECTION CHART....................................................... 6<br />
Page i
IM05805004K Page 1<br />
Effective January 2003<br />
INSTALLATION & MAINTENANCE<br />
MANUAL FOR THE JOCKEY<br />
PUMP CONTROLLER<br />
In order to familiarize yourself with the <strong>Jockey</strong> <strong>Pump</strong> Controller, please read the instruction manual thoroughly and<br />
carefully. Retain the manual <strong>for</strong> future reference.<br />
1. Installation and Mounting of the<br />
Controller<br />
Carefully unpack the controller and inspect<br />
thoroughly.<br />
It is recommended that the controller is located as<br />
close as is practical to the motor it controls<br />
The controller is not free standing and must be bolted<br />
securely to a wall. For dimensional and weight data<br />
please refer to the respective data sheets <strong>for</strong> the<br />
<strong>Jockey</strong> <strong>Pump</strong> Controller.<br />
2. System Pressure Connection<br />
The <strong>Jockey</strong> <strong>Pump</strong> Controller is equipped with a<br />
Pressure Switch. The controller is provided with a<br />
¼” NPT female system pressure connection located<br />
on the bottom, external side of the enclosure. The<br />
connection should be installed as per NFPA,<br />
pamphlet No. 20.<br />
NOTE: Water lines to the pressure switch must be<br />
free from dirt and contamination.<br />
The pressure should not exceed what the pressure<br />
switch is rated <strong>for</strong>.<br />
3. Electrical Connections<br />
All electrical connections should meet national<br />
and local electrical codes and standards.<br />
The controller should be located or so protected that<br />
they will not be damaged by water escaping from<br />
pumps or pump connections. Current carrying parts<br />
of controllers shall be a minimum of 12 inches (305<br />
mm) above the floor level.<br />
• Prior to starting verify all data on the nameplate<br />
such as, catalog number, AC line voltage and<br />
horsepower.<br />
• Inspect all electrical connections, components<br />
and wiring <strong>for</strong> any visible damage and correct as<br />
necessary. Ensure that all electrical connections<br />
are tightened be<strong>for</strong>e energization.<br />
• Install necessary conduit using proper methods<br />
and tools.<br />
• Incoming AC line voltage is clearly marked L1,<br />
L2, L3 and ground, located at the top of the<br />
breaker.
Page 2<br />
3.1 Electrical Checkout <strong>Instructions</strong><br />
Effective January 2003<br />
IM05805004K<br />
WARNING: The following procedures should be carried out by a qualified electrician familiar with the electrical<br />
safety procedures associated with this product and its associated equipment..<br />
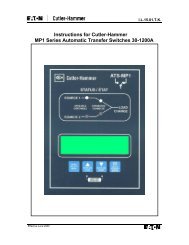
3.1.1 Motor Rotation Check: With the controller energized, move the H.O.A. selector switch to "HAND" then back to<br />
“OFF” immediately to check the direction of the motor and pump rotation. If rotation direction is not correct,<br />
open the breaker and reverse the phase sequence of the load terminals of the contactor T1, T2, T3 or at the motor<br />
terminals.<br />
3.1.2 Set up pressure switch set point as described on page 3 in these instructions. These instructions check out<br />
automatic starting and stopping.<br />
3.1.3 Starting and Stopping: Energize the controller. With the H.O.A. selector switch set to “AUTO”, if the system<br />
water pressure is lower than the pressure switch set-point pressure, the pump will start. The pump will stop when<br />
pressure is restored. If the optional running period timer is included, the pump will run <strong>for</strong> the set time and then<br />
reset provided pressure has been restored. For manual operation, set the H.O.A. selector switch to “HAND’ to<br />
start the pump and “OFF” to stop.<br />
3.1.4 Overload Relay Trip Setting: The trip setting must be set as indicated on the drawing inside the starter door or<br />
according to the chart at the back of this manual.<br />
3.1.5 Running Period Timer: (Optional) The RPT timer must be set <strong>for</strong> a minimum of 10 minutes. A calibrated dial is<br />
provided on the front of the timer.<br />
Page 3
IM05805004K<br />
3.2 Pressure Switch Setting <strong>Instructions</strong><br />
Be<strong>for</strong>e attempting to set the pressure switch, de-energize the jockey pump controller by opening the Circuit Breaker. This<br />
is done <strong>for</strong> safety, and so that the jockey pump will not start and interfere with the adjustment procedure.<br />
1. Set the differential adjustment on the pressure switch to minimum by turning the Differential Adjusting Screw fully<br />
counter clockwise. Set the operating pressure to well below the required pump starting pressure. Turn the Range<br />
Adjusting Screw clockwise to reduce the pressure and observe the scale on the switch.<br />
2. Bleed the fire protection water system until the pressure is reduced to the required pump starting pressure. Hold this<br />
pressure by closing the drain valve.<br />
3. Slowly rotate the Range Adjusting Screw counter clockwise until a click is heard from the pressure switch. The<br />
switch is now set to the required pump starting pressure.<br />
4. If it is necessary to re-adjust the differential, the operating pressure of the switch will also be changed and should be<br />
reset.<br />
NOTE: The cut-in (start point) pressure is the cut-out (range adjusting setting) pressure minus the differential setting.<br />
Effective January 2003
Page 4<br />
Effective January 2003<br />
FIGURE # 1<br />
IM05805004K
IM05805004K<br />
Effective January 2003<br />
FIGURE # 2<br />
Page 5
Page 6<br />
Effective January 2003<br />
FIGURE #3<br />
IM05805004K
IM05805004K<br />
Effective January 2003<br />
Page 7
EATON<br />
<strong>Cutler</strong>-<strong>Hammer</strong><br />
403 East Lake Blvd., Airdrie, Alberta, T4A 2G1<br />
Canada<br />
tel: 403-948-7955<br />
fax: 403-948-6967<br />
www.chfire.com<br />
© 2003 Eaton Corporation<br />
All Rights Reserved<br />
Printed in Canada<br />
Publication No.: IM05805004K<br />
January 2003