Building the Powerhouse - Society of Antique Modelers
Building the Powerhouse - Society of Antique Modelers
Building the Powerhouse - Society of Antique Modelers

You also want an ePaper? Increase the reach of your titles
YUMPU automatically turns print PDFs into web optimized ePapers that Google loves.
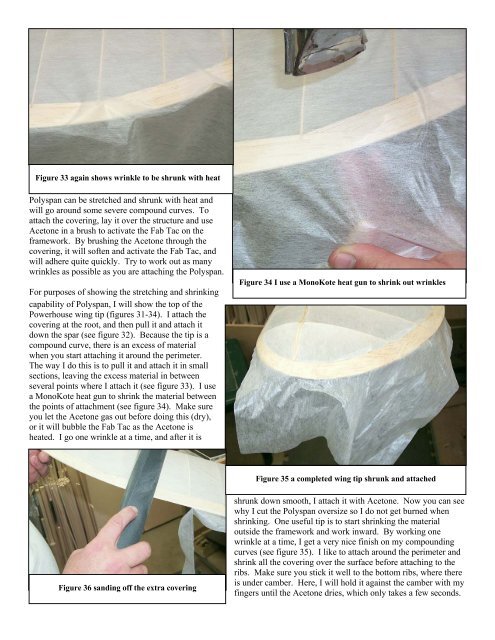
Figure 33 again shows wrinkle to be shrunk with heat<br />
Polyspan can be stretched and shrunk with heat and<br />
will go around some severe compound curves. To<br />
attach <strong>the</strong> covering, lay it over <strong>the</strong> structure and use<br />
Acetone in a brush to activate <strong>the</strong> Fab Tac on <strong>the</strong><br />
framework. By brushing <strong>the</strong> Acetone through <strong>the</strong><br />
covering, it will s<strong>of</strong>ten and activate <strong>the</strong> Fab Tac, and<br />
will adhere quite quickly. Try to work out as many<br />
wrinkles as possible as you are attaching <strong>the</strong> Polyspan.<br />
For purposes <strong>of</strong> showing <strong>the</strong> stretching and shrinking<br />
capability <strong>of</strong> Polyspan, I will show <strong>the</strong> top <strong>of</strong> <strong>the</strong><br />
<strong>Powerhouse</strong> wing tip (figures 31-34). I attach <strong>the</strong><br />
covering at <strong>the</strong> root, and <strong>the</strong>n pull it and attach it<br />
down <strong>the</strong> spar (see figure 32). Because <strong>the</strong> tip is a<br />
compound curve, <strong>the</strong>re is an excess <strong>of</strong> material<br />
when you start attaching it around <strong>the</strong> perimeter.<br />
The way I do this is to pull it and attach it in small<br />
sections, leaving <strong>the</strong> excess material in between<br />
several points where I attach it (see figure 33). I use<br />
a MonoKote heat gun to shrink <strong>the</strong> material between<br />
<strong>the</strong> points <strong>of</strong> attachment (see figure 34). Make sure<br />
you let <strong>the</strong> Acetone gas out before doing this (dry),<br />
or it will bubble <strong>the</strong> Fab Tac as <strong>the</strong> Acetone is<br />
heated. I go one wrinkle at a time, and after it is<br />
Figure 36 sanding <strong>of</strong>f <strong>the</strong> extra covering<br />
Figure 34 I use a MonoKote heat gun to shrink out wrinkles<br />
Figure 35 a completed wing tip shrunk and attached<br />
shrunk down smooth, I attach it with Acetone. Now you can see<br />
why I cut <strong>the</strong> Polyspan oversize so I do not get burned when<br />
shrinking. One useful tip is to start shrinking <strong>the</strong> material<br />
outside <strong>the</strong> framework and work inward. By working one<br />
wrinkle at a time, I get a very nice finish on my compounding<br />
curves (see figure 35). I like to attach around <strong>the</strong> perimeter and<br />
shrink all <strong>the</strong> covering over <strong>the</strong> surface before attaching to <strong>the</strong><br />
ribs. Make sure you stick it well to <strong>the</strong> bottom ribs, where <strong>the</strong>re<br />
is under camber. Here, I will hold it against <strong>the</strong> camber with my<br />
fingers until <strong>the</strong> Acetone dries, which only takes a few seconds.