Building the Powerhouse - Society of Antique Modelers
Building the Powerhouse - Society of Antique Modelers
Building the Powerhouse - Society of Antique Modelers

You also want an ePaper? Increase the reach of your titles
YUMPU automatically turns print PDFs into web optimized ePapers that Google loves.
oth, and on some <strong>of</strong> <strong>the</strong> old timer<br />
models think <strong>the</strong> Satin makes it look<br />
more period correct. That is what I<br />
will use on this model. I use a digital<br />
scale, and mix my 16:1 ratio <strong>of</strong> <strong>the</strong><br />
Fullerplast by weight. It is ready to<br />
shoot when mixed, and no thinning is<br />
necessary. I shoot one heavy coat <strong>of</strong><br />
Fullerplast using 60 pounds <strong>of</strong> air<br />
pressure and <strong>the</strong> same cheap touch up<br />
gun I use to paint with. The stuff is<br />
really sticky, but can be cleaned up<br />
with Lacquer thinner. It dries kind <strong>of</strong><br />
slow, so be sure to not shoot it too<br />
heavy or it will run. I would suggest<br />
shooting a test panel before trying it<br />
on your first model. I have found that<br />
I can store any left-over Fullerplast in<br />
a glass jar in my freezer for up to 9<br />
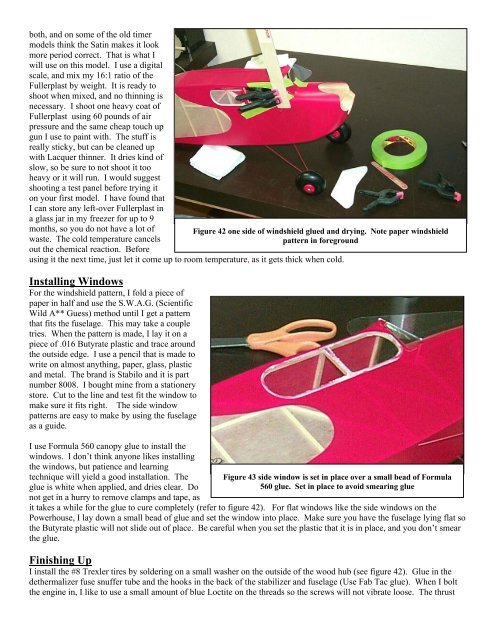
months, so you do not have a lot <strong>of</strong> Figure 42 one side <strong>of</strong> windshield glued and drying. Note paper windshield<br />
waste. The cold temperature cancels<br />
pattern in foreground<br />
out <strong>the</strong> chemical reaction. Before<br />
using it <strong>the</strong> next time, just let it come up to room temperature, as it gets thick when cold.<br />
Installing Windows<br />
For <strong>the</strong> windshield pattern, I fold a piece <strong>of</strong><br />
paper in half and use <strong>the</strong> S.W.A.G. (Scientific<br />
Wild A** Guess) method until I get a pattern<br />
that fits <strong>the</strong> fuselage. This may take a couple<br />
tries. When <strong>the</strong> pattern is made, I lay it on a<br />
piece <strong>of</strong> .016 Butyrate plastic and trace around<br />
<strong>the</strong> outside edge. I use a pencil that is made to<br />
write on almost anything, paper, glass, plastic<br />
and metal. The brand is Stabilo and it is part<br />
number 8008. I bought mine from a stationery<br />
store. Cut to <strong>the</strong> line and test fit <strong>the</strong> window to<br />
make sure it fits right. The side window<br />
patterns are easy to make by using <strong>the</strong> fuselage<br />
as a guide.<br />
I use Formula 560 canopy glue to install <strong>the</strong><br />
windows. I don’t think anyone likes installing<br />
<strong>the</strong> windows, but patience and learning<br />
technique will yield a good installation. The<br />
glue is white when applied, and dries clear. Do<br />
not get in a hurry to remove clamps and tape, as<br />
Figure 43 side window is set in place over a small bead <strong>of</strong> Formula<br />
560 glue. Set in place to avoid smearing glue<br />
it takes a while for <strong>the</strong> glue to cure completely (refer to figure 42). For flat windows like <strong>the</strong> side windows on <strong>the</strong><br />
<strong>Powerhouse</strong>, I lay down a small bead <strong>of</strong> glue and set <strong>the</strong> window into place. Make sure you have <strong>the</strong> fuselage lying flat so<br />
<strong>the</strong> Butyrate plastic will not slide out <strong>of</strong> place. Be careful when you set <strong>the</strong> plastic that it is in place, and you don’t smear<br />
<strong>the</strong> glue.<br />
Finishing Up<br />
I install <strong>the</strong> #8 Trexler tires by soldering on a small washer on <strong>the</strong> outside <strong>of</strong> <strong>the</strong> wood hub (see figure 42). Glue in <strong>the</strong><br />
de<strong>the</strong>rmalizer fuse snuffer tube and <strong>the</strong> hooks in <strong>the</strong> back <strong>of</strong> <strong>the</strong> stabilizer and fuselage (Use Fab Tac glue). When I bolt<br />
<strong>the</strong> engine in, I like to use a small amount <strong>of</strong> blue Loctite on <strong>the</strong> threads so <strong>the</strong> screws will not vibrate loose. The thrust