Building the Powerhouse - Society of Antique Modelers
Building the Powerhouse - Society of Antique Modelers
Building the Powerhouse - Society of Antique Modelers

Create successful ePaper yourself
Turn your PDF publications into a flip-book with our unique Google optimized e-Paper software.
Also, make sure it is attached to <strong>the</strong> top <strong>of</strong> <strong>the</strong> ribs and all spars.<br />
After <strong>the</strong> covering is attached to <strong>the</strong> perimeters, ribs, and spars, I roll up a piece <strong>of</strong> 320 wet-or-dry sandpaper and use it to<br />
trim <strong>of</strong>f <strong>the</strong> excess covering (see figure 36). Make sure you have allowed adequate time for <strong>the</strong> Fab Tac and Acetone to<br />
dry before doing this.<br />
Whenever Polyspan is lapped over itself, like at <strong>the</strong> dihedral joints <strong>of</strong> <strong>the</strong> wing, brush on two coats <strong>of</strong> Fab Tac over <strong>the</strong><br />
first layer where it will be overlapped by <strong>the</strong> second layer. This will ensure a good positive joint, and <strong>the</strong> covering will<br />
not split away. I also use full strength Fab Tac or Super Seam to attach <strong>the</strong> rudder to <strong>the</strong> stab after both are covered. It<br />
makes a good joint as both glues are designed to glue fabric to wood or metal, so it is <strong>the</strong> best choice.<br />
After finishing <strong>the</strong> wing<br />
covering, I drill a small hole<br />
through <strong>the</strong> center section<br />
sheeting (bottom) to vent <strong>the</strong><br />
wing. Remember <strong>the</strong> holes in<br />
<strong>the</strong> ribs that were made<br />
during <strong>the</strong> scratch building<br />
process? Well now <strong>the</strong>y act<br />
as vents and allow <strong>the</strong> wing to<br />
vent tip to tip. Without a<br />
vent, <strong>the</strong> wing would tend to<br />
blow up like a balloon when<br />
put in <strong>the</strong> sun at <strong>the</strong> flying<br />
field. Venting adds to <strong>the</strong><br />
stability <strong>of</strong> <strong>the</strong> covering and it<br />
is much less-likely to warp by<br />
doing this. On <strong>the</strong> rudder<br />
and stab, I use a straight pin<br />
to poke small holes (on <strong>the</strong><br />
bottom <strong>of</strong> stab, and one side<br />
<strong>of</strong> rudder) in <strong>the</strong> corners <strong>of</strong><br />
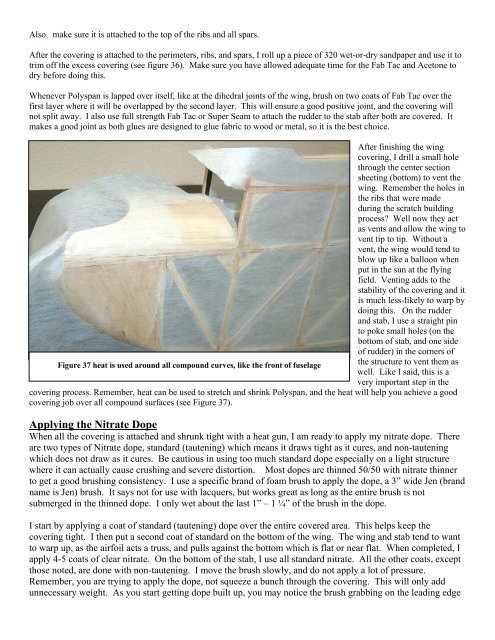
Figure 37 heat is used around all compound curves, like <strong>the</strong> front <strong>of</strong> fuselage<br />
<strong>the</strong> structure to vent <strong>the</strong>m as<br />
well. Like I said, this is a<br />
very important step in <strong>the</strong><br />
covering process. Remember, heat can be used to stretch and shrink Polyspan, and <strong>the</strong> heat will help you achieve a good<br />
covering job over all compound surfaces (see Figure 37).<br />
Applying <strong>the</strong> Nitrate Dope<br />
When all <strong>the</strong> covering is attached and shrunk tight with a heat gun, I am ready to apply my nitrate dope. There<br />
are two types <strong>of</strong> Nitrate dope, standard (tautening) which means it draws tight as it cures, and non-tautening<br />
which does not draw as it cures. Be cautious in using too much standard dope especially on a light structure<br />
where it can actually cause crushing and severe distortion. Most dopes are thinned 50/50 with nitrate thinner<br />
to get a good brushing consistency. I use a specific brand <strong>of</strong> foam brush to apply <strong>the</strong> dope, a 3” wide Jen (brand<br />
name is Jen) brush. It says not for use with lacquers, but works great as long as <strong>the</strong> entire brush is not<br />
submerged in <strong>the</strong> thinned dope. I only wet about <strong>the</strong> last 1” – 1 ¼” <strong>of</strong> <strong>the</strong> brush in <strong>the</strong> dope.<br />
I start by applying a coat <strong>of</strong> standard (tautening) dope over <strong>the</strong> entire covered area. This helps keep <strong>the</strong><br />
covering tight. I <strong>the</strong>n put a second coat <strong>of</strong> standard on <strong>the</strong> bottom <strong>of</strong> <strong>the</strong> wing. The wing and stab tend to want<br />
to warp up, as <strong>the</strong> airfoil acts a truss, and pulls against <strong>the</strong> bottom which is flat or near flat. When completed, I<br />
apply 4-5 coats <strong>of</strong> clear nitrate. On <strong>the</strong> bottom <strong>of</strong> <strong>the</strong> stab, I use all standard nitrate. All <strong>the</strong> o<strong>the</strong>r coats, except<br />
those noted, are done with non-tautening. I move <strong>the</strong> brush slowly, and do not apply a lot <strong>of</strong> pressure.<br />
Remember, you are trying to apply <strong>the</strong> dope, not squeeze a bunch through <strong>the</strong> covering. This will only add<br />
unnecessary weight. As you start getting dope built up, you may notice <strong>the</strong> brush grabbing on <strong>the</strong> leading edge