Building the Powerhouse - Society of Antique Modelers
Building the Powerhouse - Society of Antique Modelers
Building the Powerhouse - Society of Antique Modelers

Create successful ePaper yourself
Turn your PDF publications into a flip-book with our unique Google optimized e-Paper software.
showing up. Polyspan has a smooth side and a<br />
rougher side, where <strong>the</strong> fibers stick up. It is very hard<br />
to see <strong>the</strong> difference, but <strong>the</strong> smooth side is a little<br />
shinier, and with careful inspection, you can see <strong>the</strong><br />
fibers on <strong>the</strong> rough side. The smooth, shiny side goes<br />
out and is <strong>the</strong> finish side. As <strong>of</strong> now, <strong>the</strong> only color<br />
that Polyspan comes in is white (natural).<br />
To prepare <strong>the</strong> surfaces to be covered, I make sure all<br />
are sanded smooth and are blown clean. I brush on a<br />
coat <strong>of</strong> lacquer sanding sealer (see figure 30)<br />
everywhere <strong>the</strong> covering will contact <strong>the</strong> structure.<br />
That means <strong>the</strong> top and bottom <strong>of</strong> ribs, all <strong>the</strong><br />
perimeters, etc. I finish exclusively with nitrate dope,<br />
and have found <strong>the</strong> lacquer sanding sealer to be<br />
compatible. If you plan to use an alternative finish,<br />
make sure everything is compatible by making a test<br />
panel. After my sanding sealer is dry, I sand all <strong>the</strong><br />
surfaces with 220-320 grit paper and again blow <strong>the</strong><br />
surface clean with compressed air. I <strong>the</strong>n add a second<br />
coat <strong>of</strong> sanding sealer and sand it with 320 paper. You<br />
will notice <strong>the</strong> second coat will sand much easier and<br />
you will have a very smooth surface. Blow <strong>the</strong> dust<br />
<strong>of</strong>f <strong>the</strong> structure.<br />
There are a few products that can be used to attach <strong>the</strong><br />
covering to <strong>the</strong> surface, but I have been using Fab Tac<br />
also available from Aircraft Spruce (contact<br />
information noted previously in this article). The<br />
Super Seam used to glue in <strong>the</strong> blind nuts works great<br />
too. I have found <strong>the</strong> Fab Tac works just as well as <strong>the</strong><br />
Super Seam, and is about half <strong>the</strong> price. Both products<br />
need to be thinned a lot using Nitrate thinner to get to<br />
brushing consistency.<br />
I brush on two coats <strong>of</strong> thinned Fab Tac<br />
over all <strong>the</strong> areas I used <strong>the</strong> lacquer sanding<br />
sealer on (where <strong>the</strong> covering will contact<br />
<strong>the</strong> framework). It dries fast, so you will<br />
have to work fast. Make sure to let it dry<br />
fully between coats. When both coats are<br />
dried, I make sure <strong>the</strong>re are no defects in it<br />
like a run. If I find a defect, I lightly sand<br />
that area, and clean with compressed air.<br />
Now, I am ready to cover.<br />
I usually start with <strong>the</strong> bottom <strong>of</strong> <strong>the</strong> stab. It<br />
is always correct to cover from <strong>the</strong> bottom<br />
to <strong>the</strong> top on all parts. The flat surfaces are<br />
very easy to do. Do not forget <strong>the</strong> fuzzy<br />
side goes towards <strong>the</strong> frame work, and <strong>the</strong><br />
smooth side out. Cut your Polyspan larger<br />
than <strong>the</strong> area to be covered. You want extra<br />
material to hold onto around <strong>the</strong> perimeter if<br />
heating is necessary to get it smooth.<br />
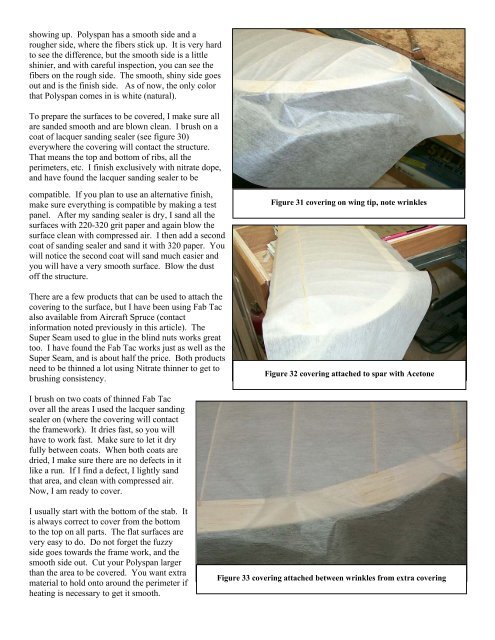
Figure 31 covering on wing tip, note wrinkles<br />
Figure 32 covering attached to spar with Acetone<br />
Figure 33 covering attached between wrinkles from extra covering